
Aim of the tutorial is to get started with ReactiveSwift without any previous setup except having Xcode installed. We will go through how to install it using Carthage package manager, add it to an iOS project and then observing a change of a property.
Installing Carthage
First we need to have Carthage installed. If it is not installed, you can use Homebrew and in Terminal running
brew install carthage
Creating a project with Reactive Swift
Building ReactiveSwift
Open Xcode and use single view iOS app template, let’s name it “ReactiveSwiftObservingProperty”. Then we need to create Cartfile what contains reference to ReactiveSwift. For that, open a preferred text editor, add
github "ReactiveCocoa/ReactiveSwift" ~> 3.0
and save it to the same folder as the project file with a name Cartfile. If this is done, open Terminal and navigate to the same folder and run
carthage update --platform iOS
The output of the command will look something like:
*** Cloning ReactiveSwift

*** Cloning Result

*** Checking out ReactiveSwift at "3.1.0"

*** Checking out Result at "3.2.4"

*** xcodebuild output can be found in /var/folders/fp/69n6gr652cvgyt5_rnf7_6dh0000gn/T/carthage-xcodebuild.DJayGE.log

*** Building scheme "Result-iOS" in Result.xcodeproj

*** Building scheme "ReactiveSwift-iOS" in ReactiveSwift.xcworkspace
Adding ReactiveSwift to the Xcode project
Now we have ReactiveSwift built and we can find the frameworks in /Path-to-Xcode-project-file/Carthage/Build/iOS/. Drag and drop ReactiveSwift.framework and Result.framework to “Linked Frameworks and Libraries”.
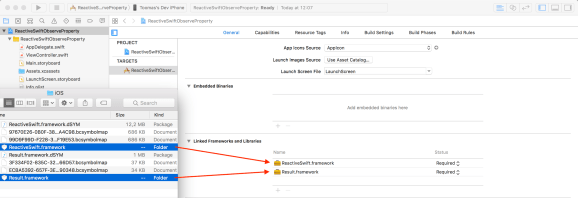
Then add a new build phase using the plus button in “Build Phases” tab which will copy the frameworks to the application’s bundle.
Script:
/usr/local/bin/carthage copy-frameworks
Input files:
$(SRCROOT)/Carthage/Build/iOS/Result.framework

$(SRCROOT)/Carthage/Build/iOS/ReactiveSwift.framework
Output files:
$(BUILT_PRODUCTS_DIR)/$(FRAMEWORKS_FOLDER_PATH)/Result.framework

$(BUILT_PRODUCTS_DIR)/$(FRAMEWORKS_FOLDER_PATH)/ReactiveSwift.framework

Reacting to property changes
For demonstrating reacting to change of a property we first add an object called Pantry what just stores an array of jams. We make it a MutableProperty as later on we want to change the array of jams and observe the change.
| import Foundation | |
| import ReactiveSwift | |
| final class Pantry { | |
| let jams = MutableProperty([Jam(flavour: .apple)]) | |
| func add(jam: Jam) { | |
| jams.value.append(jam) | |
| } | |
| } | |
| struct Jam { | |
| enum Flavour: String { | |
| case apple, orange | |
| } | |
| let flavour: Flavour | |
| init(flavour: Flavour) { | |
| self.flavour = flavour | |
| } | |
| } |
In this very simple case of observing changes we will look into Signal and SignalProducer. MutableProperty has both Signal and SignalProducer and in our example we will use Signal when we just want to know when the array of jams changes and SignalProducer when want to react to the initial value.
| final class ViewController: UIViewController { | |
| @IBOutlet weak var textView: UITextView! | |
| let pantry = Pantry() | |
| override func viewDidLoad() { | |
| super.viewDidLoad() | |
| // SignalProducer runs the closure immediately. | |
| pantry.jams.producer.startWithValues { [weak self] (jams) in | |
| self?.textView.text = jams.map({ $0.flavour.rawValue }).joined(separator: ", ") | |
| } | |
| // Signal runs the closure only when the property changes. | |
| pantry.jams.signal.observeValues { (jams) in | |
| print("Pantry has \(jams.count) jars of jam.") | |
| } | |
| pantry.add(jam: Jam(flavour: .orange)) | |
| } | |
| @IBAction func addJam(_ sender: Any) { | |
| pantry.add(jam: Jam(flavour: .apple)) | |
| } | |
| } |
When running the example project and tapping on the “Add More Jam” button, the number of jams is printed to the console and text view updates to show the flavours of all the jams currently in the pantry.

In this blog post we learned how to fetch and build ReactiveSwift using Carthage, how to add it to a Xcode project and finally reacting to changes of a property. This is just a glimpse of ReactiveSwift!
Thank you for reading.
References


2 replies on “Getting started with ReactiveSwift”
Thanks. Nice little tutorial. However, “That’s it, when running the project…” That’s it? Umm… I think you left out the part where you define / hookup the UI.
LikeLike
I intentionally left it out as I only wanted to concentrate on the main topic of using ReactiveSwift and leaving out building the UI part (what can be looked up from the linked project).
LikeLike