Categories
iOS Swift

Initializing @MainActor type from a non-isolated context in Swift

Recently I was in the middle of working on code where I wanted a type to require @MainActor since the type was an ObservaleObject and makes sense if it always publishes changes on the MainActor. The MainActor type needed to be created by another type which is not a MainActor. How to do it?

This does not work by default, since we are creating the MainActor type from a non-isolated context.

final class ViewPresenter {
init(dataObserver: DataObserver) {
// Call to main actor-isolated initializer 'init(dataObserver:)' in a synchronous nonisolated context
self.viewState = ViewState(dataObserver: dataObserver)
}
let viewState: ViewState
}
@MainActor final class ViewState: ObservableObject {
let dataObserver: DataObserver
init(dataObserver: DataObserver) {
self.dataObserver = dataObserver
}
@Published private(set) var status: Status = .loading
@Published private(set) var contacts: [Contact] = []
}
view raw ViewState.swift hosted with ❤ by GitHub

OK, this does not work. But since the ViewState has a simple init then why not slap nonisolated on the init and therefore not requiring the init to be called on a MainActor. This leads to a warning: “Main actor-isolated property ‘dataObserver’ can not be mutated from a non-isolated context; this is an error in Swift 6”. After digging in Swift forums to understand the error, I learned that as soon as init assigns the dataObserver instance to the MainActor guarded property, then compiler considers that the type is owned by the MainActor now. Since init is nonisolated, compiler can’t ensure that the assigned instance is not mutated by the non-isolated context.

final class ViewPresenter {
init(dataObserver: DataObserver) {
self.viewState = ViewState(dataObserver: dataObserver)
}
let viewState: ViewState
}
@MainActor final class ViewState: ObservableObject {
let dataObserver: DataObserver
nonisolated init(dataObserver: DataObserver) {
// Main actor-isolated property 'dataObserver' can not be mutated
// from a non-isolated context; this is an error in Swift 6
self.dataObserver = dataObserver
}
@Published private(set) var status: Status = .loading
@Published private(set) var contacts: [Contact] = []
}
view raw ViewState.swift hosted with ❤ by GitHub

This warning can be fixed by making the DataObserver type to conform to Sendable protocol which tells the compiler that it is OK, if the instance is mutated from different contexts (of course we need to ensure that the type really is thread-safe before adding the conformance). In this particular case, making the type Sendable was not possible, and I really did not want to go to the land of @unchecked Sendable, so I continued my research. Moreover, having nonisolated init looked like something what does not look right anyway.

Finally, I realized that since the ViewState is @MainActor, then I could make the viewState property @MainActor as well and delay creating the instance until the property is accessed. Makes sense since if I want to access the ViewState and interact with it then I need to be on the MainActor anyway. If the property is lazy var and created using a closure, then we achieve what we want: force the instance creation to MainActor. Probably, code speaks itself more clearly.

final class ViewPresenter {
private let viewStateBuilder: @MainActor () -> ViewState
init(dataObserver: DataObserver) {
self.viewStateBuilder = { ViewState(dataObserver: dataObserver) }
}
@MainActor lazy var viewState: ViewState = viewStateBuilder()
}
@MainActor final class ViewState: ObservableObject {
let dataObserver: DataObserver
init(dataObserver: DataObserver) {
self.dataObserver = dataObserver
}
@Published private(set) var status: Status = .loading
@Published private(set) var contacts: [Contact] = []
}
view raw ViewState.swift hosted with ❤ by GitHub

What I like is that I can keep one of the types fully @MainActor and still manage the creation from a non-isolated context. The downside is having lazy var and handling the closure.

If you want to try my apps, then grab one of the free offer codes for Silky Brew.

If this was helpful, please let me know on Mastodon@toomasvahter orĀ Twitter @toomasvahter. Feel free to subscribe to RSS feed. Thank you for reading.

Categories
Foundation iOS Swift

Merging sorted arrays with duplicates in Swift

The other day, I needed a way for merging sorted arrays containing structs. In addition, not just merging arrays, I also needed to handle duplicates. The duplicate handling needed to prioritize elements being inserted to the existing array. The case for that was adding an updated element to the existing array. In general, sounded like a leet code exercise, but something what I actually needed.

The fact that we are dealing with structs and need to take care of duplicates, then one way for that would be rebuilding the resulting array every time when merging new elements. Looping over existing elements allows doing the duplicate detection and in the end, we just need to loop over existing elements once and new elements twice (twice due to duplicates handling). Identification for elements are served by an id property. Since we’ll rebuild the resulting array we need a way to figure out how to sort elements, therefore, we can use a typical areInIncreasingOrder closure familiar from other sort related APIs. Since we discussed using id for identification, we require that Array elements conform to Identifiable protocol.

extension RandomAccessCollection {
func sortedMerged(
with otherSorted: [Element],
areInIncreasingOrder: (Element, Element) -> Bool
) -> [Element] where Element: Identifiable {

This interface will allow us to detect duplicates and keep the resulting array sorted after inserting new elements.

The core of the function is looping over existing array and new/other elements and adding the smaller element to the resulting array. Then advancing the index of the existing array or the new/other elements array, depending on which was just inserted, to the resulting array. One of the requirements is that we should prefer elements from the new/other elements array. Therefore, each time we try to add an element from the existing array to the resulting array, we should check that this element is not present in the new/other elements array. Such lookup is easy to implement with a Set which contains ids of all the elements in the new elements array. If we put everything together, the function looks like this.

extension RandomAccessCollection {
func sortedMerged(
with otherSorted: [Element],
areInIncreasingOrder: (Element, Element) -> Bool
) -> [Element] where Element: Identifiable {
let otherIds = Set<Element.ID>(otherSorted.map(\.id))
var result = [Element]()
result.reserveCapacity(count + otherSorted.count)
var currentIndex = startIndex
var otherIndex = otherSorted.startIndex
while currentIndex < endIndex, otherIndex < otherSorted.endIndex {
if areInIncreasingOrder(self[currentIndex], otherSorted[otherIndex]) {
// Prefer elements from the other collection over elements in the existing collection
if !otherIds.contains(self[currentIndex].id) {
result.append(self[currentIndex])
}
currentIndex = self.index(after: currentIndex)
} else {
result.append(otherSorted[otherIndex])
otherIndex = otherSorted.index(after: otherIndex)
}
}
// The other sorted array was exhausted, add remaining elements from the existing array
while currentIndex < endIndex {
// Prefer elements from the other collection over elements in the existing collection
if !otherIds.contains(self[currentIndex].id) {
result.append(self[currentIndex])
}
currentIndex = self.index(after: currentIndex)
}
// The existing sorted array was exhausted, add remaining elements from the other array
if otherIndex < otherSorted.endIndex {
result.append(contentsOf: otherSorted[otherIndex…])
}
return result
}
}

Here is an example of how to use it. The example involves inserting elements where some are duplicates, with one of the properties has changed.

struct Item: Identifiable {
let id: String
let date: Date
}
let referenceDate = Date(timeIntervalSince1970: 1711282131)
let original: [Item] = [
Item(id: "1", date: referenceDate.addingTimeInterval(1.0)),
Item(id: "2", date: referenceDate.addingTimeInterval(2.0)),
Item(id: "3", date: referenceDate.addingTimeInterval(3.0)),
Item(id: "4", date: referenceDate.addingTimeInterval(4.0)),
Item(id: "5", date: referenceDate.addingTimeInterval(5.0)),
]
let other: [Item] = [
Item(id: "3", date: referenceDate.addingTimeInterval(1.5)),
Item(id: "7", date: referenceDate.addingTimeInterval(2.5)),
Item(id: "4", date: referenceDate.addingTimeInterval(4.0)),
Item(id: "5", date: referenceDate.addingTimeInterval(5.5)),
Item(id: "6", date: referenceDate.addingTimeInterval(8.0)),
]
let result = original.sortedMerged(with: other, areInIncreasingOrder: { $0.date < $1.date })
result.forEach { item in
print("\(item.id) – \(item.date.timeIntervalSince(referenceDate))")
}
// 1 – 1.0
// 3 – 1.5
// 2 – 2.0
// 7 – 2.5
// 4 – 4.0
// 5 – 5.5
// 6 – 8.0

If this was helpful, please let me know on Mastodon@toomasvahter orĀ Twitter @toomasvahter. Feel free to subscribe to RSS feed. Thank you for reading.

Categories
iOS Swift

Collection with opaque base collection in Swift

The other day I had an interesting small problem to solve. How to create a custom collection type which could have other kinds of collections as a base collection. The use-case for the collection is being a middle layer for data sources of different types. Another important requirement was that we want to avoid any expensive array allocations. Otherwise, we could just initialize these data source with Swift Array and call it a day. Moreover, base collections could even change during runtime, therefore the custom collection can’t reference any concrete types of the base collection using generics.

The high-level definition of the collection look like this: struct WrappedCollection<Element>: RandomAccessCollection.

After researching this and digging through Swift collection documentation without any great ideas, I suddenly realized that the solution was simpler than expected. If we can limit WrappedCollection’s Index type to Int (one of the required associated types), then the collection’s implementation becomes really short, since then we can benefit from RandomAccessCollection‘s default implementations for required functions and properties. This means, we just need to implement startIndex, endIndex and subscript for accessing an element at index. If it is just three properties and methods to implement, and we want to avoid exposing the type of the base collection, then we can use closures. Simple as that.

struct WrappedCollection<Element>: RandomAccessCollection {
typealias Index = Int
var startIndex: Index { _startIndex() }
var endIndex: Index { _endIndex() }
subscript(position: Index) -> Element {
_position(position)
}
init<BaseCollection>(_ baseCollection: BaseCollection) where BaseCollection: RandomAccessCollection, BaseCollection.Element == Element, BaseCollection.Index == Index {
_position = { baseCollection[$0] }
_startIndex = { baseCollection.startIndex }
_endIndex = { baseCollection.endIndex }
}
private let _endIndex: () -> Index
private let _startIndex: () -> Index
private let _position: (Index) -> Element
}

Since the base collection is captured using closures, the base collection’s type can be anything as long as it follows some basic limits where the Index associated type is Int and the generic Element types match. In the end, we can create a property of the new type, which can change the base collection type in runtime. Here is an example:

// Base collection is an Array
private var items = WrappedCollection<Item>([Item(ā€¦), Item(ā€¦)])
// Base collection is an OtherCustomCollection type
func received(_ items: OtherCustomCollection<Item>) {
self.items = WrappedCollection(items)
}
view raw Example.swift hosted with ❤ by GitHub

Just to reiterate that this makes sense only when it is too expensive to initialize Swift Array with elements of other collection types. Most of the time it is OK, but if not, then we can use the approach presented in this post.

If this was helpful, please let me know on Mastodon@toomasvahter orĀ Twitter @toomasvahter. Feel free to subscribe to RSS feed. Thank you for reading.

Categories
iOS Swift SwiftUI

Performing accessibility audits with UI tests on iOS

A new way how to test your app’s accessibility was added in iOS 17. XCUIApplication has a new method, performAccessibilityAudit. It has two arguments where the first is audit types which is by default set to all. The second argument is an issue handler, and we can use if for filtering out any false positives. Let’s see what are the different audit types. Audit types are listed under XCUIAccessibilityAuditType type: contrast, elementDetection, hitRegion, sufficientElementDescription, dynamicType, textClipped, and trait.

Since I recently released my app Silky Brew, then let’s see how to set up the accessibility auditing with UI-tests.

final class AccessibilityAuditTests: XCTestCase {
override func setUpWithError() throws {
continueAfterFailure = false
}
func testBeansListAccessibility() throws {
let app = XCUIApplication()
app.launchEnvironment["SBOnboardingVisibility"] = "-1"
app.launchEnvironment["SBSkipsAnimations"] = "1"
app.launchEnvironment["SBUsesPreviewData"] = "1"
app.launch()
try app.performAccessibilityAudit()
}
}

The test sets some environment keys which are used by the app to reconfigure some of its state. In the example above, we turn off onboarding view, speed up animations, and enable custom data (pre-defined user content). Here we can see how the test is running.

The accessibility audit did not come back without issues. One of the issues was a hitRegion problem. Report navigator shows more information about the failure.

After some trial and error, I found the issue triggering it. Not sure why, but the performAccessibilityAudit function failed to catch the element triggering the issue. Fortunately, accessibility indicator was able to pinpoint the element without a problem. So seems like if UI-tests catch accessibility issues but fail to highlight elements, then we can still go back to accessibility indicator for finding these. The particular issue was with the row view which shows several lines of text and two of these labels were using footnote and caption text styles. This in turn made text labels smaller and triggered the hitRegion error.

VStack(alignment: .leading) {
Text(beans.name)
Text("by \(beans.roastery)")
.font(.footnote)
.foregroundStyle(.secondary)
if let grindLabel {
Divider()
Text(grindLabel)
.font(.caption)
.foregroundStyle(.secondary)
}
}
view raw RowView.swift hosted with ❤ by GitHub

Since the row view is just multiple lines of text, then we can make it easier for accessibility users to read by combining all the text labels into one by adding .accessibilityElement(children: .combine) to the VStack. This solved that particular issue.

If this was helpful, please let me know on Mastodon@toomasvahter orĀ Twitter @toomasvahter. Feel free to subscribe to RSS feed. Thank you for reading.
Categories
iOS Swift

Avoiding subtle mistake when guarding mutable state with DispatchQueue

Last week, I spent quite a bit of time on investigating an issue which sometimes happened, sometimes did not. There was quite a bit of code involved running on multiple threads, so tracking it down was not so simple. No surprise to find that this was a concurrency issue. The issue lied in the implementation of guarding a mutable state with DispatchQueue. The goal of the blog post is to remind us again a pattern which looks nice at first but actually can cause issues along the road.

Let’s have a look at an example where we have a Storage class which holds data in a dictionary where keys are IDs and values are Data instances. There are multiple ways for guarding the mutable state. In the example, we are using a concurrent DispatchQueue. Concurrent queues are not as optimized as serial queues, but the reasoning here is that we store large data blobs and concurrent reading gives us a slight benefit over serial reading. With concurrent queues we must make sure all the reading operations have finished before we mutate the shared state, and therefore we use the barrier flag which tells the queue to wait until all the enqueued tasks are finished.

final class Storage {
private let queue = DispatchQueue(label: "myexample", attributes: .concurrent)
private var _contents = [String: Data]()
private var contents: [String: Data] {
get {
queue.sync { _contents }
}
set {
queue.async(flags: .barrier) { self._contents = newValue }
}
}
func store(_ data: Data, forIdentifier id: String) {
contents[id] = data
}
// ā€¦
}
view raw Storage.swift hosted with ❤ by GitHub

The snippet above might look pretty nice at first, since all the logic around synchronization is in one place, and we can use the contents property in other functions without needing to think about using the queue. For validating that it works correctly, we can add a unit test.

func testThreadSafety() throws {
let iterations = 100
let storage = Storage()
DispatchQueue.concurrentPerform(iterations: iterations) { index in
storage.store(Data(), forIdentifier: "\(index)")
}
XCTAssertEqual(storage.numberOfItems, iterations)
}
view raw Test.swift hosted with ❤ by GitHub

The test fails because we actually have a problem in the Storage class. The problem is that contents[id] = data does two operations on the queue: firstly, reading the current state using the property getter and then setting the new modified dictionary with the setter. Let’s walk this through with an example where thread A calls the store function and tries to add a new key “d” and thread B calls the store function at the same time and tries to add a new key “e”. The flow might look something like this:

A calls the getter and gets an instance of the dictionary with keys “a, b, c”. Before the thread A calls the setter, thread B already had a chance to read the dictionary as well and gets the same keys “a, b, c”. Thread A reaches the point where it calls the setter and inserts modified dictionary with keys”a, b, c, d” and just after that the thread B does the same but tries to insert dictionary with keys “a, b, c, e”. When the queue ends processing all the work items, the key “d” is going to be lost, since the thread B managed to read the shared dictionary state before the thread A modified it. The morale of the story is that when modifying a shared state, we must make sure that reading the initial state and setting a new value must be synchronized and can’t happen as separate work items on the synchronizing queue. This happened here, since using the dictionaries subscript first runs the getter and then the setter.

The suggestion how to fix such issues is to use a single queue and making sure that read and write happen within the same work item.

func store(_ data: Data, forIdentifier id: String) {
// Incorrect because read and write happen in separate blocks on the queue
// contents[id] = data
// Correct
queue.async(flags: .barrier) {
self._contents[id] = data
}
}
view raw Fixed.swift hosted with ❤ by GitHub

An alternative approach to this Storage class’ implementation with new concurrency features in mind could be using the new actor type instead. But keep in mind that in that case we need to use await when accessing the storage since actors are part of the structured concurrency in Swift. Using the await keyword in turn requires having async context available, so it might not be straight-forward to adopt.

actor Storage {
private var contents = [String: Data]()
func store(_ data: Data, forIdentifier id: String) {
contents[id] = data
}
var numberOfItems: Int { contents.count }
}
// Example:
// await storage.store(data, forIdentifier: id)
view raw Actor.swift hosted with ❤ by GitHub

If this was helpful, please let me know on Mastodon@toomasvahter orĀ Twitter @toomasvahter. Feel free to subscribe to RSS feed. Thank you for reading.

Categories
iOS Swift SwiftUI

SubscriptionStoreView for iOS apps

While building my indie iOS app, I decided to go for a subscription type of approach. At first, I built a fully custom upsell view which showed all the subscription options and handled the purchase actions (not as straight-forward as it sounds). Later, I realized that since iOS 17 there is a SubscriptionStoreView which does all of this and allows some customization as well. The aim of the blog post it to demonstrate how to configure the SubscriptionStoreView and therefore saving time by not building a fully custom one.

Configuring the testing environment for subscriptions

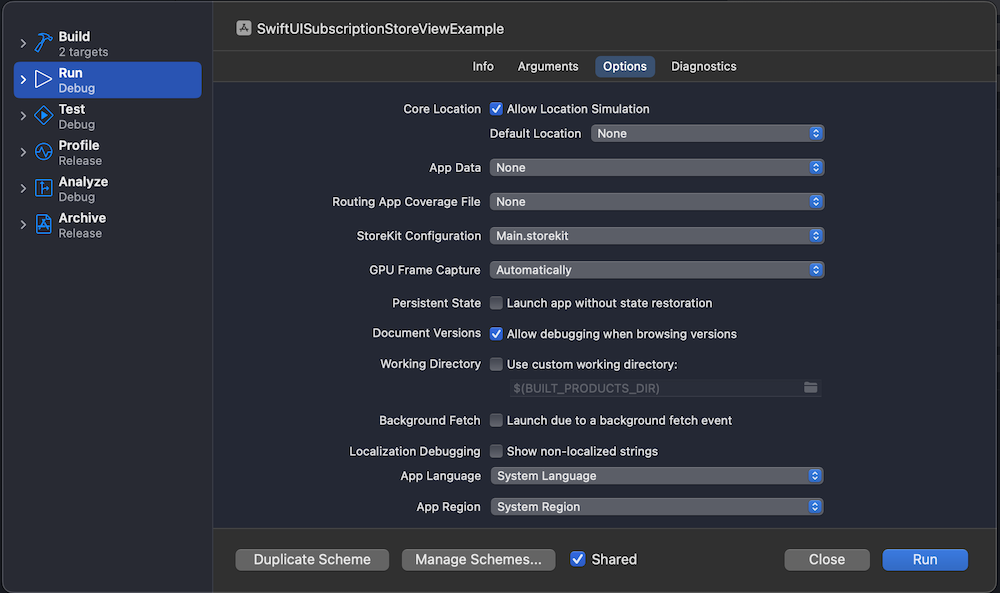
Before we start using the SubscriptionStoreView, we will need to configure subscriptions with Xcode’s StoreKit configuration file. This allows us to test subscriptions without needing to set everything up on the App Store. Open the new file panel and select StoreKit Configuration File. After that, create a subscription group and some auto-renewable subscriptions. In the example app, I just created a “Premium” subscription group and added “Monthly” and “Yearly” auto-renewable subscriptions.

The last thing to do is setting this configuration file as the StoreKit configuration file to the current scheme.

Using the SubscriptionStoreView for managing subscriptions

Now we are ready to go and display the SubscriptionStoreView. Since we are going to configure it a bit by inserting custom content into it, we’ll create a wrapping SubscriptionsView and use the StoreKit provided view from there. Let’s see an example first.

struct SubscriptionsView: View {
var body: some View {
SubscriptionStoreView(productIDs: Subscriptions.subscriptionIDs) {
VStack {
VStack(spacing: 8) {
Image(systemName: "graduationcap.fill")
.resizable()
.scaledToFill()
.frame(width: 96, height: 96)
.foregroundStyle(Color.brown)
Text("Premium Access")
.font(.largeTitle)
Text("Unlock premium access for enabling **X** and **Y**.")
.multilineTextAlignment(.center)
}
.padding()
}
}
.subscriptionStorePolicyDestination(url: AppConstants.URLs.privacyPolicy, for: .privacyPolicy)
.subscriptionStorePolicyDestination(url: AppConstants.URLs.termsOfUse, for: .termsOfService)
.subscriptionStoreButtonLabel(.multiline)
.storeButton(.visible, for: .restorePurchases)
}
}

The view above is pretty much the minimal we need to get going. App review requires having terms of service and privacy policy visible and also the restore subscription button as well.

There is quite a bit of more customization of what we can do. Adding these view modifiers will give us a slightly different view.

.subscriptionStorePolicyForegroundStyle(.teal)
.subscriptionStoreControlStyle(.prominentPicker)
.subscriptionStoreControlIcon { product, info in
switch product.id {
case "premium_yearly": Image(systemName: "star.fill").foregroundStyle(.yellow)
default: EmptyView()
}
}
.background {
Color(red: 1.0, green: 1.0, blue: 0.95)
.ignoresSafeArea()
}

Note: While playing around with subscriptions, an essential tool is in Xcode’s Debug > StoreKit > Manage Transactions menu.

Observing subscription changes

Our app also needs to react to subscription changes. StoreKit provides Transaction.currentEntitlements and Transaction.updates for figuring out the current state and receiving updates. A simple way for setting this up in SwiftUI is to create a class and inserting it into SwiftUI environment. On app launch, we can read the current entitlements and set up the observation for updates.

@Observable final class Subscriptions {
static let subscriptionIDs = ["premium_monthly", "premium_yearly"]
// MARK: Starting the Subscription Observing
@ObservationIgnored private var observerTask: Task<Void, Never>?
func prepare() async {
guard observerTask == nil else { return }
observerTask = Task(priority: .background) {
for await verificationResult in Transaction.updates {
consumeVerificationResult(verificationResult)
}
}
for await verificationResult in Transaction.currentEntitlements {
consumeVerificationResult(verificationResult)
}
}
// MARK: Validating Purchased Subscription Status
private var verifiedActiveSubscriptionIDs = Set<String>()
private func consumeVerificationResult(_ result: VerificationResult<Transaction>) {
guard case .verified(let transaction) = result else {
return
}
if transaction.revocationDate != nil {
verifiedActiveSubscriptionIDs.remove(transaction.productID)
}
else if let expirationDate = transaction.expirationDate, expirationDate < Date.now {
verifiedActiveSubscriptionIDs.remove(transaction.productID)
}
else if transaction.isUpgraded {
verifiedActiveSubscriptionIDs.remove(transaction.productID)
}
else {
verifiedActiveSubscriptionIDs.insert(transaction.productID)
}
}
var hasPremium: Bool {
!verifiedActiveSubscriptionIDs.isEmpty
}
}

Next, let’s insert it into the SwiftUI environment and update the current state. Wherever we need to read the state, we can access the Subscriptions class and read the hasPremium property. Moreover, thanks to the observation framework, the SwiftUI view will automatically update when the state changes.

@main
struct SwiftUISubscriptionStoreViewExampleApp: App {
@State private var subscriptions = Subscriptions()
var body: some Scene {
WindowGroup {
ContentView()
.environment(subscriptions)
.task {
await subscriptions.prepare()
}
}
}
}
struct ContentView: View {
@Environment(Subscriptions.self) var subscriptions
@State private var isPresentingSubscriptions = false
var body: some View {
VStack {
Text(subscriptions.hasPremium ? "Subscribed!" : "Not subscribed")
Button("Show Subscriptions") {
isPresentingSubscriptions = true
}
}
.sheet(isPresented: $isPresentingSubscriptions, content: {
SubscriptionsView()
})
.padding()
}
}
view raw App.swift hosted with ❤ by GitHub

SwiftUISubscriptionStoreViewExample (GitHub, Xcode 15.2)

If this was helpful, please let me know on Mastodon@toomasvahter orĀ Twitter @toomasvahter. Feel free to subscribe to RSS feed. Thank you for reading.

Categories
iOS Swift Swift Package

Most visited blog posts in 2023

I am happy to report that unique visitors keeps growing every year, with +39% in 2023. Thank you everyone!

Top 10 written in 2023

  1. Changes to URL string parsing in iOSĀ 17 (October 2, 2023)
  2. Using on-demand resources for securely storing API keys in iOSĀ apps (November 27, 2023)
  3. Async-await support for Combineā€™s sink andĀ map (January 9, 2023)
  4. Implicit self for weak selfĀ captures (May 1, 2023)
  5. Applying metal shader to text inĀ SwiftUI (August 7, 2023)
  6. @Observable macro inĀ SwiftUI (June 7, 2023)
  7. TaskGroup error handling inĀ Swift (March 6, 2023)
  8. Async-await and completion handler compatibility inĀ Swift (March 20, 2023)
  9. Examples of animating SF symbols inĀ SwiftUI (August 21, 2023)
  10. Getting started with matched geometry effect inĀ SwiftUI (May 15, 2023)

Top 10 overall

  1. Opening hyperlinks in UILabel on iOS (December 20, 2020)
  2. UIKit navigation with SwiftUI views (March 7, 2022)
  3. Changes to URL string parsing in iOSĀ 17 (October 2, 2023)
  4. Using on-demand resources for securely storing API keys in iOSĀ apps (November 27, 2023)
  5. Accessing UIHostingController from a SwiftUIĀ view (September 19, 2022)
  6. Async-await support for Combineā€™s sink andĀ map (January 9, 2023)
  7. Setting up a build tool plugin for a SwiftĀ package (November 28, 2022)
  8. Linking a Swift package only in debugĀ builds (May 2, 2022)
  9. Sidebar layout on macOS inĀ SwiftUI (September 13, 2021)
  10. Implicit self for weak selfĀ captures (May 1, 2023)

If this was helpful, please let me know on Mastodon@toomasvahter orĀ Twitter @toomasvahter. Feel free to subscribe to RSS feed. Thank you for reading.

Categories
iOS Swift SwiftUI

AsyncPhoto with caching in SwiftUI (part 2)

In the part 1 of the series, AsyncPhoto for displaying large photos inĀ SwiftUI, we built a SwiftUI view which has a similar interface to Apple’s AsyncImage, but provides a way to use any kind of image data source. In the part 2 of the series, we’ll implement an in-memory cache for the AsyncPhoto. This is important for reducing any flickering caused by the nature of async image loading. An example to highlight where it comes useful is when we have a detail view which displays a thumbnail of a large photo. If we open the detail view multiple times for the same photo, we really do not want to see the loading spinner every single time. Another benefit is that we do not need to load a huge photo in memory and then spending CPU on scaling it down.

OK, let’s jump into it.

The aim of the cache is to cache the scaled down images. We never want to cache the original image data since it would make the memory usage to through the roof, and we would still need to use CPU to scale down the image. Before we start, we need to remember that in part 1 we designed the AsyncPhoto in a way where it has an ID, scaledSize properties and a closure for returning image data asynchronously. Therefore, the caching key needs to be created by using the ID and the scaled size, since we might want to display a photo in multiple AsyncPhoto instances with different sizes. Let’s create an interface for the caching layer. We’ll go for a protocol based approach, which allows replacing the caching logic with different concrete implementations. In this blog post we’ll go for a NSCache backed caching implementation, but anyone else could use other approaches as well, like LRUCache.

/// An interface for caching images by identifier and size.
protocol AsyncPhotoCaching {
/// Store the specified image by size and identifier.
/// – Parameters:
/// – image: The image to be cached.
/// – id: The unique identifier of the image.
func store(_ image: UIImage, forID id: any Hashable)
/// Returns the image associated with a given id and size.
/// – Parameters:
/// – id: The unique identifier of the image.
/// – size: The size of the image stored in the cache.
/// – Returns: The image associated with id and size, or nil if no image is associated with id and size.
func image(for id: any Hashable, size: CGSize) -> UIImage?
/// Returns the caching key by combining a given image id and a size.
/// – Parameters:
/// – id: The unique identifier of the image.
/// – size: The size of the image stored in the cache.
/// – Returns: The caching key by combining a given id and size.
func cacheKey(for id: any Hashable, size: CGSize) -> String
}
extension AsyncPhotoCaching {
func cacheKey(for id: any Hashable, size: CGSize) -> String {
"\(id.hashValue):w\(Int(size.width))h\(Int(size.height))"
}
}

The protocol only defines 3 functions for writing, reading, and creating a caching key. We’ll provide a default implementation for the cacheKey(for:size:) function. Since the same image data should be cached by size, the cache key combines id and size arguments. Since we are dealing with floats in a string, we’ll round the width and height.

The next step is to create a concrete implementation. In this blog post, we’ll go for NSCache which automatically evicts images from the cache in case of a memory pressure. The downside of a NSCache is that the logic in which order images are evicted is not defined. The implementation is straight-forward.

struct AsyncPhotoCache: AsyncPhotoCaching {
private var storage: NSCache<NSString, UIImage>
static let shared = AsyncPhotoCache(countLimit: 10)
init(countLimit: Int) {
self.storage = NSCache()
self.storage.countLimit = countLimit
}
func store(_ image: UIImage, forID id: any Hashable) {
let key = cacheKey(for: id, size: image.size)
storage.setObject(image, forKey: key as NSString)
}
func image(for id: any Hashable, size: CGSize) -> UIImage? {
let key = cacheKey(for: id, size: size)
return storage.object(forKey: key as NSString)
}
}

We also added a shared instance since we want to use a single cache instance for all the AsyncPhoto instances. Let’s see how the AsyncPhoto implementation changes when we add a caching layer. The answer is, not so much.

struct AsyncPhoto<ID, Content, Progress, Placeholder>: View where ID: Hashable, Content: View, Progress: View, Placeholder: View {
// redacted
init(id value: ID = "",
scaledSize: CGSize,
cache: AsyncPhotoCaching = AsyncPhotoCache.shared,
data: @escaping (ID) async -> Data?,
content: @escaping (Image) -> Content = { $0 },
progress: @escaping () -> Progress = { ProgressView() },
placeholder: @escaping () -> Placeholder = { Color(white: 0.839) }) {
// redacted
}
var body: some View {
// redacted
}
@MainActor func load() async {
// Here we access the cache
if let image = cache.image(for: id, size: scaledSize) {
phase = .success(Image(uiImage: image))
}
else {
phase = .loading
if let image = await prepareScaledImage(for: id) {
guard !Task.isCancelled else { return }
phase = .success(image)
}
else {
guard !Task.isCancelled else { return }
phase = .placeholder
}
}
}
private func prepareScaledImage(for id: ID) async -> Image? {
guard let photoData = await data(id) else { return nil }
guard let originalImage = UIImage(data: photoData) else { return nil }
let scaledImage = await originalImage.scaled(toFill: scaledSize)
guard let finalImage = await scaledImage.byPreparingForDisplay() else { return nil }
// Here we store the scaled down image in the cache
cache.store(finalImage, forID: id)
return Image(uiImage: finalImage)
}
}

We added a new cache argument but also set the default value to the shared instance. The load() function tries to read a cached image as a first step, and the preparedScaledImage(for:) updates the cache. We rely on the cache implementation to keep the cache size small, therefore here is no code for manually evicting images from the cache when the ID changes. The main reason is that the AsyncPhoto instance does not have enough context for deciding this. For example, there might be other instances showing the photo for the old ID or maybe a moment later we want to display the photo for the old ID.

To recap, what we did. We defined an interface for caching images, created a NSCache based in-memory cache and hooked it up to the AsyncPhoto. We did all of this in a way that we did not need to change any existing code using AsyncPhoto instances.

There were some other tiny improvements, like using Task.isCancelled() to more quickly react to the ID change, setting the default placeholder colour to a light gray, and providing a default implementation for the content closure. Please check the example project for the full implementation. Here is the example project which reloads an avatar and as we can see at first, spinner is shown, but when images are cached, the change is immediate.

SwiftUIAsyncPhotoExample2 (GitHub, Xcode 15.1)

If this was helpful, please let me know on Mastodon@toomasvahter orĀ Twitter @toomasvahter. Feel free to subscribe to RSS feed. Thank you for reading.

Categories
Foundation iOS Swift Xcode

Using on-demand resources for securely storing API keys in iOS apps

Many apps use API keys when authenticating network requests. Although there are better ways of authenticating requests like OAuth with PKCE, but it might not always be possible. One thing what we must keep in mind is that it is fairly simple to extract strings from IPA files and therefore, if we store API keys in code, someone else can get access to these. This is of course a security issue. One of the approaches how to avoid it is using Apple’s on-demand resources with prefetching enabled. This means that as soon as we install the app, iOS will download additional resources separately and these resources can contain our API keys. This separation enables not putting any API keys into the IPA file. No one can go and inspect the IPA file any more and try to extract string constants. Let’s see how to set it up.

First step is that we create a prefetching enabled tag. Apple uses tags to identify on-demand resources. Open your Xcode project settings, app target and then “Resource Tags” tab. Let’s add a new resource tag named “APIKeys”.

The next step is to attach a resource to the tag. We’ll use a JSON file for our API keys, so go ahead and add a new JSON file for API keys. We’ll just create a key-value pairs in that file and assign a resource tag to the file, which can be found in the utilities area > file inspector tab. In our example, the tag has the same name as the file “APIKeys”.

So far we have created a resource tag and assigned a tag to the JSON file. The default behaviour is that the tag is treated as on-demand resource and only downloaded when it is required by the app. With API keys, it makes sense to download it along with the app binary when the user installs that app. Then on the first launch we can immediately store the API key in keychain for future usage. Prefetching can be enabled in the “Resource Tags” tab. Tap on the “Prefetched” button and drag the “APIKeys” tag under “Initial Install Tags”.

An important thing to note is that even though we have set that tag to be part of initial install tags there is still the possibility that the tag has been purged. This happens when the user installs the app and then waits a long time. In that case, the system needs to go and download it again when we want to access it. Therefore, the code accessing the tag could still take some time. Let’s see a simple function which accesses the JSON file through NSBundleResourceRequest API and makes the API keys available for the app.

enum Constants {
static func loadAPIKeys() async throws {
let request = NSBundleResourceRequest(tags: ["APIKeys"])
try await request.beginAccessingResources()
let url = Bundle.main.url(forResource: "APIKeys", withExtension: "json")!
let data = try Data(contentsOf: url)
// TODO: Store in keychain and skip NSBundleResourceRequest on next launches
APIKeys.storage = try JSONDecoder().decode([String: String].self, from: data)
request.endAccessingResources()
}
enum APIKeys {
static fileprivate(set) var storage = [String: String]()
static var mySecretAPIKey: String { storage["MyServiceX"] ?? "" }
static var mySecretAPIKey2: String { storage["MyServiceY"] ?? "" }
}
}
view raw APIKeys.swift hosted with ❤ by GitHub

With a setup like this, we need to make sure that the loadAPIkeys function is called before we access mySecretAPIKey and mySecretAPIKey2. If we have a centralized place for network requests, let’s say some networking module which wraps URLSession then that could be an excellent place where to run this async code. Another way could be delaying showing the main UI before the function completes. Personally, I would go for the former and integrate it into the networking stack.

OnDemandAPIKeyExample (GitHub, Xcode 15.0.1)

If this was helpful, please let me know on Mastodon@toomasvahter orĀ Twitter @toomasvahter. Feel free to subscribe to RSS feed. Thank you for reading.

Categories
Generics iOS Swift SwiftUI

Loading async data for SwiftUI views

Sometimes we need to invoke an async function for fetching data before presenting a SwiftUI view. Therefore, a common flow is showing a spinner while the data is being fetched and then showing the main view. Moreover, if an error occurs, we show a failure view with a retry button. Let’s dive in how to build such view in a generic way.

As said before, our container view, let’s call it ContentPrepareView (similar naming to Apple’s ContentUnavailableView), has three distinct states: loading, failure, and success (named as “content” in the enum).

extension ContentPrepareView {
enum ViewContent {
case loading
case content
case failure(Error)
}
}

We’ll go for a fully generic implementation where each of the view state corresponds to a view builder. This gives as flexibility if in some places we want to use custom loading views or different failure view. But on the other hand, most of the time we just want to use a common loading and failure views, that is why we set default values for loading and failure view builders (see below). In addition to view builders, we need an async throwing task closure which handles the data fetching/preparation. If we put it all together, then the ContentPrepareView becomes this:

struct ContentPrepareView<Content, Failure, Loading>: View where Content: View, Failure: View, Loading: View {
@State private var viewContent: ViewContent = .loading
@ViewBuilder let content: () -> Content
@ViewBuilder let failure: (Error, @escaping () async -> Void) -> Failure
@ViewBuilder let loading: () -> Loading
let task: () async throws -> Void
init(content: @escaping () -> Content,
failure: @escaping (Error, @escaping () async -> Void) -> Failure = { FailureView(error: $0, retryTask: $1) },
loading: @escaping () -> Loading = { ProgressView() },
task: @escaping () async throws -> Void) {
self.content = content
self.failure = failure
self.loading = loading
self.task = task
}
var body: some View {
Group {
switch viewContent {
case .content:
content()
case .failure(let error):
failure(error, loadTask)
case .loading:
loading()
}
}
.onLoad(perform: loadTask)
}
// redacted
}

Since loading, failure and success views can be any kind of views, then our view needs to be a generic view. The body of the view has a switch-case for creating a view for the current view state. One thing to note here is that the onLoad view modifier is a custom one, and the idea is that it makes sure that the content preparation work only runs once per view life-time (onAppear() or task() can run multiple times). The reasoning is that we want to have an experience where we show the loading spinner only when the view is presented the first time, not when it appears again. The loadTask function is async and has responsibility of running the passed in async task closure and updating the current view state.

struct ContentPrepareView<Content, Failure, Loading>: View where Content: View, Failure: View, Loading: View {
// redacted
@MainActor func loadTask() async {
do {
viewContent = .loading
try await task()
viewContent = .content
}
catch {
viewContent = .failure(error)
}
}
}
view raw LoadTask.swift hosted with ❤ by GitHub

In this example we used a custom FailureView and it is a small view wrapping Apple’s ContentUnavailableView. It sets a label, description and handles the creation of the retry button.

struct FailureView: View {
let error: Error
let retryTask: () async -> Void
var body: some View {
ContentUnavailableView(label: {
Label("Failed to load", systemImage: "exclamationmark.circle.fill")
}, description: {
Text(error.localizedDescription)
}, actions: {
Button(action: {
Task { await retryTask() }
}, label: {
Text("Retry")
})
})
}
}

Here is an example how to use the final ContentPrepareView. For demo purposes, it fails the first load and allows succeeding the second.

struct ContentView: View {
// Demo: first load leads to an error
@State private var showsError = true
var body: some View {
ContentPrepareView {
VStack {
Image(systemName: "globe")
.imageScale(.large)
.foregroundStyle(.tint)
Text("Hello, world!")
}
.padding()
} task: {
try await Task.sleep(nanoseconds: 3_000_000_000)
// Demo: Retrying a task leads to success
guard showsError else { return }
showsError = false
throw LoadingError.example
}
}
}
enum LoadingError: LocalizedError {
case example
var errorDescription: String? {
"The connection to Internet is unavailable"
}
}
view raw Usage.swift hosted with ❤ by GitHub

ContentPrepareViewExample (GitHub, Xcode 15.0.1)

If this was helpful, please let me know on Mastodon@toomasvahter orĀ Twitter @toomasvahter. Feel free to subscribe to RSS feed. Thank you for reading.