Some time ago I published a tiny Swift package IndexedDataStore which tackles a problem of storing data blobs on disk. It could the image data or anything else. When working with Swift packages then it is extremely easy to build and run tests on macOS but when we want to build and run tests on iOS simulator then we need to drop using swift build and swift test commands. Fortunately xcodebuild can help here and we can build and run tests without generating a project file ourselves with swift package generate-xcodeproj. Something I would like to mention about the generate-xcodeproj command is that it generates a project which does not contain resource files. The aim of this blog post is to configure a GitHub action which runs unit-tests both on macOS and iOS.
GitHub actions need to be in the repostory’s .github/workflows folder. GitHub workflows are defined in YAML files which need to be in that folder. Let’s jump into it and start creating a worflow which runs tests on macOS and iOS. GitHub workflows must define a name, in our case, name: CI. Secondly we’ll need to define when the workflow should be triggered. Running the workflow whenever pull request is created of when something was pushed to main branch will suffice.
name: CI

on:
  push:
    branches: [ main ]
  pull_request:
    branches:
      - '*'
The next step is creating a job and defining a number of steps. Jobs require a name, then which resource it needs to use. The first step is the repository checkout followed by running swiftlint which is already part of the enviornment. The linting step uses the default configuration file .swiftlint.yml at the repository root. At this point we are ready to build and run tests.
jobs:
  unit_tests:
    runs-on: macos-latest
    steps:
    - name: Repository checkout
      uses: actions/checkout@v2
    - name: Lint
      run: swiftlint
The simplest way to build and test Swift packages is to use swift build and swift test commands which builds and runs tests on macOS. Unfortunately there is not a way to use those commands and setting the deplyoment to iOS. Therefore we’ll need to use xcodebuild command instead. It will know how to deal with Swift packages and therefore we only need to define scheme and destination arguments. It also makes sense to separate building (build-for-testing) from running tests (test-without-building) as it makes it easier to see where a failure happened. We can make the xcodebuild output a little bit cleaner by using xcpretty. In addition it is also reasonable to use set -o pipefail which makes the pipeline to use an occured error code as the final code of the whole pipeline. Finally, we’ll disable any buffering by setting NSUnbufferedIO to YES.
jobs:
  unit_tests:
    runs-on: macos-latest
    steps:
    - name: Repository checkout
      uses: actions/checkout@v2
    - name: Lint
      run: swiftlint
    - name: Build for macOS
      run: swift build -v
    - name: Run macOS tests
      run: swift test -v
    - name: Build for iOS
      run: set -o pipefail && env NSUnbufferedIO=YES xcodebuild build-for-testing -scheme IndexedDataStore -destination "platform=iOS Simulator,OS=latest,name=iPhone 12" | xcpretty
    - name: Run iOS tests
      run: set -o pipefail && env NSUnbufferedIO=YES xcodebuild test-without-building -scheme IndexedDataStore -destination "platform=iOS Simulator,OS=latest,name=iPhone 12" | xcpretty
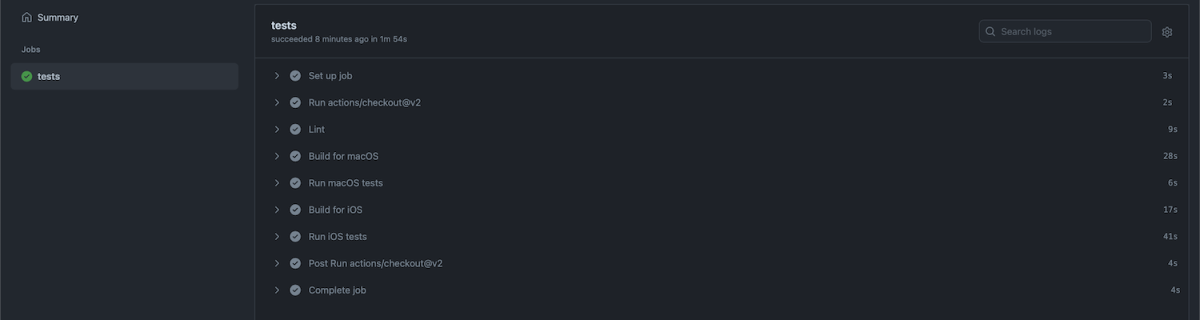
This completes our workflow and we can check in the YAML file which gets then picked up by GitHub. All the actions can be see under the Actions section on GitHub.
Summary
We looked into how to add a GitHub workflow for running tests both on macOS and iOS. Although swift build does not support building the package for iOS we could still do that with xcodebuild.
If this was helpful, please let me know on Mastodon@toomasvahter or Twitter @toomasvahter. Feel free to subscribe to RSS feed. Thank you for reading.

3 replies on “Running tests in Swift package with GitHub actions”
[…] have written before about running tests and getting code coverage data for Swift packages in Running tests in Swift package with GitHub actions and Code coverage for Swift Packages with Fastlane. In this post, I am going to revisit the […]
LikeLike
build iOS with swift build is not difficult. try this
swift build -Xswiftc “-sdk” -Xswiftc “/Applications/Xcode.app/Contents/Developer/Platforms/iPhoneSimulator.platform/Developer/SDKs/iPhoneSimulator13.0.sdk” -Xswiftc “-target” -Xswiftc “x86_64-apple-ios12.1-simulator”
LikeLike
[…] Running tests in Swift package with GitHub actions (April 26, 2021) […]
LikeLike