Categories
iOS SpriteKit

Deforming sprites with SKWarpGeometryGrid in SpriteKit

SKWarpGeometryGrid is a grid based deformation what can be applied to nodes conforming to SKWarpable protocol. It defines normalised vertex positions for source and destination where source positions are un-warped geometry and destination warped geometry. Therefore, if destination vertex positions are not equal to source, the node will look deformed.

Vertex positions

Grid_vertex_positions_source
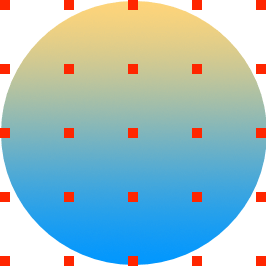
Here is a geometry grid with 4 columns and 4 rows. Positions in grid are normalised and in case of un-warped geometry both x and y-values are in range of 0 to 1. Therefore, position at the top left corner has coordinates 0,1 and the bottom right 1,0. It should be noted that when deforming a node, destination vertex positions can have x and y values larger than 1 and less than 0 – node will just look stretched.

Deforming a node

Deforming a sprite consists of two steps: creating a SKWarpGeometryGrid and applying it to a warpable node. Firstly, let’s create a function on SKWarpGeometryGrid what takes in a normalised contact position and returns a deformed grid. Normalised means that the contact point is in grid’s coordinate system.

extension SKWarpGeometryGrid {
func deform(at contactPoint: float2, radius: Float) -> SKWarpGeometryGrid {
// Make a copy of current grid positions.
let currentPositions: [float2] = {
var positions = [float2](repeating: .zero, count: vertexCount)
(0..<vertexCount).forEach({ positions[$0] = destPosition(at: $0) })
return positions
}()
// Move some of the positions in the grid close to contact point.
let destination = currentPositions.map { (gridPoint) -> float2 in
let contactDistance = gridPoint.distance(to: contactPoint)
guard contactDistance <= Float(radius) else { return gridPoint }
// If contact was very close to the grid point, move it a little bit further away from the contact point.
let gridPointChangeFactor = (Float(radius) - contactDistance) / Float(radius)
let maxDeformation: Float = 0.1
let gridPointDistanceChange = Float(maxDeformation) * gridPointChangeFactor // vector length
// Limit angle, as otherwise the edges of the crater are too far away from the center of the node.
let angleToCenter = contactPoint.angle(to: float2(x: 0.5, y: 0.5))
let maxAngleOffset = Float.pi / 4.0
let minAngle = angleToCenter - maxAngleOffset
let maxAngle = angleToCenter + maxAngleOffset
var gridPointOffsetAngle = contactPoint.angle(to: gridPoint)
gridPointOffsetAngle = min(max(gridPointOffsetAngle, minAngle), maxAngle)
return float2(x: gridPoint.x + gridPointDistanceChange * cos(gridPointOffsetAngle), y: gridPoint.y + gridPointDistanceChange * sin(gridPointOffsetAngle))
}
return replacingByDestinationPositions(positions: destination)
}
}

This function copies all the current destination vertex positions as node might be already deformed. Secondly, it loops over all the vertex positions and modifies the ones, which are fairly close to the contact point. The amount how much each vertex position is moved should depend on the distance to the contact point. The angle is calculated between the contact point and the grid position. Angle is clamped for avoiding moving vertex positions too far away from the centre point what gives more natural deformation. Magnitude and angle gives us a deformation vector for a given vertex position.

Grid deformation

Here we can see a contact point in green and moved vertex positions. In one case, angle is not limited and vertex position is moved further away (contact point, old vertex position and new vertex position line up). In the second case, angle of the offset vector is clamped and the vertex position moves to the right and it will not line up with the contact point and previous position.

The deformed geometry can be applied by setting warpGeometry property which will deform the node without an animation. For animating deformation, use warp(to:duration:).

func touchUp(atPoint position: CGPoint) {
let gridContactPoint = position.normalizedContactPoint(sprite.position, rotation: sprite.zRotation)
let grid = sprite.warpGeometry as? SKWarpGeometryGrid ?? SKWarpGeometryGrid(columns: 4, rows: 4)
let deformedGrid = grid.deform(at: float2(Float(gridContactPoint.x), Float(gridContactPoint.y)))
guard let action = SKAction.warp(to: deformedGrid, duration: 0.5) else { fatalError("Invalid deformation.") }
action.timingMode = .easeOut
sprite.run(action, withKey: "deform")
}

Finally, here is a demo app with a rotating circle and clicking anywhere around the circle will cause it to deform.

Deformation_demo.gif

Summary

SKWarpGeometryGrid adds a simple way for creating deformations in SpriteKit. The precision of the deformation is defined by the amount of vertex positions in a grid. Applying coordinate system transformations and using euclidian geometry, it is possible to create pretty cool deformations with a little bit of code.

Playground

SKWarpGeometryGridExample (GitHub) Xcode 10, Swift 4.2

References

SKWarpGeometryGrid (Apple)
SKWarpable (Apple)
Euclidian geometry (Wikipedia)

Categories
iOS SpriteKit

Adding an animating glow to SKSpriteNode

Having a glow behind a sprite can give game a move lively environment. In this blog post I am going to present a way of adding a glow to SKSpriteNode using an instance of SKEffectNode.

Node Tree

First of all let’s take a look on the node tree needed for achieving the end result.

GlowingSpriteNodeTree

SKSpriteNode (root)

Displays a texture what needs a glow.

SKNode

Enables running actions on the glow without causing to render the glow again. Running an action on the SKEffectNode would cause it to redraw although it is rasterizing its content. Also note that the zPosition of the node should be -1 as the glow should be rendered behind the root node.

SKEffectNode

Applies gaussian blur filter to the child node what in this case is a SKSpriteNode displaying the same texture as the root node. It is important to cache the content by setting shouldRasterize to true. Otherwise the glow gets re-rendered in every frame and therefore uses computing power unnecessary.

SKSpriteNode

Uses the same texture as the root node what is rendered together with the filter SKEffectNode provides.

SKSpriteNode Extension

import SpriteKit
extension SKSpriteNode {
/// Initializes a textured sprite with a glow using an existing texture object.
convenience init(texture: SKTexture, glowRadius: CGFloat) {
self.init(texture: texture, color: .clear, size: texture.size())
let glow: SKEffectNode = {
let glow = SKEffectNode()
glow.addChild(SKSpriteNode(texture: texture))
glow.filter = CIFilter(name: "CIGaussianBlur", withInputParameters: ["inputRadius": glowRadius])
glow.shouldRasterize = true
return glow
}()
let glowRoot: SKNode = {
let node = SKNode()
node.name = "Glow"
node.zPosition = -1
return node
}()
glowRoot.addChild(glow)
addChild(glowRoot)
}
}

Download Playground

Please check out the playground demonstrating rendering the glow in code: GlowingSprite (GitHub)

Categories
iOS SpriteKit

Positioning a node at the edge of a screen

iOS devices have several screen sizes and aspect ratios. This is something to keep in mind when building a game in SpriteKit because placing a node at the edge of a screen is not straight forward. But first let’s take a quick look on managing scenes. One way for it is to use scene editor in Xcode for setting up all nodes in it. When scene is ready and gets presented in SKView, it is scaled based on the scaleMode property (we are looking into SKSceneScaleMode.aspectFill). Without scaling scenes it would be impossible to reuse them on iPads and iPhones. But on the other hand scaled scenes makes it a bit more tricky to position a node at the edge of a screen. For achieving that a little bit of code is needed what takes account how scene has been scaled. In the code example a SKSpriteNode is positioned at the top right of the scene with a small margin. Idea is simple: calculate a scale factor and use scaled size of the scene for positioning the node.

private var initialSize: CGSize = .zero
private var presentedSize: CGSize { return scene?.view?.bounds.size ?? size }
private var presentedScaleFactor: CGFloat { return initialSize.width / presentedSize.width }
override func sceneDidLoad()
{
super.sceneDidLoad()
initialSize = size
}
func layoutNodes()
{
let margin: CGFloat = 10
if let topRight = childNode(withName: "topRight") as? SKSpriteNode
{
topRight.position.x = presentedSize.width / 2.0 * presentedScaleFactor - topRight.size.width / 2.0 - margin
topRight.position.y = presentedSize.height / 2.0 * presentedScaleFactor - topRight.size.height / 2.0 - margin
}
}
view raw GameScene.swift hosted with ❤ by GitHub

Here is a full sample app demonstrating how to place a node to every corner and repositioning the nodes when orientation of the device changes.

Please check the sample app in GitHub: NodesAtScreenEdges.

Categories
iOS SpriteKit

Drawing gradients in SpriteKit

SpriteKitGradientTexture

I was working on an upcoming game in SpriteKit only to discover that adding a simple gradient is not so straight-forward as one would expect. Therefore I created an extension to SKTexture.

extension SKTexture
{
convenience init(radialGradientWithColors colors: [UIColor], locations: [CGFloat], size: CGSize)
{
let renderer = UIGraphicsImageRenderer(size: size)
let image = renderer.image { (context) in
let colorSpace = context.cgContext.colorSpace ?? CGColorSpaceCreateDeviceRGB()
let cgColors = colors.map({ $0.cgColor }) as CFArray
guard let gradient = CGGradient(colorsSpace: colorSpace, colors: cgColors, locations: UnsafePointer<CGFloat>(locations)) else {
fatalError("Failed creating gradient.")
}
let radius = max(size.width, size.height) / 2.0
let midPoint = CGPoint(x: size.width / 2.0, y: size.height / 2.0)
context.cgContext.drawRadialGradient(gradient, startCenter: midPoint, startRadius: 0, endCenter: midPoint, endRadius: radius, options: [])
}
self.init(image: image)
}
convenience init(linearGradientWithAngle angleInRadians: CGFloat, colors: [UIColor], locations: [CGFloat], size: CGSize)
{
let renderer = UIGraphicsImageRenderer(size: size)
let image = renderer.image { (context) in
let colorSpace = context.cgContext.colorSpace ?? CGColorSpaceCreateDeviceRGB()
let cgColors = colors.map({ $0.cgColor }) as CFArray
guard let gradient = CGGradient(colorsSpace: colorSpace, colors: cgColors, locations: UnsafePointer<CGFloat>(locations)) else {
fatalError("Failed creating gradient.")
}
let angles = [angleInRadians + .pi, angleInRadians]
let radius = (pow(size.width / 2.0, 2.0) + pow(size.height / 2.0, 2.0)).squareRoot()
let points = angles.map { (angle) -> CGPoint in
let dx = radius * cos(-angle) + size.width / 2.0
let dy = radius * sin(-angle) + size.height / 2.0
return CGPoint(x: dx, y: dy)
}
context.cgContext.drawLinearGradient(gradient, start: points[0], end: points[1], options: [])
}
self.init(image: image)
}
}

This extension adds support for creating linear and radial gradients. Linear gradient can be drawn with an angle (in radians) although in most of the cases rotating SKSpriteNode would be enough. Gradients are drawn using core graphics APIs what are a little bit difficult to use but now nicely hidden in the extension. Both initialisers take in array of colors (UIColor) and CGFloat array with values in range of 0 to 1 defining the locations for colors in CGGradient.

For adding linear gradient or radial gradient to a SpriteKit scene we need to create a SKTexture and assign it to a SKSpriteNode. I created an example project SpriteKitGradientTexture for showing gradients in action. In the example project one SKSpriteNode is animating with textures containing linear gradients with different angles and the other SKSpriteNode just displays radial gradient.

final class GameScene: SKScene
{
override func didMove(to view: SKView)
{
let linearGradientSize = size
let linearGradientColors = [UIColor(red: 53.0 / 255.0, green: 92.0 / 255.0, blue: 125.0 / 255.0, alpha: 1.0),
UIColor(red: 108.0 / 255.0, green: 91.0 / 255.0, blue: 123.0 / 255.0, alpha: 1.0),
UIColor(red: 192.0 / 255.0, green: 108.0 / 255.0, blue: 132.0 / 255.0, alpha: 1.0)]
let linearGradientLocations: [CGFloat] = [0, 0.5, 1]
let textureCount = 8
let textures = (0..<textureCount).map { (index) -> SKTexture in
let angle = 2.0 * CGFloat.pi / CGFloat(textureCount) * CGFloat(index)
return SKTexture(linearGradientWithAngle: angle, colors: linearGradientColors, locations: linearGradientLocations, size: linearGradientSize)
}
let linearGradientNode = SKSpriteNode(texture: textures.first)
linearGradientNode.zPosition = 1
addChild(linearGradientNode)
let action = SKAction.animate(with: textures, timePerFrame: 0.5)
linearGradientNode.run(SKAction.repeatForever(action))
let radialGradientSize = CGSize(width: min(size.width, size.height), height: min(size.width, size.height))
let radialGradientColors = [UIColor.yellow, UIColor.orange]
let radialGradientLocations: [CGFloat] = [0, 1]
let radialGradientTexture = SKTexture(radialGradientWithColors: radialGradientColors, locations: radialGradientLocations, size: radialGradientSize)
let radialGradientNode = SKSpriteNode(texture: radialGradientTexture)
radialGradientNode.zPosition = 2
addChild(radialGradientNode)
let pulse = SKAction.sequence([SKAction.fadeIn(withDuration: 3.0), SKAction.fadeOut(withDuration: 1.0)])
radialGradientNode.run(SKAction.repeatForever(pulse))
}
}
view raw GameScene.swift hosted with ❤ by GitHub

If this was helpful, please let me know on Mastodon@toomasvahter or Twitter @toomasvahter. Feel free to subscribe to RSS feed. Thank you for reading.

Example project

SpriteKitGradientTexture (GitHub)