iOS and macOS got a new framework in WWDC’19 named LinkPresentation. LinkPresentation enables fetching URL previews.
Adding LPLinkView for presenting preview
LPLinkView is a view subclass meant for rendering LPLinkMetadata. LPLinkMetadata contains information about the link: title, icon, image, video.
This file contains hidden or bidirectional Unicode text that may be interpreted or compiled differently than what appears below. To review, open the file in an editor that reveals hidden Unicode characters.
Learn more about bidirectional Unicode characters
Instances of LPLinkMetadata are fetched using LPLinkMetadataProvider for a given url. LPLinkMetadata is conforming to NSSecureCoding what enables a way of converting it to Data and storing the metadata on disk. Next time we need metadata for this url, we can use a locally cached data instead. Archiving and unarchiving is done with help of NSKeyedArchiver and NSKeyedUnarchiver and in the example archived data is stored in UserDefaults. In real apps it makes sense to store the data in separate files instead and not polluting UserDefaults with preview data.
This file contains hidden or bidirectional Unicode text that may be interpreted or compiled differently than what appears below. To review, open the file in an editor that reveals hidden Unicode characters.
Learn more about bidirectional Unicode characters
This file contains hidden or bidirectional Unicode text that may be interpreted or compiled differently than what appears below. To review, open the file in an editor that reveals hidden Unicode characters.
Learn more about bidirectional Unicode characters
Local LPMetadata storage using UserDefaults as storage
Summary
LinkPresentation framework adds a easy way of fetching previews for web pages. It provides a LPLinkView class making it extremely easy to render the preview.
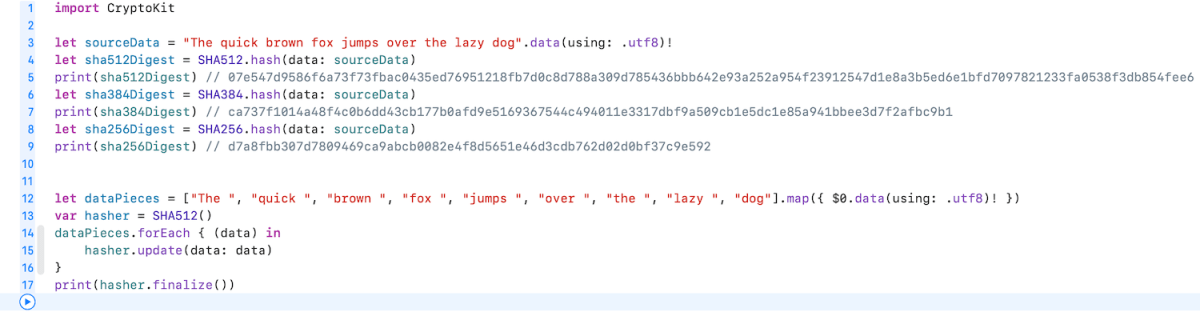
So far we have been using CommonCrypto when it has come to creating hashes of data. I even wrote about it some time ago and presented a thin layer on top of it making it more convenient to use. In WWDC’19 Apple presented a new framework called CryptoKit. And of course, it contains functions for hashing data.
SHA512, SHA384, SHA256, SHA1 and MD5
CryptoKit contains separate types for SHA512, SHA384 and SHA256. In addition, there are MD5 and SHA1 but those are considered to be insecure and available only because of backwards compatibility reasons. With CryptoKit, hashing data becomes one line of code.
This file contains hidden or bidirectional Unicode text that may be interpreted or compiled differently than what appears below. To review, open the file in an editor that reveals hidden Unicode characters.
Learn more about bidirectional Unicode characters
In case we do not have the whole data available in memory (e.g. really huge file), new types support creating hash by feeding data in piece by piece (just highlighting here how to use the hasher with incremental data).
This file contains hidden or bidirectional Unicode text that may be interpreted or compiled differently than what appears below. To review, open the file in an editor that reveals hidden Unicode characters.
Learn more about bidirectional Unicode characters
Apple has an excellent playground describing the common operations developers need when using CryptoKit. Highly recommend to check it out if you need something more than just creating hashes.
Summary
CryptoKit is long waited framework what is easy to use and does not require managing raw pointers what was needed to when using CommonCrypto. It now just takes some time when we can bump deployment targets and forget CommonCrypto.
Storing data persistently on iOS is something what is needed quite often. In this post, we are going to look into how to build a persistent data store and how to store image data.
Initialising the persistent data store
Persistent data store is an object managing a folder on disk. It allows writing and reading data asynchronously.
Firstly, we need to create a folder where to store all the files. As every instance of the data store should manage its own folder, we will add an argument name to the initialiser. Then we can create a folder in user’s documents folder with that name. As writing and reading data is an expensive operation, we are going to offload the work to a concurrent DispatchQueue. Concurrent dispatch queue allows us to read multiple files at the same time (more about it a bit later).
This file contains hidden or bidirectional Unicode text that may be interpreted or compiled differently than what appears below. To review, open the file in an editor that reveals hidden Unicode characters.
Learn more about bidirectional Unicode characters
Method for storing data on disk consists of closure, identifier and completion handler. This allows us to create a closure what transforms object to data. For example, it could transform UIImage to Data. Secondly, this transformation, possibly slow operation, can be offloaded to the same thread writing the data into a file. Using closure gives us a flexible API what we can extend with convenience methods.
This file contains hidden or bidirectional Unicode text that may be interpreted or compiled differently than what appears below. To review, open the file in an editor that reveals hidden Unicode characters.
Learn more about bidirectional Unicode characters
Identifier is internally used as a filename and default implementation creates unique identifier. Therefore, when data store consumer would like to replace the current file, it can supply an identifier, otherwise new file is created.
Completion handler contains a Result enum type. Result enum consists of three cases: success, transformation failure and data writing failure. Success’ associated value is identifier, failure contains error object and transformation failure is equal to noData.
Important to note here is that the work item has barrier specified. Barrier means that when DispatchQueue starts to handle the work item, it will wait until all the previous work items have finished running. Meaning, we will never try to update a file on disk when some other request is busy reading it.
Loading data asynchronously
Load data is generic method allowing the data transformation closure to return a specific type (e.g. transforming Data to UIImage). Shortly, load data reads file from disk and transforms it into a different type. As transformation can be a lengthy task, it is yet again running on the background thread and will not cause any hiccups in the UI.
This file contains hidden or bidirectional Unicode text that may be interpreted or compiled differently than what appears below. To review, open the file in an editor that reveals hidden Unicode characters.
Learn more about bidirectional Unicode characters
This file contains hidden or bidirectional Unicode text that may be interpreted or compiled differently than what appears below. To review, open the file in an editor that reveals hidden Unicode characters.
Learn more about bidirectional Unicode characters
It is easy to extend the PersistentDataStore with convenience methods for storing a specific type of data. This allows us to hide the technical details of transforming image to data and vice-versa. Moreover, calling the method gets easier to read as data transformation closure is not visible anymore.
This file contains hidden or bidirectional Unicode text that may be interpreted or compiled differently than what appears below. To review, open the file in an editor that reveals hidden Unicode characters.
Learn more about bidirectional Unicode characters
We created a persistent data store what is performant and has a flexible API. API can be extended easily to support any other data transformation. In addition, it uses thread-safe techniques for making sure data never gets corrupted.