Categories
iOS Swift SwiftUI

Revealing content behind keyboard in SwiftUI

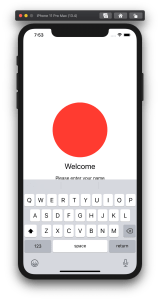
By default SwiftUI view content gets behind a keyboard when editing text. Therefore let’s create a view modifier which can be easily added to any SwiftUI view and enables revealing content behind the keyboard with animation. In the end we will fix this broken looking view where TextField is behind the keyboard.

SwiftUI view with open keyboard hiding text field.

Observing keyboard notifications

I wrote about keyboard notifications a while ago in “Observing keyboard visibility on iOS”. We’ll also create a class named KeyboardObserver and its responsibility is to observe keyboardWillChangeFrameNotification, keyboardWillShowNotification and keyboardWillHideNotification and extracting values from the notification’s userInfo. In addition, we’ll add Info struct which holds animation duration, curve and end frame. Note that user info contains more values but we are only interested in those. With this set, we can subscribe to KeyboardObserver and get notified when keyboard changes. Next step is to use those values and reserving space for keyboard in SwiftUI view.

fileprivate final class KeyboardObserver: ObservableObject {
    struct Info {
        let curve: UIView.AnimationCurve
        let duration: TimeInterval
        let endFrame: CGRect
    }
    
    private var observers = [NSObjectProtocol]()
    
    init() {
        let handler: (Notification) -> Void = { [weak self] notification in
            self?.keyboardInfo = Info(notification: notification)
        }
        let names: [Notification.Name] = [
            UIResponder.keyboardWillShowNotification,
            UIResponder.keyboardWillHideNotification,
            UIResponder.keyboardWillChangeFrameNotification
        ]
        observers = names.map({ name in
            NotificationCenter.default.addObserver(forName: name,
                                                   object: nil,
                                                   queue: .main,
                                                   using: handler)
        })
    }

    @Published var keyboardInfo = Info(curve: .linear, duration: 0, endFrame: .zero)
}

fileprivate extension KeyboardObserver.Info {
    init(notification: Notification) {
        guard let userInfo = notification.userInfo else { fatalError() }
        curve = {
            let rawValue = userInfo[UIResponder.keyboardAnimationCurveUserInfoKey] as! Int
            return UIView.AnimationCurve(rawValue: rawValue)!
        }()
        duration = userInfo[UIResponder.keyboardAnimationDurationUserInfoKey] as! TimeInterval
        endFrame = userInfo[UIResponder.keyboardFrameEndUserInfoKey] as! CGRect
    }
}

Creating view modifier

View modifiers in SwiftUI transform the original view and return a new version of the original view. In the view modifier we’ll observe KeyboardObserver and add bottom padding to the original view based on the keyboard height and current safeAreaInsets. In addition, we’ll wrap it into animation block which tells SwiftUI to animate changes.

struct KeyboardVisibility: ViewModifier {
    @ObservedObject fileprivate var keyboardObserver = KeyboardObserver()

    func body(content: Content) -> some View {
        GeometryReader { geometry in
            withAnimation() {
                content.padding(.bottom, max(0, self.keyboardObserver.keyboardInfo.endFrame.height - geometry.safeAreaInsets.bottom))
                    .animation(Animation(keyboardInfo: self.keyboardObserver.keyboardInfo))
            }
        }
    }
}

fileprivate extension Animation {
    init(keyboardInfo: KeyboardObserver.Info) {
        switch keyboardInfo.curve {
        case .easeInOut:
            self = .easeInOut(duration: keyboardInfo.duration)
        case .easeIn:
            self = .easeIn(duration: keyboardInfo.duration)
        case .easeOut:
            self = .easeOut(duration: keyboardInfo.duration)
        case .linear:
            self = .linear(duration: keyboardInfo.duration)
        @unknown default:
            self = .easeInOut(duration: keyboardInfo.duration)
        }
    }
}

The view modifier uses GeometryReader for reading safeAreaInsets. It’s important to take this into account when keyboard is open, otherwise there will be unnecessary spacing.

View modifiers can be added to a view by using modifier function and passing an instance of view modifier to it. We’ll add a convenience method for it.

extension View {
    func keyboardVisibility() -> some View {
        return modifier(KeyboardVisibility())
    }
}

Using view modifier

Next step is to adding the view modifier to a content view. The view modifier should be added to the root view and it is recommended to use ScrollView for making sure all the content is viewable when keyboard is open. It’s time to fix the view mentioned in the beginning of the post. We’ll add keyboardVisibility view modifier to the root view.

struct ContentView: View {
    @State private var text: String = ""
    
    var body: some View {
        VStack(spacing: 16) {
            Spacer()
            Ellipse().foregroundColor(.red)
                .aspectRatio(contentMode: .fit)
                .frame(height: 200)
            Text("Welcome").font(.title)
            Text("Please enter your name")
            TextField("Name", text: $text)
                .textFieldStyle(RoundedBorderTextFieldStyle())
                .padding()
            Spacer()
        }.keyboardVisibility()
    }
}

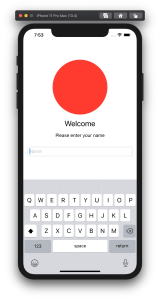
KeyboardVisibility view modifier will make sure the content view has bottom spacing equal to keyboard height and the end result looks like this.

SwiftUI view with keyboard visibility view modifier.

Summary

We created a view modifier which is easy to add to existing views. It observers keyboard notifications and animates the content view along with keyboard.

If this was helpful, please let me know on Mastodon@toomasvahter or Twitter @toomasvahter. Feel free to subscribe to RSS feed. Thank you for reading.

Example project

SwiftUIKeyboardObserver (Xcode 11.4 beta 3)

Categories
iOS Swift UIKit

Observing keyboard visibility on iOS

Almost every app needs a way of inserting information using keyboard. When keyboard shows up, we do not want to keep content behind the keyboard hidden and instead, allow user to see it. UIResponder contains several notifications we can use to adjust the layout.

Keyboard change notifications

UIResponder contains a list of notifications and user info keys. We have notifications for reacting to visibility and frame changes (for example when rotating device). Notification’s userInfo contains a variety of information about the change. What makes this API a little bit difficult to use is parsing the user info every time we need to use those notifications. If we need to observe keyboard in several view controllers then the amount of code of setting up observation and doing type casting starts to build up. Therefore it makes more sense to have an object handling the observation and type casting user info keys.

extension UIResponder {
public class let keyboardWillShowNotification: NSNotification.Name
public class let keyboardDidShowNotification: NSNotification.Name
public class let keyboardWillHideNotification: NSNotification.Name
public class let keyboardDidHideNotification: NSNotification.Name
public class let keyboardWillChangeFrameNotification: NSNotification.Name
public class let keyboardDidChangeFrameNotification: NSNotification.Name
public class let keyboardFrameBeginUserInfoKey: String // NSValue of CGRect
public class let keyboardFrameEndUserInfoKey: String // NSValue of CGRect
public class let keyboardAnimationDurationUserInfoKey: String // NSNumber of double
public class let keyboardAnimationCurveUserInfoKey: String // NSNumber of NSUInteger (UIViewAnimationCurve)
public class let keyboardIsLocalUserInfoKey: String // NSNumber of BOOL
}

Using a KeyboardObserver

KeyboardObserver is a lightweight object observing keyboard related notifications and calling the changeHandler when any of the notifications is received. User info and notification type information is represented with struct Info. Before looking into how it is implemented, let’s take a look on the example.

final class ViewController: UIViewController {
@IBOutlet weak var scrollView: UIScrollView!
private var keyboardObserver: KeyboardObserver?
override func viewWillAppear(_ animated: Bool) {
super.viewWillAppear(animated)
keyboardObserver = KeyboardObserver(changeHandler: { [weak self] (info) in
guard let self = self else { return }
switch info.event {
case .willShow:
self.scrollView.contentInset.bottom = info.endFrame.height
case .willHide:
self.scrollView.contentInset.bottom = 0
default:
break
}
})
}
override func viewDidDisappear(_ animated: Bool) {
super.viewDidDisappear(animated)
keyboardObserver = nil
}
}

Here we can see that setting up observer is straight-forward and accessing end frame of the keyboard does not require any type casting. Compare it with adding observers to those notifications and then using conditional casts for getting relevant information in the view controller. 

Creating a KeyboardObserver

But let’s now take a look on how it is implemented and see how much less code we need to write in the future. KeyboardObserver is initialised with a changeHandler closure like seen in the previous paragraph. Initialiser retains the handler and sets up observers for all the relevant notifications. For simplicity, we are observing all the notifications but it would also be possible to have an extra argument defining a set of Events and then observing only the notifications we really want to react to.

Type casting relies completely on promises made by UIKit. As UIKit promises that user info always contains those values, we can avoid having any optional values in the Info struct. Therefore it is simpler to use the struct later on as no unwrapping is required.

final class KeyboardObserver {
enum Event {
case willShow, didShow, willHide, didHide, willChangeFrame, didChangeFrame
}
struct Info {
let animationCurve: UIView.AnimationCurve
let animationDuration: TimeInterval
let isLocal: Bool
let beginFrame: CGRect
let endFrame: CGRect
let event: Event
}
let changeHandler: (Info) -> ()
init(changeHandler: @escaping (Info) -> ()) {
self.changeHandler = changeHandler
let notifications: [Notification.Name] = [UIResponder.keyboardWillShowNotification,
UIResponder.keyboardDidShowNotification,
UIResponder.keyboardWillHideNotification,
UIResponder.keyboardDidHideNotification,
UIResponder.keyboardWillChangeFrameNotification,
UIResponder.keyboardDidChangeFrameNotification]
notifications.forEach { (notification) in
NotificationCenter.default.addObserver(self, selector: #selector(KeyboardObserver.keyboardChanged(_:)), name: notification, object: nil)
}
}
@objc private func keyboardChanged(_ notification: Notification) {
guard let userInfo = notification.userInfo else { fatalError() }
let event: Event = {
switch notification.name {
case UIResponder.keyboardWillShowNotification: return .willShow
case UIResponder.keyboardDidShowNotification: return .didShow
case UIResponder.keyboardWillHideNotification: return .willHide
case UIResponder.keyboardDidHideNotification: return .didHide
case UIResponder.keyboardWillChangeFrameNotification: return .willChangeFrame
case UIResponder.keyboardDidChangeFrameNotification: return .didChangeFrame
default:
fatalError("Unknown change notification \(notification).")
}
}()
changeHandler(Info(event: event, userInfo: userInfo))
}
}
fileprivate extension KeyboardObserver.Info {
init(event: KeyboardObserver.Event, userInfo: [AnyHashable: Any]) {
self.event = event
animationCurve = {
let rawValue = userInfo[UIResponder.keyboardAnimationCurveUserInfoKey] as! Int
return UIView.AnimationCurve(rawValue: rawValue)!
}()
animationDuration = userInfo[UIResponder.keyboardAnimationDurationUserInfoKey] as! TimeInterval
isLocal = userInfo[UIResponder.keyboardIsLocalUserInfoKey] as! Bool
beginFrame = userInfo[UIResponder.keyboardFrameBeginUserInfoKey] as! CGRect
endFrame = userInfo[UIResponder.keyboardFrameEndUserInfoKey] as! CGRect
}
}

Summary

We took a look on how to avoid observing multiple notifications and type casting notification user info values on the view controller level. Instead, we created a separate object handling observing and type casting and gives us a simple and concise API to work with.

If this was helpful, please let me know on Mastodon@toomasvahter or Twitter @toomasvahter. Feel free to subscribe to RSS feed. Thank you for reading.

Example project

KeyboardObserver Xcode 10.1, Swift 4.2

References

UIResponder (Apple)