SwiftUI has multiple view modifiers for presenting sheets. If we just want to present a modal view, then we can use one of these:
This file contains hidden or bidirectional Unicode text that may be interpreted or compiled differently than what appears below. To review, open the file in an editor that reveals hidden Unicode characters.
Learn more about bidirectional Unicode characters
The first requires a boolean binding, whereas the second an identifiable item. When dealing with views which need to present different views in a sheet, then the latter can be easily expanded to support that. We can create an enum, conform it to Identifiable and then add an optional @State property which selects the view we should be presenting. The Identifiable protocol requires implementing an id property, which we can easily do by reusing rawValue property of an enum with raw types. If we put all of this together, then we can write something like this:
This file contains hidden or bidirectional Unicode text that may be interpreted or compiled differently than what appears below. To review, open the file in an editor that reveals hidden Unicode characters.
Learn more about bidirectional Unicode characters
In the example above, I also separated the sheet view creation by having a separate function with an argument of type ContentView.Sheet. Since the function returns views with different types, then it needs to be annotated with @ViewBuilder. All in all it is a pretty concise and gives a nice call site where we just assign a sheet identifier to the sheet property.
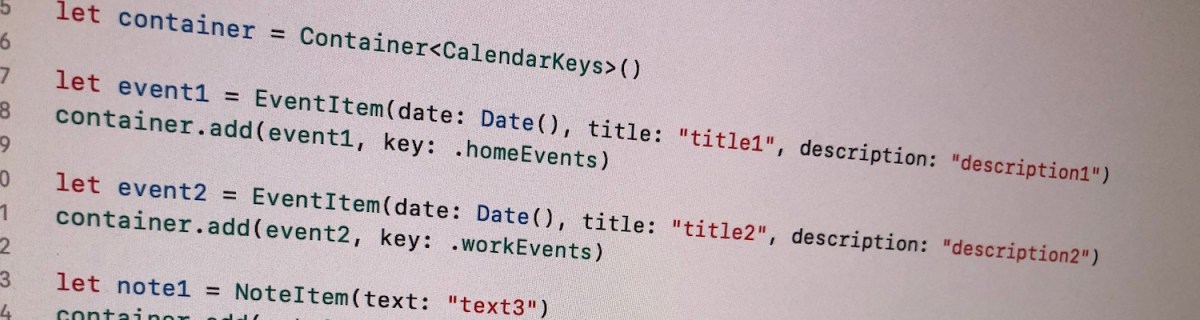
Let’s build a container where we can store collections of items conforming to a protocol. All the collections are identified by a case in enum. For making the container reusable, we’ll use protocols as requirements on keys and items in collections. Moreover, the container should be archivable and unarchivable.
Creating a reusable container
Container’s implementation wraps a dictionary and adds methods for conveniently adding an item for key. Key must implement Hashable and RawRepresentable: then it can be used in Dictionary and converting it to representation suitable for storing on disk.
Every item needs to implement ContainerItem protocol what requires to implement methods used when archiving and unarchiving the item. Thanks to Codable protocol in Swift, it is very simple to transform the item to data and back. ContainerItem provides default implementations for its own methods when the type is conforming to Codable. Therefore, when some type wants to implement ContainerItem, then it only needs to conform to ContainerItem and Codable and default implementations will do the rest.
This file contains hidden or bidirectional Unicode text that may be interpreted or compiled differently than what appears below. To review, open the file in an editor that reveals hidden Unicode characters.
Learn more about bidirectional Unicode characters
Archiving and unarchiving the container and it’s content
Let’s first extend the container with write method. As enum cases are used as keys in dictionary, then let’s implement write method for enums what have String as RawValue. (what should be a preferred way in this use case as its provides the most readable representation of the key). We can then map dictionary entries so that key is converted to String and value to array of JSON data objects. NSKeyedArchiver provides a simple way of storing Dictionary with archivable types (like String and array of Data).
For initialising the container from data on disk, we need to make sure that we convert JSON data back to the correct type. Therefore we can extend the container for this specific enum case and converting data back to the correct type. When using enums it is easy to switch over the possible cases and then converting list of data objects to list of known types.
This file contains hidden or bidirectional Unicode text that may be interpreted or compiled differently than what appears below. To review, open the file in an editor that reveals hidden Unicode characters.
Learn more about bidirectional Unicode characters
Wrapping dictionary with another type can be useful inmany cases where we have a known list of keys. Specialising generic types is an efficient way of adding more features to it and keeping type information intact. Thanks to Codable protocol we were able to make types archivable and unarchivable.
This file contains hidden or bidirectional Unicode text that may be interpreted or compiled differently than what appears below. To review, open the file in an editor that reveals hidden Unicode characters.
Learn more about bidirectional Unicode characters
RawRepresentable is a protocol in Swift standard library and enables converting from a custom type to raw value type and back. In this post we’ll be looking into how to implement RawRepresentable for enumeration containing an associated value.
Conforming to RawRepresentable
Implementing RawRepresentable requires three steps: firstly, choose RawValue type; secondly, implement initialiser where RawValue type is matched to one of the cases in the enumeration, and thirdly, rawValue getter where enumeration cases are converted into RawValue type.
In the example we’ll be looking into enumeration representing scenes: home, levelSelection and level(Int), where the associated value stores a number of the level. RawValue type is String and without associated values it is quite straight-forward: use switch-case for conversions. When associated values are in the mix, a little bit more processing is needed. Let’s look into level(Int). In the getter returning String we can just compose a string “level” followed by the level number. In the initialiser the string must be matched to that format. First we check if the string starts with prefix “level” (anchored == prefix) and after that try to create an integer from the rest of the string: nice and concise.
This file contains hidden or bidirectional Unicode text that may be interpreted or compiled differently than what appears below. To review, open the file in an editor that reveals hidden Unicode characters.
Learn more about bidirectional Unicode characters