Swift’s foundation library provides a sorted(by:) function for sorting arrays. The areInIncreasingOrder closure needs to return true if the closure’s arguments are increasing, false otherwise. How to use the closure for sorting by multiple criteria? Let’s take a look at an example of sorting an array of Player structs.
Sort by score in descending order
Sort by name in ascending order
Sort by id in ascending order
This file contains hidden or bidirectional Unicode text that may be interpreted or compiled differently than what appears below. To review, open the file in an editor that reveals hidden Unicode characters.
Learn more about bidirectional Unicode characters
As said before, the closure should return true if the left element should be ordered before the right element. If they happen to be equal, we should use the next sorting criteria. For comparing strings, we’ll go for case-insensitive sorting using Foundation’s built-in localizedCaseInsensitiveCompare.
This file contains hidden or bidirectional Unicode text that may be interpreted or compiled differently than what appears below. To review, open the file in an editor that reveals hidden Unicode characters.
Learn more about bidirectional Unicode characters
DateFormatter is used for converting string representation of date and time to a Date type and visa-versa. Something to be aware of is that the conversion loses microseconds precision. This is extremely important if we use these Date values for sorting and therefore ending up with incorrect order. Let’s consider an iOS app which uses API for fetching a list of items and each of the item contains a timestamp used for sorting the list. Often, these timestamps have the ISO8601 format like 2024-09-21T10:32:32.113123Z. Foundation framework has a dedicated formatter for parsing these strings: ISO8601DateFormatter. It is simple to use:
This file contains hidden or bidirectional Unicode text that may be interpreted or compiled differently than what appears below. To review, open the file in an editor that reveals hidden Unicode characters.
Learn more about bidirectional Unicode characters
Great, but there is on caveat, it ignores microseconds. Fortunately this can be fixed by manually parsing microseconds and adding the missing precision to the converted Date value. Here is an example, how to do this using an extension.
This file contains hidden or bidirectional Unicode text that may be interpreted or compiled differently than what appears below. To review, open the file in an editor that reveals hidden Unicode characters.
Learn more about bidirectional Unicode characters
That this code does is first converting the string using the original date(from:) method, followed by manually extracting digits for microseconds by handling cases where there are less than 3 digits or event there are nanoseconds present. Lastly a new Date value is created with the microseconds precision. Here are examples of the output (note that float’s precision comes into play).
This file contains hidden or bidirectional Unicode text that may be interpreted or compiled differently than what appears below. To review, open the file in an editor that reveals hidden Unicode characters.
Learn more about bidirectional Unicode characters
It took a long time, I mean years, but it finally happened. I stumbled on a struct which had a property of the same type.
This file contains hidden or bidirectional Unicode text that may be interpreted or compiled differently than what appears below. To review, open the file in an editor that reveals hidden Unicode characters.
Learn more about bidirectional Unicode characters
At first, it is kind of interesting that the replies property compiles fine, although it is a collection of the same type. I guess it is so because array’s storage type is a reference type.
The simplest workaround is to use a closure for capturing the actual value.
This file contains hidden or bidirectional Unicode text that may be interpreted or compiled differently than what appears below. To review, open the file in an editor that reveals hidden Unicode characters.
Learn more about bidirectional Unicode characters
This file contains hidden or bidirectional Unicode text that may be interpreted or compiled differently than what appears below. To review, open the file in an editor that reveals hidden Unicode characters.
Learn more about bidirectional Unicode characters
Or if we prefer property wrappers, using that instead.
This file contains hidden or bidirectional Unicode text that may be interpreted or compiled differently than what appears below. To review, open the file in an editor that reveals hidden Unicode characters.
Learn more about bidirectional Unicode characters
The other day, I needed a way for merging sorted arrays containing structs. In addition, not just merging arrays, I also needed to handle duplicates. The duplicate handling needed to prioritize elements being inserted to the existing array. The case for that was adding an updated element to the existing array. In general, sounded like a leet code exercise, but something what I actually needed.
The fact that we are dealing with structs and need to take care of duplicates, then one way for that would be rebuilding the resulting array every time when merging new elements. Looping over existing elements allows doing the duplicate detection and in the end, we just need to loop over existing elements once and new elements twice (twice due to duplicates handling). Identification for elements are served by an id property. Since we’ll rebuild the resulting array we need a way to figure out how to sort elements, therefore, we can use a typical areInIncreasingOrder closure familiar from other sort related APIs. Since we discussed using id for identification, we require that Array elements conform to Identifiable protocol.
This file contains hidden or bidirectional Unicode text that may be interpreted or compiled differently than what appears below. To review, open the file in an editor that reveals hidden Unicode characters.
Learn more about bidirectional Unicode characters
This interface will allow us to detect duplicates and keep the resulting array sorted after inserting new elements.
The core of the function is looping over existing array and new/other elements and adding the smaller element to the resulting array. Then advancing the index of the existing array or the new/other elements array, depending on which was just inserted, to the resulting array. One of the requirements is that we should prefer elements from the new/other elements array. Therefore, each time we try to add an element from the existing array to the resulting array, we should check that this element is not present in the new/other elements array. Such lookup is easy to implement with a Set which contains ids of all the elements in the new elements array. If we put everything together, the function looks like this.
This file contains hidden or bidirectional Unicode text that may be interpreted or compiled differently than what appears below. To review, open the file in an editor that reveals hidden Unicode characters.
Learn more about bidirectional Unicode characters
Here is an example of how to use it. The example involves inserting elements where some are duplicates, with one of the properties has changed.
This file contains hidden or bidirectional Unicode text that may be interpreted or compiled differently than what appears below. To review, open the file in an editor that reveals hidden Unicode characters.
Learn more about bidirectional Unicode characters
Many apps use API keys when authenticating network requests. Although there are better ways of authenticating requests like OAuth with PKCE, but it might not always be possible. One thing what we must keep in mind is that it is fairly simple to extract strings from IPA files and therefore, if we store API keys in code, someone else can get access to these. This is of course a security issue. One of the approaches how to avoid it is using Apple’s on-demand resources with prefetching enabled. This means that as soon as we install the app, iOS will download additional resources separately and these resources can contain our API keys. This separation enables not putting any API keys into the IPA file. No one can go and inspect the IPA file any more and try to extract string constants. Let’s see how to set it up.
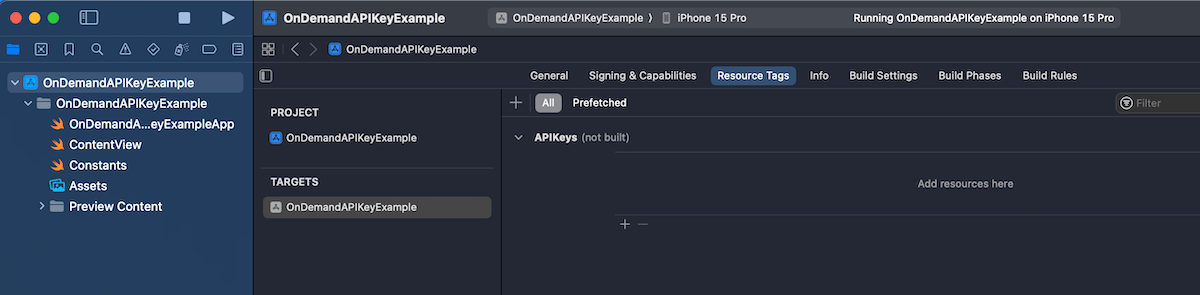
First step is that we create a prefetching enabled tag. Apple uses tags to identify on-demand resources. Open your Xcode project settings, app target and then “Resource Tags” tab. Let’s add a new resource tag named “APIKeys”.
The next step is to attach a resource to the tag. We’ll use a JSON file for our API keys, so go ahead and add a new JSON file for API keys. We’ll just create a key-value pairs in that file and assign a resource tag to the file, which can be found in the utilities area > file inspector tab. In our example, the tag has the same name as the file “APIKeys”.
So far we have created a resource tag and assigned a tag to the JSON file. The default behaviour is that the tag is treated as on-demand resource and only downloaded when it is required by the app. With API keys, it makes sense to download it along with the app binary when the user installs that app. Then on the first launch we can immediately store the API key in keychain for future usage. Prefetching can be enabled in the “Resource Tags” tab. Tap on the “Prefetched” button and drag the “APIKeys” tag under “Initial Install Tags”.
An important thing to note is that even though we have set that tag to be part of initial install tags there is still the possibility that the tag has been purged. This happens when the user installs the app and then waits a long time. In that case, the system needs to go and download it again when we want to access it. Therefore, the code accessing the tag could still take some time. Let’s see a simple function which accesses the JSON file through NSBundleResourceRequest API and makes the API keys available for the app.
This file contains hidden or bidirectional Unicode text that may be interpreted or compiled differently than what appears below. To review, open the file in an editor that reveals hidden Unicode characters.
Learn more about bidirectional Unicode characters
With a setup like this, we need to make sure that the loadAPIkeys function is called before we access mySecretAPIKey and mySecretAPIKey2. If we have a centralized place for network requests, let’s say some networking module which wraps URLSession then that could be an excellent place where to run this async code. Another way could be delaying showing the main UI before the function completes. Personally, I would go for the former and integrate it into the networking stack.
If we go to Apple’s documentation for URL’s init(string:) method, then this comes with a huge yellow banner describing new behaviour in iOS 17.
For apps linked on or after iOS 17 and aligned OS versions, URL parsing has updated from the obsolete RFC 1738/1808 parsing to the same RFC 3986 parsing as URLComponents. This unifies the parsing behaviors of the URL and URLComponents APIs. Now, URL automatically percent- and IDNA-encodes invalid characters to help create a valid URL.
Switching to the newer URL specification is a big deal, and in addition, the last sentence says that the new default is that URL(string:) tries to encode invalid characters. This is a big deal. This was not a case before. If we want to keep using the pre-iOS 17 behaviour, then we would need to replace URL(string:) with the new URL(string:encodingInvalidCharacters:) and passing false to the second argument. Apps which deals with URL strings definitely need to be tested thoroughly on iOS 17.
// iOS 16
URL(string: "my string") -> nil
// iOS 17
URL(string: "my string") -> my%20string
but
URL(string: "my string", encodingInvalidCharacters: false) -> nil
I have a tiny Swift package, what I have been using for reading and writing data on disk. Data is written to a subfolder in the documents folder. Beginning with iOS 16 there is a new way how to create that URL. It is such a tiny addition to what should have been there a long time ago.
This file contains hidden or bidirectional Unicode text that may be interpreted or compiled differently than what appears below. To review, open the file in an editor that reveals hidden Unicode characters.
Learn more about bidirectional Unicode characters
Here we can see that instead of a throwing function which has 4 parameters, we can replace it with a non-throwing type property. Finally! Not sure why it gives me so much happiness, maybe because I always forget the URL API whenever I need it.
This file contains hidden or bidirectional Unicode text that may be interpreted or compiled differently than what appears below. To review, open the file in an editor that reveals hidden Unicode characters.
Learn more about bidirectional Unicode characters
KeyPathComparator was added to Foundation in iOS 15 and macOS 12. The KeyPathComparator is used by defining a key path which is used for fetching a value for comparison. Values are then compared with a SortComparator. In the simplest form we do not need to create the SortComparator ourselves and instead, ComparableComparator is created automatically. But if the value is String then String.StandardComparator.localizedStandard is used instead of ComparableComparator. All in all it is pretty much the similar to NSSortDescriptor which was used for sorting NSArray and NSMutableArray. New comparator types on the other hand can be used with many more types.
Using KeyPathComparator
As an example, let’s take a case of having an array of Player types where each player has played two rounds and therefore have two different scores. Additionally, each player type stores a competitor number as well.
This file contains hidden or bidirectional Unicode text that may be interpreted or compiled differently than what appears below. To review, open the file in an editor that reveals hidden Unicode characters.
Learn more about bidirectional Unicode characters
If we want to sort the array of players by first and second round scores then it goes like this (note that order is set to reverse which gives us descending order):
This file contains hidden or bidirectional Unicode text that may be interpreted or compiled differently than what appears below. To review, open the file in an editor that reveals hidden Unicode characters.
Learn more about bidirectional Unicode characters
Here we can see that sequences have sorted(using:) functions which take in either one comparator or several. An example of using several comparators is sorting the same players array by the highest score first and if two or more players hace the same highest score, then sorting by the worst score from these two rounds.
This file contains hidden or bidirectional Unicode text that may be interpreted or compiled differently than what appears below. To review, open the file in an editor that reveals hidden Unicode characters.
Learn more about bidirectional Unicode characters
WWDC’21 brought new APIs for creating attributed strings. AttributedString is a new value type which provides a type-safe API for dealing with attributes, its also localizable, supports limited amount of Markdown syntax, and can be even archived and unarchived thanks to the Codable support. In this blog post, we’ll take a look at the new API and will compose some attributed strings.
An AttributedString with attributes applied to multiple ranges.
The attributed string visible above contains multiple attributes starting with background color attribute and finishing with a link attribute. In the snippet below we can find different ways how to set attributes: searching for a range, manually creating a range, using AttributedContainer for setting multiple attributes at once, and also setting attributes to the whole string. As this string is displayed in a SwiftUI view then all the used attributes are part of the SwiftUI attribute scope.
This file contains hidden or bidirectional Unicode text that may be interpreted or compiled differently than what appears below. To review, open the file in an editor that reveals hidden Unicode characters.
Learn more about bidirectional Unicode characters
If we would like to see the ranges attributes were set to, we can use the runs API. A single run is a set of attributes shared by a single range. If we print all the runs, in this case 9, then it would look like this:
The {
	NSLanguage = en
	NSPresentationIntent = [paragraph (id 1)]
	SwiftUI.Font = Font(provider: SwiftUI.(unknown context at $7fff5bb7d400).FontBox<SwiftUI.Font.(unknown context at $7fff5bbfdb68).SystemProvider>)
	SwiftUI.BackgroundColor = indigo
}
 quick  {
	SwiftUI.Font = Font(provider: SwiftUI.(unknown context at $7fff5bb7d400).FontBox<SwiftUI.Font.(unknown context at $7fff5bbfdb68).SystemProvider>)
	NSLanguage = en
	NSPresentationIntent = [paragraph (id 1)]
}
brown {
	NSPresentationIntent = [paragraph (id 1)]
	NSLanguage = en
	SwiftUI.Font = Font(provider: SwiftUI.(unknown context at $7fff5bb7d400).FontBox<SwiftUI.Font.(unknown context at $7fff5bbfdb68).SystemProvider>)
	SwiftUI.ForegroundColor = brown
}
 fox  {
	SwiftUI.Font = Font(provider: SwiftUI.(unknown context at $7fff5bb7d400).FontBox<SwiftUI.Font.(unknown context at $7fff5bbfdb68).SystemProvider>)
	NSLanguage = en
	NSPresentationIntent = [paragraph (id 1)]
}
jumps {
	SwiftUI.UnderlineColor = cyan
	NSLanguage = en
	SwiftUI.Kern = 5.0
	SwiftUI.BaselineOffset = 4.0
	SwiftUI.Font = Font(provider: SwiftUI.(unknown context at $7fff5bb7d400).FontBox<SwiftUI.Font.(unknown context at $7fff5bbfdb68).SystemProvider>)
	NSPresentationIntent = [paragraph (id 1)]
	NSUnderline = NSUnderlineStyle(rawValue: 256)
}
 over the  {
	SwiftUI.Font = Font(provider: SwiftUI.(unknown context at $7fff5bb7d400).FontBox<SwiftUI.Font.(unknown context at $7fff5bbfdb68).SystemProvider>)
	NSLanguage = en
	NSPresentationIntent = [paragraph (id 1)]
}
lazy {
	SwiftUI.StrikethroughColor = yellow
	SwiftUI.Font = Font(provider: SwiftUI.(unknown context at $7fff5bb7d400).FontBox<SwiftUI.Font.(unknown context at $7fff5bbfdb68).SystemProvider>)
	NSLanguage = en
	NSPresentationIntent = [paragraph (id 1)]
	NSStrikethrough = NSUnderlineStyle(rawValue: 1)
}
  {
	SwiftUI.Font = Font(provider: SwiftUI.(unknown context at $7fff5bb7d400).FontBox<SwiftUI.Font.(unknown context at $7fff5bbfdb68).SystemProvider>)
	NSLanguage = en
	NSPresentationIntent = [paragraph (id 1)]
}
dog {
	NSLink = https://www.apple.com
	SwiftUI.Font = Font(provider: SwiftUI.(unknown context at $7fff5bb7d400).FontBox<SwiftUI.Font.(unknown context at $7fff5bbfdb68).SystemProvider>)
	NSLanguage = en
	NSPresentationIntent = [paragraph (id 1)]
}
The new AttributedString API also supports custom attributes. Custom attributes need to conform to a AttributeStringKey protocol in bare minimum. But when we would like to benefit from using the custom attribute in Markdown and also allowing to decode and encode it to data with Codable then we would need to conform to MarkdownDecodableAttributedStringKey and CodableAttributedStringKey respectively. In a simple example, let’s create a new attribute named MessageAttribute which can store a value of Message struct with id and value fields. The MessageAttribute needs to define the type it stores and a name used when encoding and decoding. In addition, we’ll need to add a new attribute scope which contains the new attribute. As we intend to use the new attribute in a SwiftUI app then we’ll add swiftUI attributes to the scope as well.
This file contains hidden or bidirectional Unicode text that may be interpreted or compiled differently than what appears below. To review, open the file in an editor that reveals hidden Unicode characters.
Learn more about bidirectional Unicode characters
With this set we can create attributed strings with this attribute either using markdown syntax or adding the attribute manually. Markdown syntax for custom attributes uses caret followed with square brackets and with the content in brackets after that. We also need to make sure to pass custom attribute scope into the AttributedString initializer as well. One thing what I have not figured out is how to create a completely custom appearance for custom attributes in SwiftUI views, like we can do in UIKit views.
This file contains hidden or bidirectional Unicode text that may be interpreted or compiled differently than what appears below. To review, open the file in an editor that reveals hidden Unicode characters.
Learn more about bidirectional Unicode characters
This file contains hidden or bidirectional Unicode text that may be interpreted or compiled differently than what appears below. To review, open the file in an editor that reveals hidden Unicode characters.
Learn more about bidirectional Unicode characters
We took a look on AttributedString, AttributeContainer, AttributeScope, and created attributed strings with the new API. With this knowledge, we got going with the new API and can continue exploring it further. The last thing to mention is that AttributedString can be converted to and from NSAttributedString with breeze.
I was looking at formatters provided by Foundation framework and this time I would like to put some attention on MeasurementFormatter. Like the name says, it is used for creating localized strings of some sort of measurements. Measurements are represented by a generic struct Measurement where the generic UnitType describes the unit represented by it. Apple provides an Unit subclass Dimension which in turn has a many subclasses on its own. At the time of writing there are 22 dimensional units available with each of those having multitude of related units. For example, UnitDuration provides units for seconds, minutes, and hours. The full list of Apple provided dimensions are available in a table here: Dimension.
Using MeasurementFormatter
MeasurementFormatter is simple to use. If we change the unitStyle property then we can configure how the unit is spelled in the localized string.
This file contains hidden or bidirectional Unicode text that may be interpreted or compiled differently than what appears below. To review, open the file in an editor that reveals hidden Unicode characters.
Learn more about bidirectional Unicode characters
MeasurementFormatter also has an unitOptions property which controls the way how the final string is composed when taking account the current locale. For example, if locale is set to en_US then UnitTemperature measurement is formatted in Fahrenheits. If locale is set to en_GB then the measurement returns Celsius.
This file contains hidden or bidirectional Unicode text that may be interpreted or compiled differently than what appears below. To review, open the file in an editor that reveals hidden Unicode characters.
Learn more about bidirectional Unicode characters
MeasurementFormatter selecting output unit based on the locale.
In case we would like to make sure the same unit is used, then we can use the providedUnit option.
This file contains hidden or bidirectional Unicode text that may be interpreted or compiled differently than what appears below. To review, open the file in an editor that reveals hidden Unicode characters.
Learn more about bidirectional Unicode characters
Another thing to note is that the Measurement type also supports comparing measurements and mathematical operations. For example, we can add two measurements.
This file contains hidden or bidirectional Unicode text that may be interpreted or compiled differently than what appears below. To review, open the file in an editor that reveals hidden Unicode characters.
Learn more about bidirectional Unicode characters
MeasurementFormatter is built in a way that it can support custom units as well. We could create a pseudo unit for a children’s game named UnitBanana.
This file contains hidden or bidirectional Unicode text that may be interpreted or compiled differently than what appears below. To review, open the file in an editor that reveals hidden Unicode characters.
Learn more about bidirectional Unicode characters
MeasurementFormatter and Measurement types create a powerful combination which can be used for creating localized strings of values with an unit. Next time when you need to present a value with an unit, then check out the MeasurementFormatter first.