Categories
iOS macOS Swift Xcode

Performance testing using XCTMetric

XCTMetric enables creating tests with measure blocks collecting information about CPU, memory and disk. In this post we’ll write UI-tests measuring a button tap what triggers writing to disk, allocating larger amount of memory and applying filters what requires CPU to do more work. It should be noted that XCTMetric can also be used in unit-tests.

Method under the test

The method we are going to write performance tests against is a simple method dealing with loading an image, writing data to disk, applying CIFilter and writing processed image to disk. In this example case, everything runs on a main thread what probably would not be a case in a real application.

@IBAction func process(_ sender: Any) {
	let image = UIImage(named: "Image")!
	imageStorage.store(image, filename: "original")
        
	let processedImage = ImageProcessor.processImage(image)
	imageStorage.store(image, filename: "processed")
	processedImageView.image = processedImage
}

XCTClockMetric for measuring taken time

XCTClockMetric is for measuring time taken by the block. Useful for catching regressions in longer running operations.

func testCalculateWithClockMetric() {
	let app = XCUIApplication()
	app.launch()
	measure(metrics: [XCTClockMetric()]) {
		app.buttons["Process"].tap()
	}
}

XCTCPUMetric for measuring CPU utilization

XCTCPUMetric measures CPU activity and output 3 different results: CPU time, CPU cycles and CPU instructions retired. CPUs have a feature called speculative execution what means that more instructions are completed than the actual program flow requires. Retired instructions are the instructions which were actually needed by the flow of the program. This feature speeds up the program execution as CPU can process data ahead of time. Example case would be if else where CPU processes both branches but only one branch is valid in the program flow.

func testCalculateWithCPUMetric() {
	let app = XCUIApplication()
	app.launch()
	measure(metrics: [XCTCPUMetric(application: app)]) {
		app.buttons["Process"].tap()
	}
}

XCTMemoryMetric for measuring allocated memory

XCTMemoryMetric measures allocated physical memory useful for testing operation allocating significant amount of memory (processing images).

func testCalculateWithMemoryMetric() {
	let app = XCUIApplication()
	app.launch()
	measure(metrics: [XCTMemoryMetric(application: app)]) {
		app.buttons["Process"].tap()
	}
}

XCTStorageMetric for measuring disk usage

XCTStorageMetric measures bytes written to the disk.

func testCalculateWithStorageMetric() {
	let app = XCUIApplication()
	app.launch()
	measure(metrics: [XCTStorageMetric(application: app)]) {
		app.buttons["Process"].tap()
	}
}

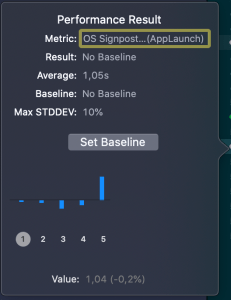
XCTOSSignpostMetric for measuring time between signposts

Apple provides signpost metric for application launch time for making it easy to add performance test measing launch time. In WWDC’19 session “Optimizing app launch” the suggested goal is 400 ms which is the duration of the app launch animation. XCTOSSignpostMetric has initializer for custom signpost as well.

func testLaunchPerformance() {
	if #available(macOS 10.15, iOS 13.0, tvOS 13.0, *) {
		measure(metrics: [XCTOSSignpostMetric.applicationLaunch]) {
			XCUIApplication().launch()
		}
	}
}

Summary

XCTMetric enables writing performance tests for performance critical parts of the application. We took a look at CPU, memory, storage and signpost metrics.

If this was helpful, please let me know on Mastodon@toomasvahter or Twitter @toomasvahter. Feel free to subscribe to RSS feed. Thank you for reading.

Example

MeasuringInTests (Xcode 11.3)

Categories
Swift Xcode

Basic debugging in Xcode

Printing object description

Probably the most used command when debugging apps is po. It evaluates the expression and prints out the object description. When printing custom objects, it should be noted that the format of the result can be customised by implementing debugDescription in CustomDebugStringConvertible protocol.

Modifying code in runtime

LLDB’s expression command allows executing code when hitting a breakpoint. It is very useful for changing internal state of the app for reproducing hard to catch issues. For example, in a game there is a button combo or custom gesture what triggers a specific code path. Reproducing it can be time consuming and alternatively we can change the state of the app to always trigger it (e.g. calling a function when tapping on the screen). Another use-case is rapid prototyping. When fine-tuning animations, we can change values of the animation using a breakpoint and then triggering it from the app. Time saved by not rerunning the app after changing one value. In the example above, we are changing CAEmitterCell’s velocity property from 80 to 160.

Symbolic breakpoints

Symbolic breakpoints are helpful when stopping execution when specific function is called. Symbolic breakpoints can be added by opening breakpoint navigator in Xcode -> add button -> Symbolic breakpoint. Example above sets breakpoint to Objective-C method as QuartzCore is written in Objective-C. Example below illustrates symbolic breakpoint of a Swift function. When Objective-C symbolic breakpoint stops the execution, we can use $arg1 for printing out self.

Conditional breakpoint

Another very useful feature is setting conditional breakpoints. We can just write boolean expression to the condition field and LLDB will stop execution when it evaluates to true. Very useful when dealing with loops and trying to catch a specific case.

Summary

I would consider mentioned tips as the basic knowledge when debugging apps in Xcode. Many of those techniques can help to save tremendous amount of time as we do not need to rerun the app so often and we can skip reproducing the error condition in the app manually.

If this was helpful, please let me know on Mastodon@toomasvahter or Twitter @toomasvahter. Feel free to subscribe to RSS feed. Thank you for reading.

Resources

Categories
iOS Xcode

Hashing data using CommonCrypto and SHA256

Looking for hashing data using CryptoKit? Please navigate to here.

In this post we will look into how to add CommonCrypto to a Xcode project and how to generate hash using SHA256.

Adding CommonCrypto as a module

Note: Since Swift 4.2, this step is not necessary and manually added CommonCrypto module must be removed.

CommonCrypto library can be added in two ways: importing it in the Objective-C bridging header or by using module maps.
The first option makes sense for projects having both Objective-C and Swift code. In this case Objective-C bridging header is already part of the project and therefore adding #import to the bridging header is the quickest way.
The second option is more suitable for pure Swift projects as it enables to avoid adding the bridging header (although it is up for everyone’s preference).
Adding CommonCrypto as a module consists of two steps. Firstly, we need to create a folder named ‘CommonCrypto’ in the same folder as the Xcode project file is. Then we need to create a file ‘module.map’ and save it to ‘CommonCrypto’ folder.

module CommonCrypto [system] {
header "/Applications/Xcode.app/Contents/Developer/Platforms/iPhoneOS.platform/Developer/SDKs/iPhoneOS.sdk/usr/include/CommonCrypto/CommonCrypto.h"
export *
}
view raw module.map hosted with ❤ by GitHub
CommonCryptoModuleInProject

Secondly, we need to open the project in Xcode, then navigating to ‘Build Settings’ of the target and adding $(PROJECT_DIR)/CommonCrypto/ to ‘Import Paths’.

CommonCryptoImportPaths

That’s it, now Xcode knows where the module is located and it can be imported in Swift files.

Hashing data using SHA256 algorithm

CommonCrypto contains a function named CC_SHA256(…) what takes in data, the count of bytes and gives a pointer to the hash of the data. As the function operates on the data, it makes sense to extend Data. We’ll add a function what can be later on extended for adding support for other hashing algorithms as well (see here for other algorithms).

import Foundation
import CommonCrypto
extension Data {
enum Algorithm {
case sha256
var digestLength: Int {
switch self {
case .sha256: return Int(CC_SHA256_DIGEST_LENGTH)
}
}
}
func hash(for algorithm: Algorithm) -> Data {
let hashBytes = UnsafeMutablePointer<UInt8>.allocate(capacity: algorithm.digestLength)
defer { hashBytes.deallocate() }
switch algorithm {
case .sha256:
withUnsafeBytes { (buffer) -> Void in
CC_SHA256(buffer.baseAddress!, CC_LONG(buffer.count), hashBytes)
}
}
return Data(bytes: hashBytes, count: algorithm.digestLength)
}
}
if let someData = "Random string".data(using: .utf8) {
let hash = someData.hash(for: .sha256)
print("hash=\(hash.base64EncodedString()).")
}
// hash=LclzKS0NtZFSuwQF5H2FpTralr75LsjrnE3et2LxkHs=.
view raw Hashing.swift hosted with ❤ by GitHub

Example project can be found on GitHub (CommonCryptoExample).

If this was helpful, please let me know on Mastodon@toomasvahter or Twitter @toomasvahter. Feel free to subscribe to RSS feed. Thank you for reading.

Categories
iOS ReactiveSwift Xcode

Getting started with ReactiveSwift

Aim of the tutorial is to get started with ReactiveSwift without any previous setup except having Xcode installed. We will go through how to install it using Carthage package manager, add it to an iOS project and then observing a change of a property.

Installing Carthage

First we need to have Carthage installed. If it is not installed, you can use Homebrew and in Terminal running
brew install carthage

Creating a project with Reactive Swift

Building ReactiveSwift

Open Xcode and use single view iOS app template, let’s name it “ReactiveSwiftObservingProperty”. Then we need to create Cartfile what contains reference to ReactiveSwift. For that, open a preferred text editor, add
github "ReactiveCocoa/ReactiveSwift" ~> 3.0
and save it to the same folder as the project file with a name Cartfile. If this is done, open Terminal and navigate to the same folder and run
carthage update --platform iOS
The output of the command will look something like:
*** Cloning ReactiveSwift
*** Cloning Result
*** Checking out ReactiveSwift at "3.1.0"
*** Checking out Result at "3.2.4"
*** xcodebuild output can be found in /var/folders/fp/69n6gr652cvgyt5_rnf7_6dh0000gn/T/carthage-xcodebuild.DJayGE.log
*** Building scheme "Result-iOS" in Result.xcodeproj
*** Building scheme "ReactiveSwift-iOS" in ReactiveSwift.xcworkspace

Adding ReactiveSwift to the Xcode project

Now we have ReactiveSwift built and we can find the frameworks in /Path-to-Xcode-project-file/Carthage/Build/iOS/. Drag and drop ReactiveSwift.framework and Result.framework to “Linked Frameworks and Libraries”.

ReactiveSwiftXcodeCopyFrameworks

Then add a new build phase using the plus button in “Build Phases” tab which will copy the frameworks to the application’s bundle.

Script:
/usr/local/bin/carthage copy-frameworks

Input files:
$(SRCROOT)/Carthage/Build/iOS/Result.framework
$(SRCROOT)/Carthage/Build/iOS/ReactiveSwift.framework

Output files:
$(BUILT_PRODUCTS_DIR)/$(FRAMEWORKS_FOLDER_PATH)/Result.framework
$(BUILT_PRODUCTS_DIR)/$(FRAMEWORKS_FOLDER_PATH)/ReactiveSwift.framework

ReactiveSwiftCopyFrameworksBuildPhase

Reacting to property changes

For demonstrating reacting to change of a property we first add an object called Pantry what just stores an array of jams. We make it a MutableProperty as later on we want to change the array of jams and observe the change.

import Foundation
import ReactiveSwift
final class Pantry {
let jams = MutableProperty([Jam(flavour: .apple)])
func add(jam: Jam) {
jams.value.append(jam)
}
}
struct Jam {
enum Flavour: String {
case apple, orange
}
let flavour: Flavour
init(flavour: Flavour) {
self.flavour = flavour
}
}
view raw Pantry.swift hosted with ❤ by GitHub

In this very simple case of observing changes we will look into Signal and SignalProducer. MutableProperty has both Signal and SignalProducer and in our example we will use Signal when we just want to know when the array of jams changes and SignalProducer when want to react to the initial value.

final class ViewController: UIViewController {
@IBOutlet weak var textView: UITextView!
let pantry = Pantry()
override func viewDidLoad() {
super.viewDidLoad()
// SignalProducer runs the closure immediately.
pantry.jams.producer.startWithValues { [weak self] (jams) in
self?.textView.text = jams.map({ $0.flavour.rawValue }).joined(separator: ", ")
}
// Signal runs the closure only when the property changes.
pantry.jams.signal.observeValues { (jams) in
print("Pantry has \(jams.count) jars of jam.")
}
pantry.add(jam: Jam(flavour: .orange))
}
@IBAction func addJam(_ sender: Any) {
pantry.add(jam: Jam(flavour: .apple))
}
}

When running the example project and tapping on the “Add More Jam” button, the number of jams is printed to the console and text view updates to show the flavours of all the jams currently in the pantry.

ReactiveSwiftObservePropertyApp

In this blog post we learned how to fetch and build ReactiveSwift using Carthage, how to add it to a Xcode project and finally reacting to changes of a property. This is just a glimpse of ReactiveSwift!
Thank you for reading.

Download the example project.

References

Categories
Xcode

Light Xcode Theme

I got tired of using dark themes and as there were no light themes I liked, I decided to create my own. I present a light Xcode theme to you: Augmented Code. Go ahead and give it a try!