It is important to have stable unit-tests and UI-tests since no-one wants to encounter failures in tests which happen non-deterministically. Many of the iOS apps rely on networking, and therefore the content depends on what is fetched from servers. The last thing what we want to see is that an API outage or instability affects UI-tests. This time we’ll take a look at how to mock networking in UI-tests which differs from mocking networking in unit-tests since the whole app is going to be running as is and is controlled by a separate UI-testing runner app. A while ago I also covered unit-testing part in Testing networking code with custom URLProtocol on iOS, please take a look at that post for more information since we’ll be using the same custom URL protocol approach.
The main difference between unit-tests and UI-tests is that with unit-tests Xcode injects the unit-testing code into the app and then runs tests. UI-testing on the other hand rely on a separate test runner app which uses accessibility APIs for driving the user-interface in the app. This means that our network mocking code needs to be bundled with the app when we build it. The approach we are going to use is setting up a separate “UITestingSupport” Swift package, which is included only in debug builds. This library contains mocked data and configures the custom URL protocol and handles any network requests. Please see Linking a Swift package only in debug builds for more information on how to only link a package in debug builds.
I’ll be using a sample app “UITestingNetworking” for demonstrating how to set it up. The app has an app target and a local Swift package with a name “UITestingSupport”.
Xcode project layout with UITestingSupport package.
The first piece of the “UITestingSupport” package is a custom URLProtocol. All it does is providing a way to return either error or URLResponse and Data for a URLRequest. It is a simplified protocol. In an actual app we would want to control which requests are handled by it and which are not. Either because it is way too difficult to mock all the network request in all the tests at first, or we might also want to have some tests using an actual data coming from servers.
This file contains hidden or bidirectional Unicode text that may be interpreted or compiled differently than what appears below. To review, open the file in an editor that reveals hidden Unicode characters.
Learn more about bidirectional Unicode characters
The second piece of the library is a UITestingNetworkHandler class which the app code will call, and it configures the custom URLProtocol and starts providing responses based on the “responseProvider” callback.
This file contains hidden or bidirectional Unicode text that may be interpreted or compiled differently than what appears below. To review, open the file in an editor that reveals hidden Unicode characters.
Learn more about bidirectional Unicode characters
Simple example of providing response for a URLRequest.
The example above just handles one network request. For larger apps we probably want to have more component based implementation here since this file would otherwise grow a lot based on how many cases we want to handle. Another thing to note is that in some tests we want to mimic network request failures and in others successful requests but with different response data. This is not shown above, but can be implemented by providing the expected configuration flag through environment variables. XCUIApplication has a launchEnvironent property what we can set and then reading that value in the UITestingNetworkHandler with Process environment property. I’m thinking something like “MyAppAPIExampleResponseType” which equals to a number or some identifier.
The last piece is to call the register code when we are running the app in UI-tests.
This file contains hidden or bidirectional Unicode text that may be interpreted or compiled differently than what appears below. To review, open the file in an editor that reveals hidden Unicode characters.
Learn more about bidirectional Unicode characters
Calling register only in debug builds and when a launch argument is set by the runner app.
And finally, an example UI-test which taps a button which in turn fetches some data from the network and then just displays the raw data in the app.
This file contains hidden or bidirectional Unicode text that may be interpreted or compiled differently than what appears below. To review, open the file in an editor that reveals hidden Unicode characters.
Learn more about bidirectional Unicode characters
Creating screenshots manually for App Store is time consuming because of the number of devices and localisations. Moreover, as soon as UI changes we would need to update screenshots again. Therefore, it is best to automate the process. One way is to use fastlane and creating nice device framed screenshots with additional localised text. This time we’ll see how to add fastlane to existing project, setting up UI-testing target, scheme for App Store screenshot tests, and framing screenshots with additional text.
End result of a framed screenshot with additional text.
Installing required tools
First step is installing fastlane and as frameit command requires imagemagick, let’s install it now as well. When using homebrew installation goes as: brew install fastlane imagemagick.
Adding UI-testing target
Fastlane uses UI-tests for displaying views and then capturing screenshots. If project does not have UI-testing target set up, then this is the first step. In Xcode, open add target view (File > New > Target), choose UI-Testing Bundle and add it to the project. In our case the testing target’s name is FastlaneAppStoreScreenshotsUITests.
Support files for capturing screenshots
First thing we’ll do with fastlane is running the fastlane snapshot init command in the project folder. It will generate 2 files: Snapfile and SnapshotHelper.swift. First one contains configuration for snapshot command: devices, locales etc. Helper file we’ll move to UI-testing target: first drag it to testing target folder (FastlaneAppStoreScreenshotsUITests) and then to Xcode’s file navigator. Make sure to add it to the UI-testing target. Create subfolder named fastlane and move Snapfile to there. We’ll modify it a little bit later.
Project structure after adding UI-testing target and supporting SnapshotHelper.swift
Adding UI-test case for screenshots
We are going to define tests generating App Store screenshots in a separate XCTestCase. In Xcode, add a new UI-test case class (File > New File > UI-Test Case Class) and name it to AppStoreScreenshotUITests.
Best is when it is possible to record a UI-test which does not need any special configuration: launch the app, tap here and there, take a screeshot. In more complicated apps, we need to use launch arguments and configuring the app when it launches based on the launch arguments. In document based apps it might be needed to bundle example files in the app and then using launch arguments for choosing the file to open when running the test.
Firstly, let’s add 3 UI-tests which will cover 3 different views and calling the function snapshot(“file_name”) which is part of the SnapshotHelper.swift and handles creating screenshots and storing them in the folder specified by Snapfile.
final class AppStoreScreenshotUITests: XCTestCase {
    private var app: XCUIApplication!

    override func setUpWithError() throws {
        continueAfterFailure = false
        app = XCUIApplication()
        // Example of passing in launch arguments which can be read in the app
        // by calling CommandLine.arguments.contains("--uitesting")
        // app.launchArguments.append("--uitesting")
        setupSnapshot(app)
        app.launch()
    }

    override func tearDownWithError() throws {
        app = nil
    }

    func testScreenshot1() throws {
        snapshot("1-mainview")
    }

    func testScreenshot2() throws {
        XCTAssertTrue(app.buttons["Button1"].waitForExistence(timeout: 10))
        app.buttons["Button1"].tap()
        snapshot("2-sheet1")
    }

    func testScreenshot3() throws {
        XCTAssertTrue(app.buttons["Button2"].waitForExistence(timeout: 10))
        app.buttons["Button2"].tap()
        snapshot("3-sheet2")
    }
}
Separate scheme for App Store screenshots
UI-tests are set up for App Store screenshots, next is to add a separate scheme and adding those tests to the Test action. This scheme is the one fastlane is going to use for running tests.
For adding a new scheme, open manage schemes view (Product > Scheme > Manage Schemes). Click on the + button, select the app target and name it to AppStoreScreenshots.
AppStoreScreenshots scheme in Manage Scheme view.
After that, select the scheme and click on the Edit, open Test action and select only App Store tests. Also make sure the Shared checkbox is selected for allowing fastlane to run it.
Selecting tests in Test action for AppStoreScreenshots schemes.
Configuring Snapfile
Snapfile contains configuration for the snapshot command. There we define all the devices, locales, scheme name, location where to store generated screenshots etc. For getting started, we can start with one locale and two devices. We also need to select the scheme we added before.
App Store screen generation contains of two main steps: capturing screenshots and framing those. Fastfile allows us to create custom commands, lanes, and it is useful of adding one for app store screenshots. Create a file named Fastfile and add it to previously created Fastlane folder.
default_platform(:ios)

platform :ios do
  desc 'Generate App Store screenshots'
  lane :app_store_screenshots do
    capture_screenshots(
      clean: true
    )
    frame_screenshots
  end
end
Running fastlane app_store_screenshots will then generate screenshots and create framed versions as well. If you run it now, you’ll get screenshots with and without device frames.
Adding titles and keyword to framed screenshots
Now we have nice framed screenshots, only what is missing is adding some text to all the screenshots. If we ran fastlane app_store_screenshots in the previous step we can see that AppStoreScreenshots folder has appeared and taken screenshots are in the en-US folder. Adding text and background to each of the screenshot requires a couple of steps.
First we’ll create Framefile.json file in the AppStoreScreenshots folder which contains of configuration for frameit.
Default dictionary contains shared settings for every frame operation. We can customise by adding data array which contains screenshot specific configuration (more). Filter in data dictionaries are used for matching the configuration to screenshot files (filenames used in UI-tests). In this example we have different backgrounds for every screenshot (background files are in the same AppStoreScreenshots folder). Fonts are configured by adding a path to Framefile.json and storing fonts in a subfolder.
Localised titles and keywords are handled with strings files. We’ll need to add title.strings and keyword.strings to the locale folder, in our case, en-US. Keys in strings files work the same way as filters in Framefile.json, therefore partial match with filename works. Example strings file for title.strings is shown here:
I suggest creating strings files with Xcode making sure the file encoding is correct. If we run the fastlane app_store_screenshots command again, we’ll get nice framed screenshots with additional text.
Summary
Automating App Store screenshots with fastlane is not difficult to set up. The most difficult part in this process is writing UI-tests and providing proper data in the app which is highly app specific.
XCTMetric enables creating tests with measure blocks collecting information about CPU, memory and disk. In this post we’ll write UI-tests measuring a button tap what triggers writing to disk, allocating larger amount of memory and applying filters what requires CPU to do more work. It should be noted that XCTMetric can also be used in unit-tests.
Method under the test
The method we are going to write performance tests against is a simple method dealing with loading an image, writing data to disk, applying CIFilter and writing processed image to disk. In this example case, everything runs on a main thread what probably would not be a case in a real application.
XCTCPUMetric measures CPU activity and output 3 different results: CPU time, CPU cycles and CPU instructions retired. CPUs have a feature called speculative execution what means that more instructions are completed than the actual program flow requires. Retired instructions are the instructions which were actually needed by the flow of the program. This feature speeds up the program execution as CPU can process data ahead of time. Example case would be if else where CPU processes both branches but only one branch is valid in the program flow.
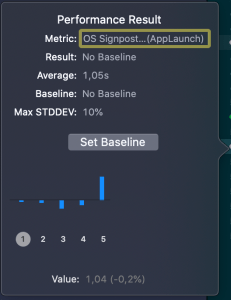
XCTOSSignpostMetric for measuring time between signposts
Apple provides signpost metric for application launch time for making it easy to add performance test measing launch time. In WWDC’19 session “Optimizing app launch” the suggested goal is 400 ms which is the duration of the app launch animation. XCTOSSignpostMetric has initializer for custom signpost as well.
XCTMetric enables writing performance tests for performance critical parts of the application. We took a look at CPU, memory, storage and signpost metrics.