View models in MVVM are responsible of making the model suitable for presenting by a view. Quite often model objects themselves have properties which can be directly presented by the view. SE-0195 added dynamic member lookup types. Using @dynamicMemberLookup we can add all the model object’s properties to the view model itself. Result, model.name is also accessible by calling name on the view model.
View model with @dynamicMemberLookup
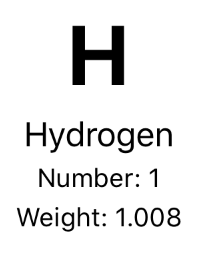
Example app presents chemical element: symbol, name, atomic number, and atomic weight. Model object’s properties which can be displayed without transformations are symbol and name. Atomic number and weight are transformed and label is prepended to a value.
View presenting properties of a chemical element.
struct ChemicalElement {
    let name: String // Hydrogen
    let symbol: String // H
    let atomicNumber: Int // 1
    let atomicWeight: Double // 1.008
}
View model is initialised with an instance of chemical element. What we would like to have is accessing all the data by asking it from view model: viewModel.name, viewModel.symbol, viewModel.numberDescription, viewModel.weightDescription. Dynamic member lookup enables us adding all the model object’s properties to the view model with only some lines of code. It makes a real difference if the model and view model have a way more data than in the current example.
struct ContentView: View {
    let viewModel: ContentViewModel

    var body: some View {
        VStack(spacing: 4) {
            Text(viewModel.symbol).font(.system(size: 42)).fontWeight(.bold)
            VStack(spacing: 4) {
                Text(viewModel.name)
                Group {
                    Text(viewModel.numberDescription)
                    Text(viewModel.weightDescription)
                }.font(.footnote)
            }
        }
    }
}
Let’s take a look on the view model. When view model is annotated with @dynamicMemerLookup, we’ll just need to implement one method. This is what is used to passing through model object’s data directly to the view. That is all we need to do for exposing model object’s properties on the view model level.
@dynamicMemberLookup
struct ContentViewModel {
    private let chemicalElement: ChemicalElement

    init(chemicalElement: ChemicalElement) {
        self.chemicalElement = element
    }

    subscript<T>(dynamicMember keyPath: KeyPath<ChemicalElement, T>) -> T {
        return chemicalElement[keyPath: keyPath]
    }

    var numberDescription: String {
        return "Number: \(chemicalElement.atomicNumber)"
    }

    var weightDescription: String {
        return "Weight: \(chemicalElement.atomicWeight)"
    }
}
Summary
Dynamic member lookup in Swift is useful addition to MVVM pattern when there is need to expose model’s properties directly to the view. When working with models with many properties, it is very useful.
Apps which integrate push or local notifications can customise notifications on Apple Watch. Let’s go through steps required for adding dynamic notifications on Apple Watch. Sample use case is an app which reminds when a plant needs watering. We’ll only concentrate on adding dynamic notification view and leave out sending local notifications from the iOS app.
Adding build target for rich notifications on Apple Watch
If Apple Watch app does not exist in the project the first step is to add it. In Xcode, we’ll add a new build target and configure it to include notification scene. In Xcode, open new target view: File>Target and select Watch App for iOS App template.
Watch App for iOS App template in File>Target.
Make sure SwiftUI is selected in the user interface selection and “Include Notification Scene” is also selected. We’ll embed it in the companion app so make sure current iOS app target is set to “Embed in Companion App”. As a side note, since iOS 13 and WatchOS 6, Apple Watch apps can be independent as well.
Watch App for iOS app build target configuration with notification scene.
Click on Finish and then Xcode will ask about activating the new scheme, click on active. It will just select the new target and we can build it right away. When inspecting the project, Xcode added two targets: watch app and extension. App contains storyboard and extension contains all the code. Storyboard is wired up so that the scene displays HostingController which is WKHostingController subclass and is responsible of hosting your SwiftUI view in the Apple Watch app. In addition, there are scenes for static and dynamic notifications. We are interested in creating dynamic notifications and in the Storyboard we can see that the dynamic view is provided by NotificationController (subclass of WKUserNotificationHostingController) which hosts SwiftUI view for the notification. There we can provide the custom interface for our user notification. Dynamic notification view is selected if the notification category matches with the one defined in the Storyboard.
Parsing notification payload and setting up dynamic notification view
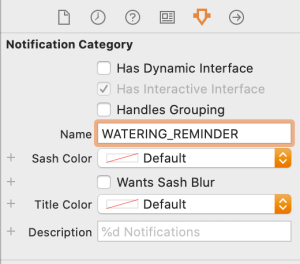
NotificationController’s responsibility is to consume user notification’s payload and configuring the SwiftUI view with it. User notification is provided by didReceive function and there we can extract the information needed for showing the view. When it comes to locally testing the dynamic view, we can add required data to the PushNotificationPayload.apns file. As we show information about plants, let’s add example plant object to the file. Also, we change category to something meaningful. Make sure to update Storyboard when setting new category.
Notification category in Storyboard for defining the connection to dynamic notification view.
Plant related information is available when accessing UNNotification’s request.content.userInfo. We can use Decodable and JSONDecoder for converting Dictionary representing the plant into value type. As JSONDecoder requires JSON data then we can first use JSONSerialization and then passing the JSON data to JSONDecoder. Alternatively we could also manually read values from the userInfo dictionary and then creating the value type. Note that we use view model for providing data to SwiftUI view and not the Plant type directly.
struct Plant: Decodable {
    let id: String
    let name: String
    let lastDate: Date
    let nextDate: Date
}

do {
	let plantInfo = notification.request.content.userInfo["plant"] as! [String: Any]
	let data = try JSONSerialization.data(withJSONObject: plantInfo, options: [])
	let decoder = JSONDecoder()
	decoder.dateDecodingStrategy = .secondsSince1970
	let plant = try decoder.decode(Plant.self, from: data)
	viewModel = NotificationViewModel(plant: plant)
}
catch let nsError as NSError {
	print(nsError.localizedDescription)
}
In addition, we would like to add 3 actions user can take: marking the plant as watered, deferring the reminder for couple of hours, or scheduling it for tomorrow. Actions are represented with instances of UNNotificationAction and when user taps on any of those, UNUserNotificationCenter’s delegate method is called with the identifier in the companion iOS app (userNotificationCenter(_:didReceive:withCompletionHandler:)).
let doneTitle = NSLocalizedString("NotificationAction_Done", comment: "Done button title in notification.")
let laterTitle = NSLocalizedString("NotificationAction_Later", comment: "Later button title in notification.")
let tomorrowTitle = NSLocalizedString("NotificationAction_Tomorrow", comment: "Tomorrow button title in notification.")
notificationActions = [
	UNNotificationAction(identifier: "water_done", title: doneTitle, options: []),
	UNNotificationAction(identifier: "water_later", title: laterTitle, options: []),
	UNNotificationAction(identifier: "water_tomorrow", title: tomorrowTitle, options: [])
]
The full implementation of the NotificationController becomes like this (including the creation of SwiftUI):
final class NotificationController: WKUserNotificationHostingController<NotificationView> {
    private var viewModel: NotificationViewModel?

    override var body: NotificationView {
        return NotificationView(viewModel: viewModel!)
    }

    override func didReceive(_ notification: UNNotification) {
        do {
            let plantInfo = notification.request.content.userInfo["plant"] as! [String: Any]
            let data = try JSONSerialization.data(withJSONObject: plantInfo, options: [])
            let decoder = JSONDecoder()
            decoder.dateDecodingStrategy = .secondsSince1970
            let plant = try decoder.decode(Plant.self, from: data)
            viewModel = NotificationViewModel(plant: plant)
        }
        catch let nsError as NSError {
            print(nsError.localizedDescription)
        }

        let doneTitle = NSLocalizedString("NotificationAction_Done", comment: "Done button title in notification.")
        let laterTitle = NSLocalizedString("NotificationAction_Later", comment: "Later button title in notification.")
        let tomorrowTitle = NSLocalizedString("NotificationAction_Tomorrow", comment: "Tomorrow button title in notification.")
        notificationActions = [
            UNNotificationAction(identifier: "water_done", title: doneTitle, options: []),
            UNNotificationAction(identifier: "water_later", title: laterTitle, options: []),
            UNNotificationAction(identifier: "water_tomorrow", title: tomorrowTitle, options: [])
        ]
    }
}
NotificationView presenting the dynamic notification
Previously mentioned view model NotificationViewModel provides text for NotificationView and it looks pretty simple, mainly dealing with creating strings with formatted dates. As we only want to show day and month then we need to create dateFormat using current locale.
struct NotificationViewModel {
    private let plant: Plant

    init(plant: Plant) {
        self.plant = plant
    }

    var title: String {
        return plant.name
    }

    var subtitle: String {
        return NSLocalizedString("NotificationView_Subtitle", comment: "Notification suggestion text")
    }

    private let dateFormatter: DateFormatter = {
        let formatter = DateFormatter()
        formatter.dateFormat = DateFormatter.dateFormat(fromTemplate: "dMMMM", options: 0, locale: .current)
        return formatter
    }()

    var lastWatering: String {
        let format = NSLocalizedString("NotificationView_LastWatering", comment: "Last watering date.")
        return String(format: format, dateFormatter.string(from: plant.lastDate))
    }

    var nextWatering: String {
        let format = NSLocalizedString("NotificationView_NextWatering", comment: "Next watering date.")
        return String(format: format, dateFormatter.string(from: plant.nextDate))
    }
}
SwiftUI view is also pretty simple with containing 4 text labels and one divider.
struct NotificationView: View {
    let viewModel: NotificationViewModel

    var body: some View {
        VStack {
            Text(viewModel.title).font(.title)
            Text(viewModel.subtitle).font(.subheadline)
            Divider()
            Text(viewModel.lastWatering).font(.body).multilineTextAlignment(.center)
            Text(viewModel.nextWatering).font(.body).multilineTextAlignment(.center)
        }
    }
}
Dynamic notification with 4 labels and divider.
Buttons in dynamic notification.
Summary
We added Apple Watch app to an existing iOS app and implemented dynamic notification view for one notification category. We looked into how to parse data associated with the user notification, create SwiftUI view and add action buttons. Next steps would be to handle notification actions in the companion iOS app based on the notification button identifier.
Let’s build a simple app using MVVM (model-view-view model) where every SwiftUI view has its own view model. It’s going to be an app with two views: list of movies and add a movie view what utilises Form view. Added movies are stored in MovieStore which is shared by the two view models. We will use environment for sharing the MovieStore. It will be read from the environment when we need to create AddMovieView with its view model.
Movie and MovieStore representing data
Movie is a small struct and just stores the title and rating. Title and rating are mutable as we are going to update those in AddMovieView. We also conform to protocol Identifiable because we are going to use List view for showing all the movies. List needs a way of identifiyng the content and its the simplest way of satisfiying the requirement.
struct Movie: Equatable, Identifiable {
    let id = UUID()
    var fullTitle: String
    var givenRating: Rating = .notSeen
}

extension Movie {
    enum Rating: Int, CaseIterable {
        case notSeen, terrible, poor, decent, good, excellent
    }
}
MovieStore is also a pretty simple although in a more sophisticated app it would contain much more logic: persistence, deleting etc. We use Published property wrapper which automatically provides a publisher we can use to subscribe against.
final class MovieStore {
    @Published private(set) var allMovies = [Movie]()

    func add(_ movie: Movie) {
        allMovies.append(movie)
    }
}
For inserting shared MovieStore to environment, we’ll use custom EnvironmentKey. Custom key is just an object conforming to EnvironmentKey protocol. We need to provide the type and default value.
struct MovieStoreKey: EnvironmentKey {
    typealias Value = MovieStore
    static var defaultValue = MovieStore()
}

extension EnvironmentValues {
    var movieStore: MovieStore {
        get {
            return self[MovieStoreKey]
        }
        set {
            self[MovieStoreKey] = newValue
        }
    }
}
If we do not insert our own instance of MovieStore to the environment, the instance returned by defaultValue is used. Typically we would like to use a specific instance initialised outside of the view hierarchy. Therefore let’s take a look how to do that next.
SceneDelegate and MovieScene presentation
MovieStore dependency is passed into view models with initialiser. We’ll use the instance stored in SceneDelegate. Yet again, in a real app, it would probably live in a separate dependency container or in something similar. MovieListView is the first view we need to present, therefore we’ll initialise view model, view and insert instance of MovieStore to environment for later use (movieStore keypath is the one we just defined in EnvironmentValues‘ extension).
final class SceneDelegate: UIResponder, UIWindowSceneDelegate {
    var window: UIWindow?
    private let movieStore = MovieStore()

    func scene(_ scene: UIScene, willConnectTo session: UISceneSession, options connectionOptions: UIScene.ConnectionOptions) {
        let viewModel = MovieListView.ViewModel(movieStore: movieStore)
        let contentView = MovieListView(viewModel: viewModel).environment(\.movieStore, movieStore)

        guard let windowScene = scene as? UIWindowScene else { return }
        let window = UIWindow(windowScene: windowScene)
        window.rootViewController = UIHostingController(rootView: contentView)
        self.window = window
        window.makeKeyAndVisible()
    }
}
MovieListView and its ViewModel
We still haven’t taken a look on MovieListView and its view model, let’s do it now. View model conforms to protocol ObservableObject and uses @Published property wrappers. ObservableObject’s default implementation provides objectWillChange publisher. @Published property wrapper automatically fires the publisher when the property value is about to change. On MovieListView we have declared view model property with @ObservedObject property wrapper. This will make the view to subscribe to objectWillChange publisher and will refresh the view when-ever objectWillChange fires.
extension MovieListView {
    final class ViewModel: ObservableObject {
        private let movieStore: MovieStore
        private var cancellables = [AnyCancellable]()

        init(movieStore: MovieStore) {
            self.movieStore = movieStore
            cancellables.append(movieStore.$allMovies.assign(to: \.movies, on: self))
        }

        @Published private(set) var movies = [Movie]()
        @Published var isPresentingAddMovie = false
    }
}
struct MovieListView: View {
    @Environment(\.self) var environment
    @ObservedObject var viewModel: ViewModel

    var body: some View {
        NavigationView {
            List(self.viewModel.movies) { movie in
                Text(movie.fullTitle)
            }.navigationBarTitle("Movies")
                .navigationBarItems(trailing: navigationBarTrailingItem)
        }
    }

    private var navigationBarTrailingItem: some View {
        Button(action: {
            self.viewModel.isPresentingAddMovie = true
        }, label: {
            Image(systemName: "plus").frame(minWidth: 32, minHeight: 32)
        }).sheet(isPresented: self.$viewModel.isPresentingAddMovie) {
            self.makeAddMovieView()
        }
    }

    private func makeAddMovieView() -> AddMovieView {
        let movieStore = environment[MovieStoreKey]
        let viewModel = AddMovieView.ViewModel(movieStore: movieStore)
        return AddMovieView(viewModel: viewModel)
    }
}
Changes in MovieStore are observed by subscribing to allMovies subscriber and then assigning the new list of movies to view model’s own property. Note that assignment is triggered on subscribing and when changes happen: like KVO with initial option. Only downside is that now the list is duplicated but that’s OK. We would need to do that anyway when we would like to sort or filter the list later on.
AddMovieView and its view model are created when user taps on the plus button in the navigation bar. Environment property wrapper can be used to get the whole environment or any of the values using a specific key. In current case I went for accessing the whole environment object and then getting MovieStore using a MovieStoreKey later when needed. Then the MovieStore is not available in the whole view scope and only when creating the AddMovieView. Other option would be to use @Environment(\.movieStore) var movieStore instead.
AddMovieView and its ViewModel
AddMovieView’s view model is initialised with MovieStore and internally it represents and instance of Movie. Published property wrapper is used similarly like in MovieListView’s view model. The model object is a private property and instead of direct access, two bindings are provded for TextField and Picker. Binding represents a two way connection between the view and model. In addition, there is canSave property what is used for enabling the save button in the navigation bar. Save button should be enabled only when title is filled. To recap the view update flow: TextField or Picker will use Binding to update private property newMovie. As newMovie property uses @Published property wrapper, it will fire ObservableObject’s objectWillChange publisher. SwiftUI automatically subscribes to objectWillChange because view model’s property uses @ObservedObject.
extension AddMovieView {
    class ViewModel: ObservableObject {
        private let movieStore: MovieStore

        init(movieStore: MovieStore) {
            self.movieStore = movieStore
        }

        @Published private var newMovie = Movie(fullTitle: "")

        lazy var title = Binding<String>(get: {
            self.newMovie.fullTitle
        }, set: {
            self.newMovie.fullTitle = $0
        })

        lazy var rating = Binding<Movie.Rating>(get: {
            self.newMovie.givenRating
        }, set: {
            self.newMovie.givenRating = $0
        })

        var canSave: Bool {
            return !newMovie.fullTitle.isEmpty
        }

        func save() {
            movieStore.add(newMovie)
        }
    }
}

struct AddMovieView: View {
    @Environment(\.presentationMode) private var presentationMode
    @ObservedObject var viewModel: ViewModel

    var body: some View {
        NavigationView {
            Form {
                titleSection
                ratingSection
            }.navigationBarTitle("Add Movie", displayMode: .inline)
                .navigationBarItems(leading: leadingBarItem, trailing: trailingBarItem)
                .navigationViewStyle(StackNavigationViewStyle())

        }
    }

    private var titleSection: some View {
        Section() {
            TextField("Title", text: viewModel.title)
        }
    }

    private var ratingSection: some View {
        Section() {
            Picker(LocalizedStringKey("Rating"), selection: viewModel.rating) {
                ForEach(Movie.Rating.allCases, id: \.rawValue) {
                    Text($0.localizedName).tag($0)
                }
            }
        }
    }

    private var leadingBarItem: some View {
        Button(action: { self.presentationMode.wrappedValue.dismiss() }, label: {
            Text("Cancel")
        })
    }

    private var trailingBarItem: some View {
        Button(action: {
            self.viewModel.save()
            self.presentationMode.wrappedValue.dismiss()
        }, label: {
            Text("Save").disabled(!self.viewModel.canSave)
        })
    }
}
Summary
We created a simple app with two views. Both views had its own view model and both view models used the same dependency: MovieStore. One view model triggered changes in MovieStore and those changes were observed by the other view model. In addition, we looked into how to use SwiftUI’s environment and how to trigger view updates from view models.