Swift Foundation contains a lot of useful functions on collection types. In the context of this blog post we are interested in map(_:) and prefix(while:). Map is used for transforming collection elements and prefix(while:) for getting a sequence containing initial elements until the predicate is true. In some cases the predicate used in the prefix(while:) can be expensive, or we just want to combine the information in prefix and map functions. One of such examples is when we use NSRegularExpression. More specifically, let’s take an example of processing a list of strings while the regular expression has matches and then extracting a range from the string. A concrete example could be parsing Fastlane’s Fastfile for visualization purposes.
Fastlane is used a lot in the iOS community for automating development related tasks. Lanes are added to a Fastfile where every individual lane has a name and optionally a description.
This file contains hidden or bidirectional Unicode text that may be interpreted or compiled differently than what appears below. To review, open the file in an editor that reveals hidden Unicode characters.
Learn more about bidirectional Unicode characters
If we would like to extract the lane name and description from the Fastfile then we can use regular expressions. The flow could be something like this: firstly, we can read the Fastfile contents, divide the file into lines and match lines with regular expressions. Second step is finding lines which contain a lane keyword. Then we could loop over preceding lines and collect lines which contain description. All in all, the logic for getting description could look like this:
This file contains hidden or bidirectional Unicode text that may be interpreted or compiled differently than what appears below. To review, open the file in an editor that reveals hidden Unicode characters.
Learn more about bidirectional Unicode characters
Now when we have seen a case where prefixMap can be useful, it is time to look into how it is implemented. The transform passed into the prefixMap function can return nil and the nil value means that the looping should be stopped and all the transformed elements should be returned. And yes, the implementation is pretty straight-forward.
This file contains hidden or bidirectional Unicode text that may be interpreted or compiled differently than what appears below. To review, open the file in an editor that reveals hidden Unicode characters.
Learn more about bidirectional Unicode characters
Foundation types can be extended with new functions easily. Although we could use prefix(while:) first followed with a map(_:) but sometimes we’ll just need to combine functionalities into a single function.
Signal Path version 2.4 is out. This time it is a smaller release concentrating on optimizing file accesses when playing audio or just scrolling through the file.
In the previous blog post Reading data from a file with DispatchIO I built a small FileReader which enabled reading data from a file for random byte ranges. Signal Path uses a similar file reader but in addition it also caches read data in some interactions where there are a lot of read requests active, for example, while recording. Therefore, in this blog post we’ll build a small file data cache which stores data chunks for byte ranges. The cache needs to be performant, otherwise it would be faster to just read the data from the file if it is slow.
Defining an interface for the cache
The interface of the FileMemoryCache needs to provide a way for retrieving data, storing data, and limiting the overall memory usage.
This file contains hidden or bidirectional Unicode text that may be interpreted or compiled differently than what appears below. To review, open the file in an editor that reveals hidden Unicode characters.
Learn more about bidirectional Unicode characters
The strategy of caching is to use a sorted array where the array is sorted by the first index of a byte range. Items in the array are structs containing a byte range and data. Having a sorted array makes it easier to merge data chunks when retrieving data for a longer byte range than the individual array items provide. As the aim is to keep it as fast as possible then data is merged only when cache is accessed which reduces the need to copy memory multiple times. The downside is that the cache can store overlapping chunks of data which reduces the efficiency. But on the other hand it is fast. Sorted array also enables to use binary search if linear search happens to be too slow with large amount of cached data chunks.
This file contains hidden or bidirectional Unicode text that may be interpreted or compiled differently than what appears below. To review, open the file in an editor that reveals hidden Unicode characters.
Learn more about bidirectional Unicode characters
Let’s start with the store method which takes a data and a byte range it corresponds to. For keeping the array sorted, we’ll use the first index of the byte range as the attribute for sorting. We’ll also make sure that the current item at the insertion index does not already contain the byte range we are trying to cache. If it does contain, we can safely ignore the current store request as the data is already cached. Additionally, we’ll check if the previous item in the array as it might also contain the byte range.
This file contains hidden or bidirectional Unicode text that may be interpreted or compiled differently than what appears below. To review, open the file in an editor that reveals hidden Unicode characters.
Learn more about bidirectional Unicode characters
When it comes to retrieving data then we’ll need to find intersecting cached data chunks and merge them if needed. Therefore, the first step is to collect cached data chunks which intersect with the requested range. For keeping it as simple as possible, will just loop over the array without using binary search and collect the items which are intersecting. The next step after that is to make sure the whole requested byte range is already present in the cache. This can be checked quite easily with IndexSet which contains indexes for every requested bytes. By removing byte indexes in intersecting ranges, the index set becomes empty. It means that every byte index is cached.
This file contains hidden or bidirectional Unicode text that may be interpreted or compiled differently than what appears below. To review, open the file in an editor that reveals hidden Unicode characters.
Learn more about bidirectional Unicode characters
We’ll need to copy intersecting byte indexes into a final contiguous data. It could be that the whole cached data chunk can be copied over or just a part of it. After figuring out which part of the cached data chunk to copy, the next step is to calculate the byte index in the resulting memory region which starts with the zero byte index. The implementation can be seen below which includes byte range index conversions.
This file contains hidden or bidirectional Unicode text that may be interpreted or compiled differently than what appears below. To review, open the file in an editor that reveals hidden Unicode characters.
Learn more about bidirectional Unicode characters
We built a simple cache for storing data chunks for byte ranges. We used a sorted array for storing individual data chunks which made it easier to merge them into one when the cache is accessed. Make sure to check the full implementation on GitHub which also includes evicting cached data.
Signal Path is an app which works with large files, even in several gigabytes. The app reads ranges from the file and visualizes the data. Signal Path heavily relies on DispatchIO for having efficient access to data in a file. The aim of the blog post is to build a FileReader class which wraps DispatchIO and provides a similar functionality.
DispatchIO manages a file descriptor and coordinates file accesses. DispatchIO object can be created by providing a path to the file and specifying the stream type: stream or random access. In the context of this post we are interested in random access as we would like to read random ranges of bytes from a file. Therefore, let’s start with defining an interface for the FileReader.
This file contains hidden or bidirectional Unicode text that may be interpreted or compiled differently than what appears below. To review, open the file in an editor that reveals hidden Unicode characters.
Learn more about bidirectional Unicode characters
The interface is pretty straight-forward with functions to open and close the file and with an asynchronous read function. DispatchIO returns read data as DispatchData which is a contiguous block of memory and what also can be cast into Data if needed.
We can use an init method on DispatchIO which has path argument when dealing with file paths. Note that the queue parameter on DispatchIO just specifies which queue is used for the cleanup handler, most of the cases .main will suffice. After creating the channel we can additionally control if data is returned once or partially with multiple handler callbacks. In our case, we would like to get a single callback, and therefore we need to set the low limit to Int.max. Then the read data is returned in with a single callback.
This file contains hidden or bidirectional Unicode text that may be interpreted or compiled differently than what appears below. To review, open the file in an editor that reveals hidden Unicode characters.
Learn more about bidirectional Unicode characters
Reading from a file requires having an opened channel and defining a byte range.
This file contains hidden or bidirectional Unicode text that may be interpreted or compiled differently than what appears below. To review, open the file in an editor that reveals hidden Unicode characters.
Learn more about bidirectional Unicode characters
This file contains hidden or bidirectional Unicode text that may be interpreted or compiled differently than what appears below. To review, open the file in an editor that reveals hidden Unicode characters.
Learn more about bidirectional Unicode characters
DispatchIO provides an efficient way for accessing raw bytes in a file. Wrapping it into a FileReader class gives us a compact interface for working with file data. Please checkout the playground which contains the full implementation and the example: FileReaderPlayground.
Signal Path just got a new feature which was requested by users. Happy to announce that Signal Path 2.3 includes a audio replay feature. Now users can record audio and then replay the recording. Especially useful for people who would like to see spectrums while replaying the recording with sound: for example singers or musical instrument players.
I was looking at formatters provided by Foundation framework and this time I would like to put some attention on MeasurementFormatter. Like the name says, it is used for creating localized strings of some sort of measurements. Measurements are represented by a generic struct Measurement where the generic UnitType describes the unit represented by it. Apple provides an Unit subclass Dimension which in turn has a many subclasses on its own. At the time of writing there are 22 dimensional units available with each of those having multitude of related units. For example, UnitDuration provides units for seconds, minutes, and hours. The full list of Apple provided dimensions are available in a table here: Dimension.
Using MeasurementFormatter
MeasurementFormatter is simple to use. If we change the unitStyle property then we can configure how the unit is spelled in the localized string.
This file contains hidden or bidirectional Unicode text that may be interpreted or compiled differently than what appears below. To review, open the file in an editor that reveals hidden Unicode characters.
Learn more about bidirectional Unicode characters
MeasurementFormatter also has an unitOptions property which controls the way how the final string is composed when taking account the current locale. For example, if locale is set to en_US then UnitTemperature measurement is formatted in Fahrenheits. If locale is set to en_GB then the measurement returns Celsius.
This file contains hidden or bidirectional Unicode text that may be interpreted or compiled differently than what appears below. To review, open the file in an editor that reveals hidden Unicode characters.
Learn more about bidirectional Unicode characters
MeasurementFormatter selecting output unit based on the locale.
In case we would like to make sure the same unit is used, then we can use the providedUnit option.
This file contains hidden or bidirectional Unicode text that may be interpreted or compiled differently than what appears below. To review, open the file in an editor that reveals hidden Unicode characters.
Learn more about bidirectional Unicode characters
Another thing to note is that the Measurement type also supports comparing measurements and mathematical operations. For example, we can add two measurements.
This file contains hidden or bidirectional Unicode text that may be interpreted or compiled differently than what appears below. To review, open the file in an editor that reveals hidden Unicode characters.
Learn more about bidirectional Unicode characters
MeasurementFormatter is built in a way that it can support custom units as well. We could create a pseudo unit for a children’s game named UnitBanana.
This file contains hidden or bidirectional Unicode text that may be interpreted or compiled differently than what appears below. To review, open the file in an editor that reveals hidden Unicode characters.
Learn more about bidirectional Unicode characters
MeasurementFormatter and Measurement types create a powerful combination which can be used for creating localized strings of values with an unit. Next time when you need to present a value with an unit, then check out the MeasurementFormatter first.
Many apps use Core Data for persistence and also need to import data from a server. Imported items typically have a unique identifier which can be used for identifying them. The count of imported items can be high therefore it is preferred to batch insert the items instead of adding them one by one. Core Data framework has a specialized request for this called NSBatchInsertRequest which is available since iOS 13. If we combine batch insert with Core Data constraints then we can achieve a flow where new items are only created when the store does not have an item for the unique identifier. All the other items already available in the persistent store are updated (instead of deleting the old item and reinserting it). In this blog post let’s take a look on how it works with a sample app which displays a list of Product entities with a name and a unique serial code attributes.
Product entity with “name” and “serialCode” attributes.
Constraints on the entity can be set in the model editor. For making sure that only one Product with a serial code of X exists in the persistent store then we will need to add a constraint on the serialCode attribute. Core Data framework will then make sure that only one entity with unique serial code exists in the persistent store. Neat, no need to query the store first for existing products and manually checking for possible duplicates.
CoreData constraint set to Product entity.
With a constraint set up, let’s take a look on the batch insert. Apple added NSBatchInsertRequest to Core Data framework in iOS 13. As we added a constraint then we need to tell Core Data what to do if there is already an item for the unique serial code. If we set NSManagedObjectContext‘s merge policy to NSMergeByPropertyObjectTrumpMergePolicy before executing the batch insert then Core Data goes and updates existing items with incoming attribute values fetched from a server. If there is not an item in the store with serial code then a new item is inserted. In summary, we get a behaviour where existing items are updated and missing items are inserted when importing items from a server. The flow of fetching data from a server, running batch insert on a background context and then refreshing fetched results controller can be seen below.
This file contains hidden or bidirectional Unicode text that may be interpreted or compiled differently than what appears below. To review, open the file in an editor that reveals hidden Unicode characters.
Learn more about bidirectional Unicode characters
Import function in a view model which fetches a list of products and inserts into a persistent store.
Summary
NSBatchInsertRequest is a welcoming change which makes it easy to insert and update existing items already in the persistent store. Setting up a constraint on a unique identifier and setting merge policy on a context enables us to handle SQL upserts without much code.
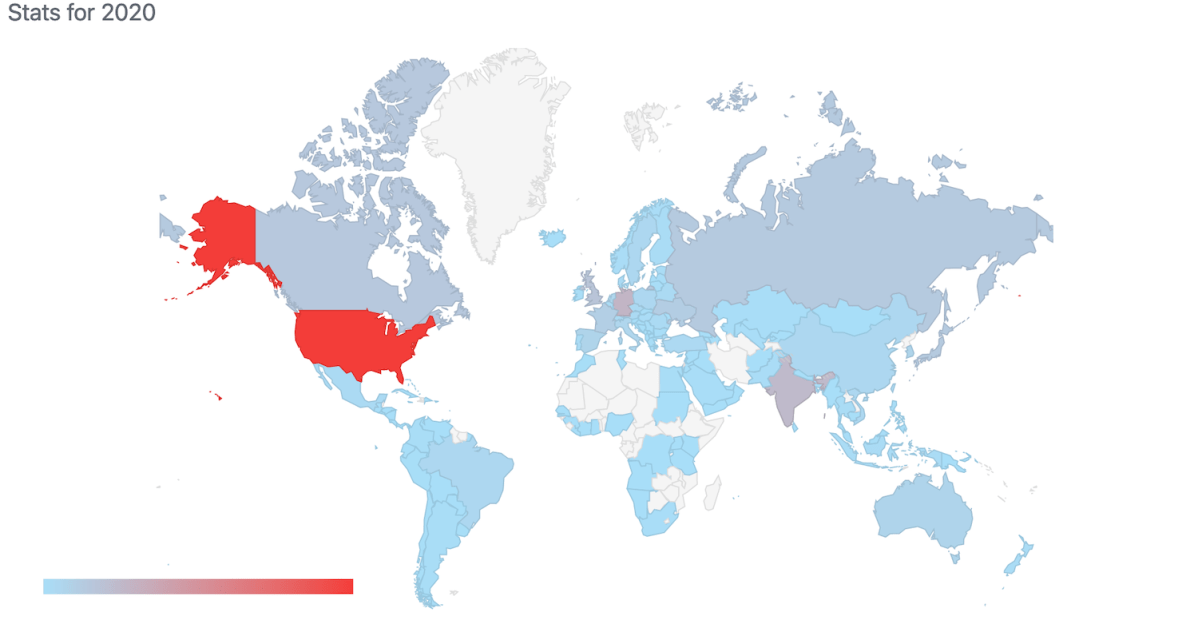
I have been writing a new blog post at least every second week and therefore in 2020 I have published total of 27 blog posts. It is time to take a look back on the 2020 and see which blog posts were the most popular ones. I am just looking at the total count of views per blog post.
UILabel supports displaying attributed strings with link attributes but what it does not support is allowing to tap on hyperlinks and opening those in Safari. An Alternative way is using an UITextView which does support opening hyperlinks but on the other hand it is a more heavy view component and therefore might not be the best choice when we just need to display some text with hyperlinks. This time lets create a simple UILabel subclass which adds support for opening hyperlinks and custom hyperlink styles.
Creating NSAttributedStrings with hyperlinks
Before we jump into implementing an UILabel subclass HyperlinkLabel, let’s first take a look on how to create a NSAttributedString with hyperlinks. In the example app we will have several labels with different configurations: default and custom link styles and left, centre, right text alignments. UITextView has a linkTextAttributes property but in our UILabel subclass we’ll need to implement custom link styling ourselves. The approach we are going to take is creating a new NSAttributedString.Key value named hyperlink and adding text attributes when the attribute is present.
This file contains hidden or bidirectional Unicode text that may be interpreted or compiled differently than what appears below. To review, open the file in an editor that reveals hidden Unicode characters.
Learn more about bidirectional Unicode characters
Let’s now create a convenience method which creates NSAttributedString and sets it to the HyperlinkLabel.
This file contains hidden or bidirectional Unicode text that may be interpreted or compiled differently than what appears below. To review, open the file in an editor that reveals hidden Unicode characters.
Learn more about bidirectional Unicode characters
The final NSAttributedString is created by first initializing a mutable version with a format string. The format string follows the familiar format specifiers like we used with NSString and String APIs when dealing with re-orderable arguments. Format specifiers are replaced with new instances of NSAttributedStrings where the string value equals to a hyperlink name and the URL value is stored on the NSAttributedString.Key.link or NSAttributedString.Key.hyperlink attribute. The former gives us the default link style defined by Apple and the latter our custom link style.
This file contains hidden or bidirectional Unicode text that may be interpreted or compiled differently than what appears below. To review, open the file in an editor that reveals hidden Unicode characters.
Learn more about bidirectional Unicode characters
Creating HyperlinkLabel which supports tapping on hyperlinks
UILabel does not provide access to its text layout and therefore it is not possible to know which hyperlink was tapped. For finding the tapped hyperlink we’ll need to use our own NSLayoutManager, NSTextStorage, and NSTextContainer. If we configure those properly we can figure out which character was tapped and therefore if it was part of the hyperlink. If it is, then we can let UIApplication to open the tapped URL. Let’s contain this in a function which gives us a configured NSTextStorage.
This file contains hidden or bidirectional Unicode text that may be interpreted or compiled differently than what appears below. To review, open the file in an editor that reveals hidden Unicode characters.
Learn more about bidirectional Unicode characters
Now we can use this function when handling UITouch events. We’ll add another private function which will take current UITouches and figure out which hyperlink was tapped. The general flow consists of creating a NSTextStorage with the function we just defined, then asking from the NSLayoutManager which character index was tapped. NSLayoutManager returns the closest character index of the touch. Therefore, we’ll need to go one step deeper and ask for the actual bounding rectangle of the glyphs representing the character and then verifying if the touch location was inside the glyph’s bounding rectangle. This is important when dealing with different text alignments and when tapping on the free space around characters. After figuring out which character was tapped we’ll need to check for the hyperlink attributes. If the tapped character has either attribute set, then we can conclude that we tapped on a hyperlink. This function can then be called in touchesEnded and if we tapped on a hyperlink, then we can open it. One thing to note is that userInteractionEnabled needs to be set to true before UILabel can handle touch events.
This file contains hidden or bidirectional Unicode text that may be interpreted or compiled differently than what appears below. To review, open the file in an editor that reveals hidden Unicode characters.
Learn more about bidirectional Unicode characters
This file contains hidden or bidirectional Unicode text that may be interpreted or compiled differently than what appears below. To review, open the file in an editor that reveals hidden Unicode characters.
Learn more about bidirectional Unicode characters
Next thing we need to do is overriding attributedText property and handling the custom style of our custom hyperlink attribute. If the attributed text has this attribute set, then we will apply custom hyperlink text attributes. The same way as Apple’s link attribute works, when the attributed string gets displayed then custom styling is used. Secondly, we’ll set the UILabel’s font to the attributed string’s ranges which do not have a font attribute set. UILabel internally use UILabel’s font when font attributes are not set, so we want to force the same behaviour when the stored attributed string is set to our own NSTextStorage. If we do not do this, then NSAttributedString just uses its default font and the displayed string is not going to be equal to the string set to NSTextStorage. This in turn will lead to invalid character index calculations because fonts are different.
This file contains hidden or bidirectional Unicode text that may be interpreted or compiled differently than what appears below. To review, open the file in an editor that reveals hidden Unicode characters.
Learn more about bidirectional Unicode characters
We created a UILabel subclass which has a capability of opening tapped links. Useful, if we need just a label for displaying some text along with hyperlinks. Please take a look on the full implementation available here: HyperlinkLabel.
Just a couple of weeks ago I wrote about resizing images on iOS: Resizing UIImages with aspect fill on iOS. As I am currently building a macOS, iOS, watchOS app I realized that I need a multiplatform image resizer. As this app deals with full size photos then I need to resize those photos for avoiding excessive memory usage. Apple’s CoreGraphics framework provides APIs what are compatible with all the before mentioned platforms. Therefore, let’s revisit the image scaler created in Resizing UIImages with aspect fill on iOS and let’s refactor it to use purely multiplatform supported CGImages.
We’ll skip the part which discusses calculating a rectangle in the original image which is then resized for assuring the image is resized equally on both axes. It is important because the aspect ratio of the original image most of the time does not equal to the aspect ratio of the target size. Let’s now take a look at cropping and resizing the original image. Cropping is easy to do because CGImage already has a convenient cropping(to:) method. On the other hand, resizing requires setting up a CGContext with the same parameters as the cropped image but the pixel size must be set to the target size. When we now draw the cropped image to the context, then CoreGraphics takes care of resizing the image.
This file contains hidden or bidirectional Unicode text that may be interpreted or compiled differently than what appears below. To review, open the file in an editor that reveals hidden Unicode characters. Learn more about bidirectional Unicode characters
I have created a multiplatform sample app which just has a single SwiftUI view shared with iOS and macOS (it is not a Mac Catalyst app). Because we use CGImages then all the code can be shared. The view just loads a full size photo, scales it, and displays it. In the example view we have resized the image by taking account the current displayScale. Depending on the displayScale value we need to make the pixel size of the CGImage larger by the factor of the displayScale. For example, if the point size is 200×200 points, displayScale is 3.0, then the pixel size of the CGImage needs to be 600×600. This will give us a nice and crisp end result when the image is rendered.
This file contains hidden or bidirectional Unicode text that may be interpreted or compiled differently than what appears below. To review, open the file in an editor that reveals hidden Unicode characters. Learn more about bidirectional Unicode characters
CoreGraphics is available on multiple Apple platforms and it provides tools for cropping and resizing images. With just a little bit of refactoring we have turned UIImage based image scaler into CoreGraphics backed scaler which can be used on multiple platforms.