Looking for hashing data using CryptoKit? Please navigate to here.
In this post we will look into how to add CommonCrypto to a Xcode project and how to generate hash using SHA256.
Adding CommonCrypto as a module
Note: Since Swift 4.2, this step is not necessary and manually added CommonCrypto module must be removed.
CommonCrypto library can be added in two ways: importing it in the Objective-C bridging header or by using module maps.
The first option makes sense for projects having both Objective-C and Swift code. In this case Objective-C bridging header is already part of the project and therefore adding #import to the bridging header is the quickest way.
The second option is more suitable for pure Swift projects as it enables to avoid adding the bridging header (although it is up for everyone’s preference).
Adding CommonCrypto as a module consists of two steps. Firstly, we need to create a folder named ‘CommonCrypto’ in the same folder as the Xcode project file is. Then we need to create a file ‘module.map’ and save it to ‘CommonCrypto’ folder.
This file contains hidden or bidirectional Unicode text that may be interpreted or compiled differently than what appears below. To review, open the file in an editor that reveals hidden Unicode characters.
Learn more about bidirectional Unicode characters
Secondly, we need to open the project in Xcode, then navigating to ‘Build Settings’ of the target and adding $(PROJECT_DIR)/CommonCrypto/ to ‘Import Paths’.
That’s it, now Xcode knows where the module is located and it can be imported in Swift files.
Hashing data using SHA256 algorithm
CommonCrypto contains a function named CC_SHA256(…) what takes in data, the count of bytes and gives a pointer to the hash of the data. As the function operates on the data, it makes sense to extend Data. We’ll add a function what can be later on extended for adding support for other hashing algorithms as well (see here for other algorithms).
This file contains hidden or bidirectional Unicode text that may be interpreted or compiled differently than what appears below. To review, open the file in an editor that reveals hidden Unicode characters.
Learn more about bidirectional Unicode characters
This file contains hidden or bidirectional Unicode text that may be interpreted or compiled differently than what appears below. To review, open the file in an editor that reveals hidden Unicode characters.
Learn more about bidirectional Unicode characters
We will look into how to make a property observable using a separate class managing the observers. It is an alternative and simple way of observing property changes without using ReactiveSwift, Key-Value Observing or anything else similar. It can be an excellent glue between Model and View Model in MVVM or between View and Presenter when using VIPER architecture.
Creating a class Observable
This file contains hidden or bidirectional Unicode text that may be interpreted or compiled differently than what appears below. To review, open the file in an editor that reveals hidden Unicode characters.
Learn more about bidirectional Unicode characters
The class Observable holds a value what can be of any type. Now when the value is store by the class itself we can use Swift’s property observer and then calling change handlers. This allows creating an object with observable properties and observing those properties from other objects. Moreover, it is possible to remove any of the added observers.
Let’s take a look on an example of class “Pantry” what has a property holding array of jams. In the example we will add two observers: one reacting to changes and the other one what will also react to the initial value. When one of the observer is removed and the array of jams changes, only one of the observers is triggered.
This file contains hidden or bidirectional Unicode text that may be interpreted or compiled differently than what appears below. To review, open the file in an editor that reveals hidden Unicode characters.
Learn more about bidirectional Unicode characters
Aim of the tutorial is to get started with ReactiveSwift without any previous setup except having Xcode installed. We will go through how to install it using Carthage package manager, add it to an iOS project and then observing a change of a property.
Installing Carthage
First we need to have Carthage installed. If it is not installed, you can use Homebrew and in Terminal running brew install carthage
Creating a project with Reactive Swift
Building ReactiveSwift
Open Xcode and use single view iOS app template, let’s name it “ReactiveSwiftObservingProperty”. Then we need to create Cartfile what contains reference to ReactiveSwift. For that, open a preferred text editor, add github "ReactiveCocoa/ReactiveSwift" ~> 3.0
and save it to the same folder as the project file with a name Cartfile. If this is done, open Terminal and navigate to the same folder and run carthage update --platform iOS
The output of the command will look something like: *** Cloning ReactiveSwift
*** Cloning Result
*** Checking out ReactiveSwift at "3.1.0"
*** Checking out Result at "3.2.4"
*** xcodebuild output can be found in /var/folders/fp/69n6gr652cvgyt5_rnf7_6dh0000gn/T/carthage-xcodebuild.DJayGE.log
*** Building scheme "Result-iOS" in Result.xcodeproj
*** Building scheme "ReactiveSwift-iOS" in ReactiveSwift.xcworkspace
Adding ReactiveSwift to the Xcode project
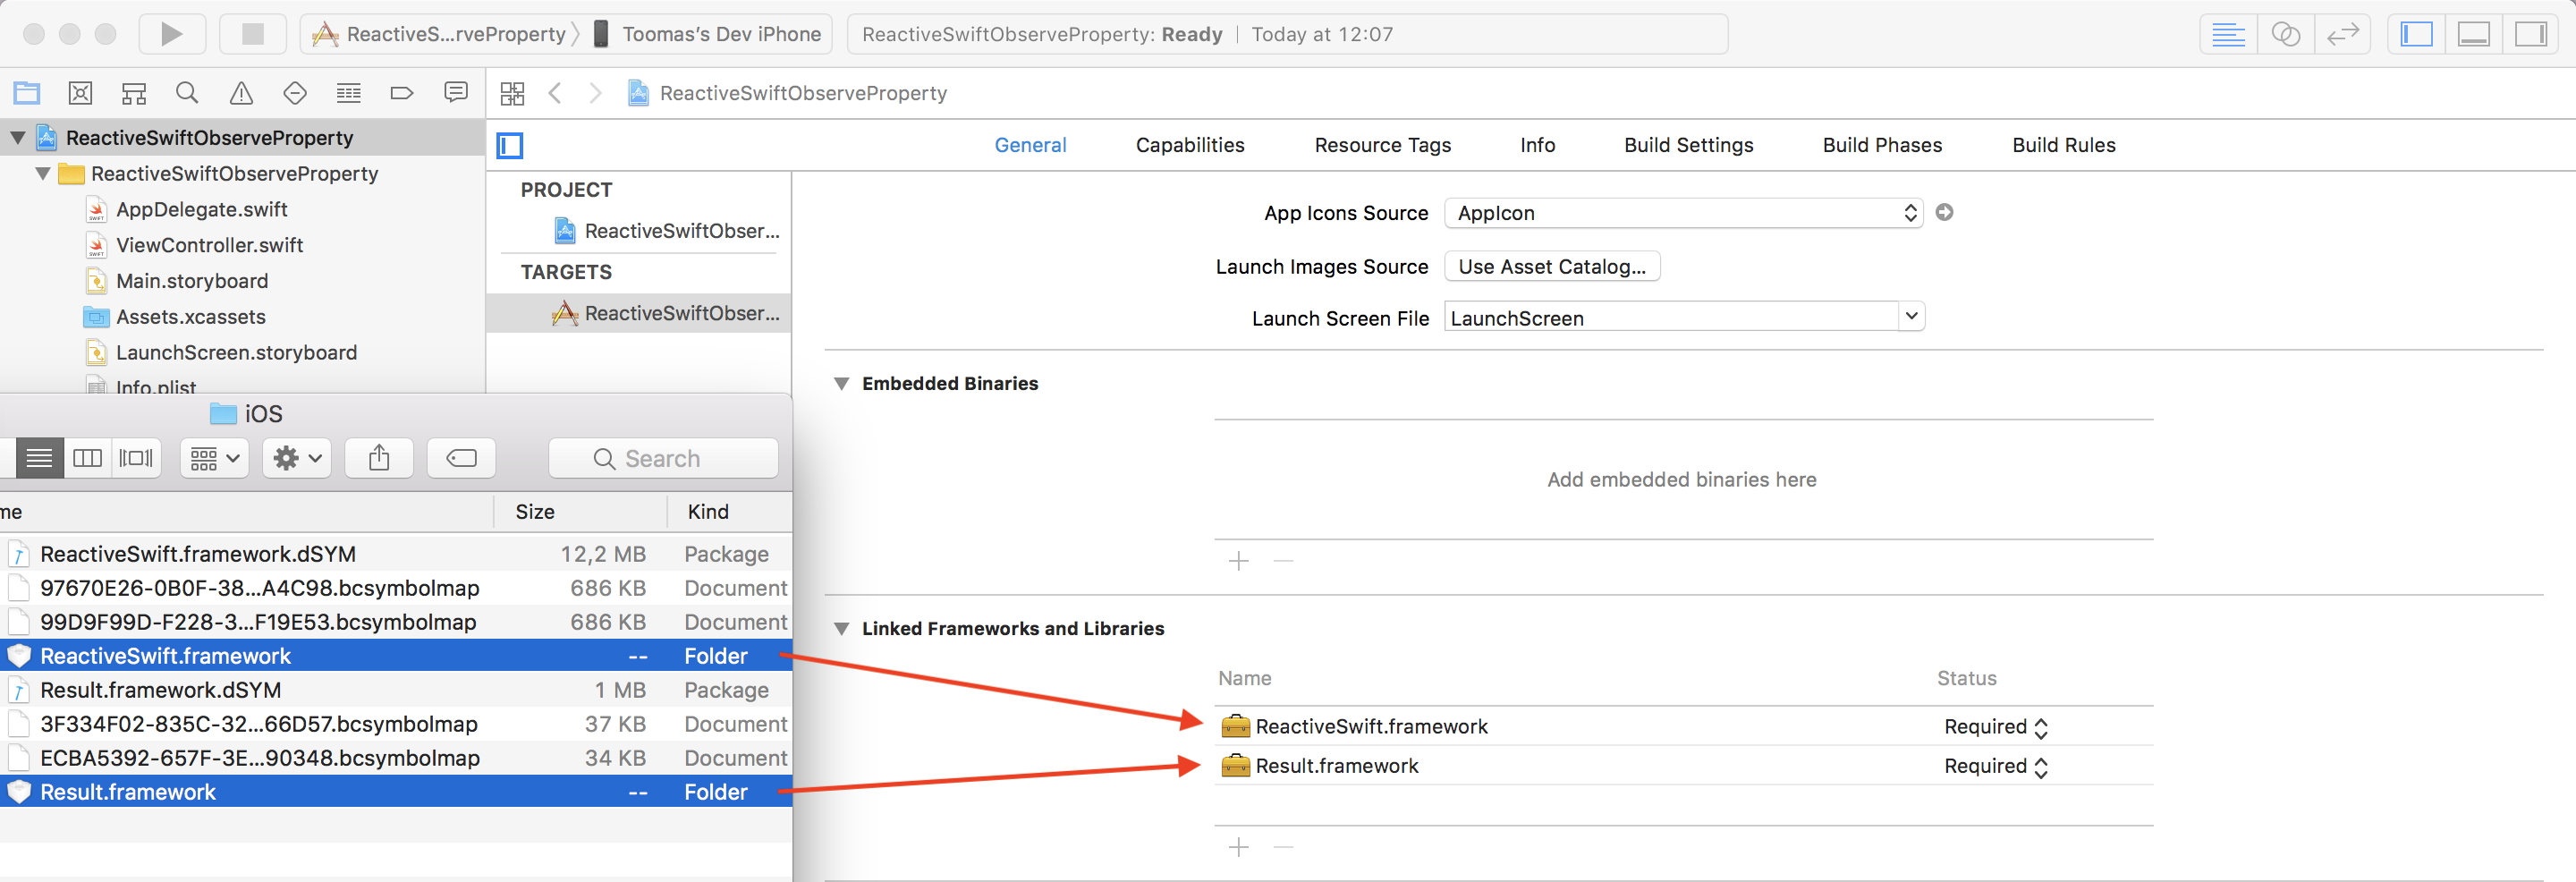
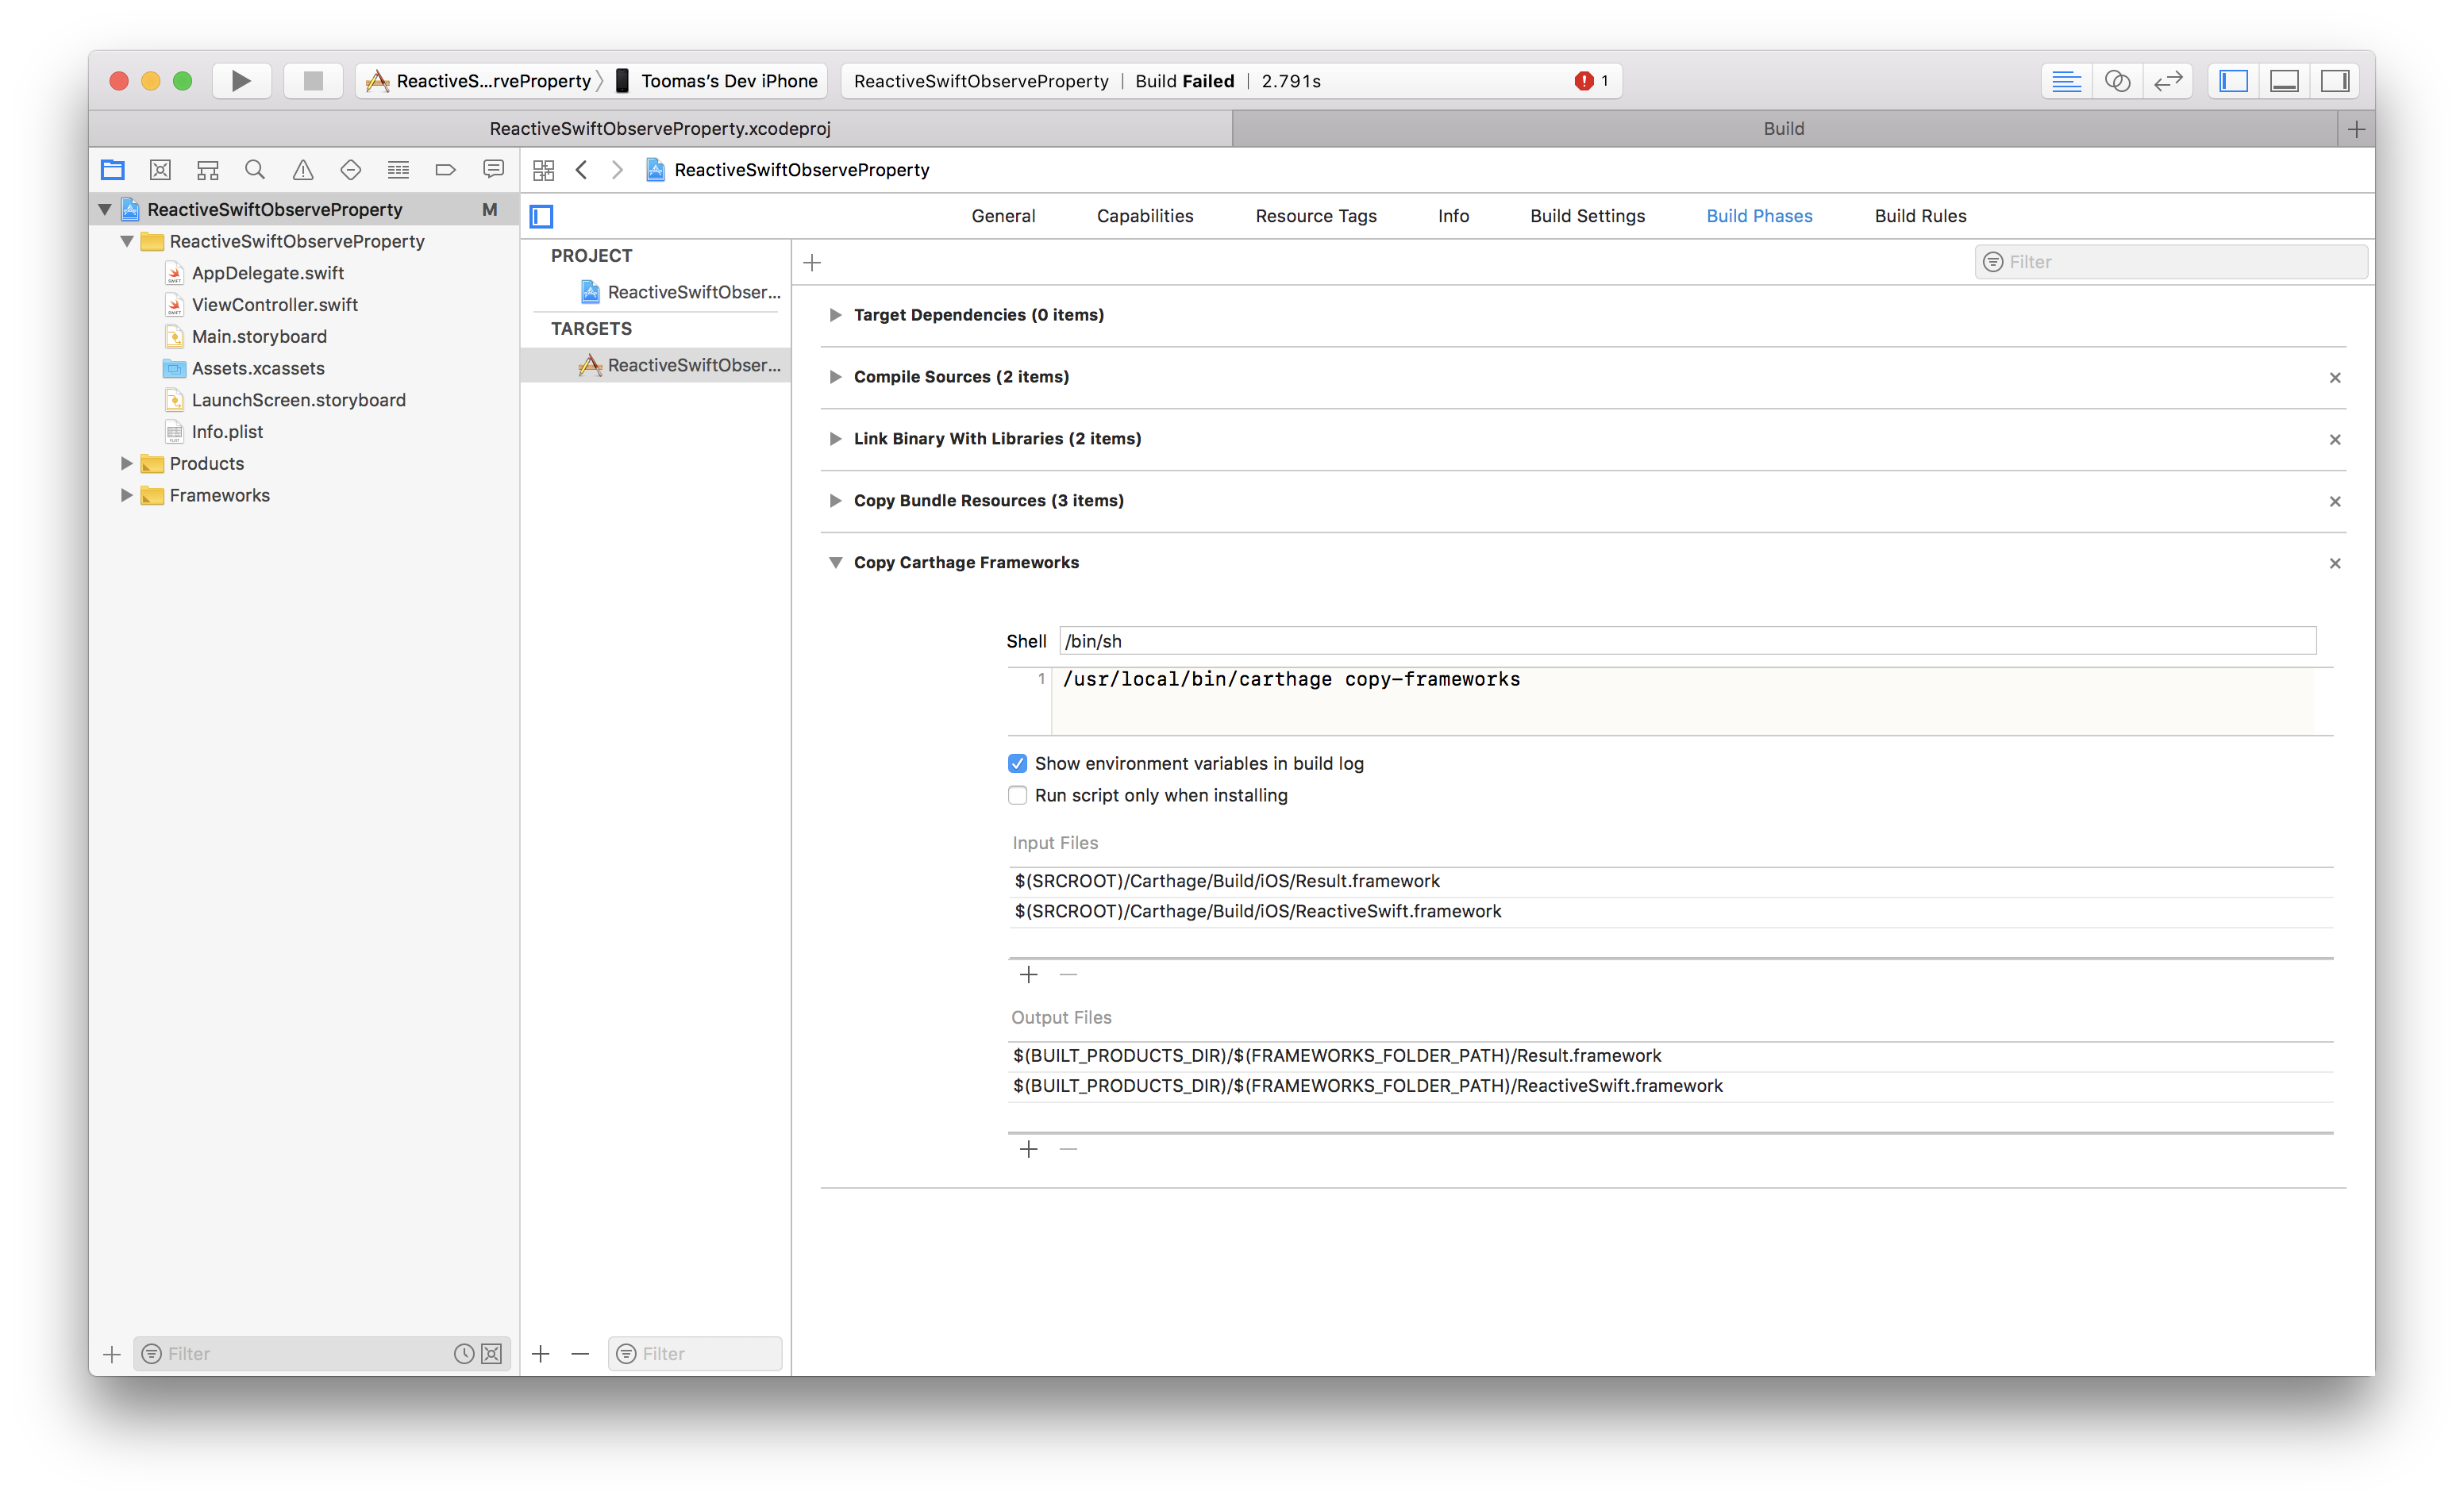
Now we have ReactiveSwift built and we can find the frameworks in /Path-to-Xcode-project-file/Carthage/Build/iOS/. Drag and drop ReactiveSwift.framework and Result.framework to “Linked Frameworks and Libraries”.
Then add a new build phase using the plus button in “Build Phases” tab which will copy the frameworks to the application’s bundle.
For demonstrating reacting to change of a property we first add an object called Pantry what just stores an array of jams. We make it a MutableProperty as later on we want to change the array of jams and observe the change.
This file contains hidden or bidirectional Unicode text that may be interpreted or compiled differently than what appears below. To review, open the file in an editor that reveals hidden Unicode characters.
Learn more about bidirectional Unicode characters
In this very simple case of observing changes we will look into Signal and SignalProducer. MutableProperty has both Signal and SignalProducer and in our example we will use Signal when we just want to know when the array of jams changes and SignalProducer when want to react to the initial value.
This file contains hidden or bidirectional Unicode text that may be interpreted or compiled differently than what appears below. To review, open the file in an editor that reveals hidden Unicode characters.
Learn more about bidirectional Unicode characters
When running the example project and tapping on the “Add More Jam” button, the number of jams is printed to the console and text view updates to show the flavours of all the jams currently in the pantry.
In this blog post we learned how to fetch and build ReactiveSwift using Carthage, how to add it to a Xcode project and finally reacting to changes of a property. This is just a glimpse of ReactiveSwift!
Thank you for reading.
RawRepresentable is a protocol in Swift standard library and enables converting from a custom type to raw value type and back. In this post we’ll be looking into how to implement RawRepresentable for enumeration containing an associated value.
Conforming to RawRepresentable
Implementing RawRepresentable requires three steps: firstly, choose RawValue type; secondly, implement initialiser where RawValue type is matched to one of the cases in the enumeration, and thirdly, rawValue getter where enumeration cases are converted into RawValue type.
In the example we’ll be looking into enumeration representing scenes: home, levelSelection and level(Int), where the associated value stores a number of the level. RawValue type is String and without associated values it is quite straight-forward: use switch-case for conversions. When associated values are in the mix, a little bit more processing is needed. Let’s look into level(Int). In the getter returning String we can just compose a string “level” followed by the level number. In the initialiser the string must be matched to that format. First we check if the string starts with prefix “level” (anchored == prefix) and after that try to create an integer from the rest of the string: nice and concise.
This file contains hidden or bidirectional Unicode text that may be interpreted or compiled differently than what appears below. To review, open the file in an editor that reveals hidden Unicode characters.
Learn more about bidirectional Unicode characters
Getting a random number within a range is a very common operation. There are multiple ways of extending Swift language to add support for getting random values within a specified range. After experimenting with different implementations like utility functions, integer and float extensions I have found that the most natural way of doing it is to extend ClosedRange. This will allow to write a very readable code:
This file contains hidden or bidirectional Unicode text that may be interpreted or compiled differently than what appears below. To review, open the file in an editor that reveals hidden Unicode characters.
Learn more about bidirectional Unicode characters
This file contains hidden or bidirectional Unicode text that may be interpreted or compiled differently than what appears below. To review, open the file in an editor that reveals hidden Unicode characters.
Learn more about bidirectional Unicode characters
1. Get a random value using a max possible range (note that arc4random_uniform excludes the upper bound).
2. Convert the value to percentage.
3. Multiply the range with the percentage.
4. Add offset to the range’s minimum value.
Random integer values
This file contains hidden or bidirectional Unicode text that may be interpreted or compiled differently than what appears below. To review, open the file in an editor that reveals hidden Unicode characters.
Learn more about bidirectional Unicode characters
Having a glow behind a sprite can give game a move lively environment. In this blog post I am going to present a way of adding a glow to SKSpriteNode using an instance of SKEffectNode.
Node Tree
First of all let’s take a look on the node tree needed for achieving the end result.
SKSpriteNode (root)
Displays a texture what needs a glow.
SKNode
Enables running actions on the glow without causing to render the glow again. Running an action on the SKEffectNode would cause it to redraw although it is rasterizing its content. Also note that the zPosition of the node should be -1 as the glow should be rendered behind the root node.
SKEffectNode
Applies gaussian blur filter to the child node what in this case is a SKSpriteNode displaying the same texture as the root node. It is important to cache the content by setting shouldRasterize to true. Otherwise the glow gets re-rendered in every frame and therefore uses computing power unnecessary.
SKSpriteNode
Uses the same texture as the root node what is rendered together with the filter SKEffectNode provides.
SKSpriteNode Extension
This file contains hidden or bidirectional Unicode text that may be interpreted or compiled differently than what appears below. To review, open the file in an editor that reveals hidden Unicode characters.
Learn more about bidirectional Unicode characters
Clamping a value is an operation of moving the value to a range of allowed values. It can be achieved by comparing the value with allowed minimum and maximum values.
For example I was deforming SKWarpGeometryGrid from the direction of a point outside the grid and needed to constrain angles between grid points and the contact point. Maximum and minimum allowed angles were related to the angle between the contact point and the grid’s center point.
The solution I propose extends FloatingPoint and BinaryInteger protocols and gives a very readable form to this example problem:
This file contains hidden or bidirectional Unicode text that may be interpreted or compiled differently than what appears below. To review, open the file in an editor that reveals hidden Unicode characters.
Learn more about bidirectional Unicode characters
This file contains hidden or bidirectional Unicode text that may be interpreted or compiled differently than what appears below. To review, open the file in an editor that reveals hidden Unicode characters.
Learn more about bidirectional Unicode characters
This file contains hidden or bidirectional Unicode text that may be interpreted or compiled differently than what appears below. To review, open the file in an editor that reveals hidden Unicode characters.
Learn more about bidirectional Unicode characters
iOS devices have several screen sizes and aspect ratios. This is something to keep in mind when building a game in SpriteKit because placing a node at the edge of a screen is not straight forward. But first let’s take a quick look on managing scenes. One way for it is to use scene editor in Xcode for setting up all nodes in it. When scene is ready and gets presented in SKView, it is scaled based on the scaleMode property (we are looking into SKSceneScaleMode.aspectFill). Without scaling scenes it would be impossible to reuse them on iPads and iPhones. But on the other hand scaled scenes makes it a bit more tricky to position a node at the edge of a screen. For achieving that a little bit of code is needed what takes account how scene has been scaled. In the code example a SKSpriteNode is positioned at the top right of the scene with a small margin. Idea is simple: calculate a scale factor and use scaled size of the scene for positioning the node.
This file contains hidden or bidirectional Unicode text that may be interpreted or compiled differently than what appears below. To review, open the file in an editor that reveals hidden Unicode characters.
Learn more about bidirectional Unicode characters
I was working on an upcoming game in SpriteKit only to discover that adding a simple gradient is not so straight-forward as one would expect. Therefore I created an extension to SKTexture.
This file contains hidden or bidirectional Unicode text that may be interpreted or compiled differently than what appears below. To review, open the file in an editor that reveals hidden Unicode characters.
Learn more about bidirectional Unicode characters
This extension adds support for creating linear and radial gradients. Linear gradient can be drawn with an angle (in radians) although in most of the cases rotating SKSpriteNode would be enough. Gradients are drawn using core graphics APIs what are a little bit difficult to use but now nicely hidden in the extension. Both initialisers take in array of colors (UIColor) and CGFloat array with values in range of 0 to 1 defining the locations for colors in CGGradient.
For adding linear gradient or radial gradient to a SpriteKit scene we need to create a SKTexture and assign it to a SKSpriteNode. I created an example project SpriteKitGradientTexture for showing gradients in action. In the example project one SKSpriteNode is animating with textures containing linear gradients with different angles and the other SKSpriteNode just displays radial gradient.
This file contains hidden or bidirectional Unicode text that may be interpreted or compiled differently than what appears below. To review, open the file in an editor that reveals hidden Unicode characters.
Learn more about bidirectional Unicode characters