Recently I was asked a question about creating an app which has SwiftUI views but no navigation logic in it. Instead, UIKit controls how views are presented. It is a fair question since SwiftUI views have navigation support, but not everything is there if we need to support previous iOS versions as well, or we have a case of an app which have both UIKit and SwiftUI views. Therefore, let’s take a look at on one approach, how to handle navigation on the UIKit side but still use SwiftUI views.
UIHostingController presenting SwiftUI view
SwiftUI views are presented in UIKit views with UIHostingController which just takes in the SwiftUI view. UIHostingController is a UIViewController subclass, therefore it can be used like any other view controller in the view hierarchy. For getting things started, let’s configure SceneDelegate to use an object named FlowCoordinator which will handle navigation logic and then ask it to present a simple SwiftUI view.
This file contains hidden or bidirectional Unicode text that may be interpreted or compiled differently than what appears below. To review, open the file in an editor that reveals hidden Unicode characters.
Learn more about bidirectional Unicode characters
A simple app showing a green view which is rendered with SwiftUI but presented with UIKit.
Inserting the FlowCoordinator into SwiftUI view
The next step is that we want to allow SwiftUI view to control what is presented on the screen. For example, let’s add a button to the SwiftUI view which should present a sheet with another SwiftUI view. The button action needs to be able to talk to the flow coordinator, which controls what is presented on the screen. One way to insert the FlowCoordinator into SwiftUI environment is by conforming to ObservableObject and using the environmentObject() view modifier. Alternative is using EnvironmentValues and defining a key. For more information please check Injecting dependencies using environment values and keys in SwiftUI.
This file contains hidden or bidirectional Unicode text that may be interpreted or compiled differently than what appears below. To review, open the file in an editor that reveals hidden Unicode characters.
Learn more about bidirectional Unicode characters
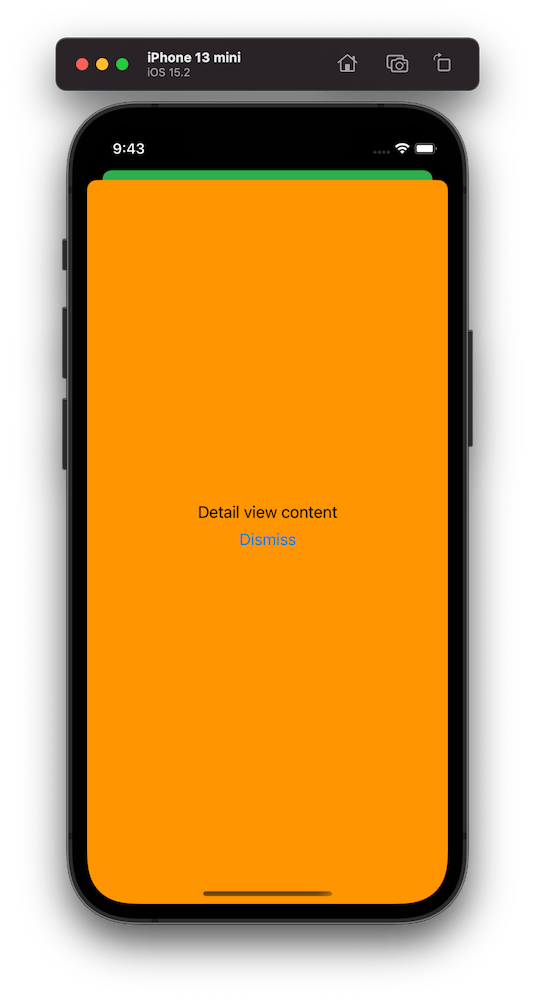
The sheet presentation code goes into the FlowCoordinator and as an example we show a DetailView which has a button for dismissing itself. Yet again, SwiftUI view just passes the handling to the FlowCoordinator.
This file contains hidden or bidirectional Unicode text that may be interpreted or compiled differently than what appears below. To review, open the file in an editor that reveals hidden Unicode characters.
Learn more about bidirectional Unicode characters
A simple app showing an orange sheet which is rendered with SwiftUI but presented with UIKit.
Summary
We created a simple sample app which uses UIKit navigation logic but renders views with SwiftUI views. This kind of setup could be useful for apps which mix UIKit and SwiftUI. But I believe that even in case of that we could still use SwiftUI navigation in sub-flows but could keep using this approach for handling root view navigation.
One building block for navigating from one view to another is NavigationView which is a representation of UINavigationController in UIKit. This time, let’s take a look on how to transition from one SwiftUI view to another one without NavigationView.
AppFlowCoordinator managing choosing the view
The idea is to have a root SwiftUI view with only responsibility of presenting the active view. State is stored in AppFlowCoordinator which can be accessed from other views and therefore other views can trigger navigation. Example case we’ll build, is animating transitions from login view to main view and back. As said, AppFlowCoordinator stores the information about which view should be on-screen at a given moment. All the views are represented with an enum and based on the value in enum, views are created. This coordinator is ObservableObject what makes it easy to bind to a SwiftUI view – whenever activeFlow changes, SwiftUI view is updated. The term flow is used because views can consist of stack of other views and therefore creating a flow of views.
This file contains hidden or bidirectional Unicode text that may be interpreted or compiled differently than what appears below. To review, open the file in an editor that reveals hidden Unicode characters.
Learn more about bidirectional Unicode characters
RootView selects which view is currently visible. It accesses coordinator through environment. SwiftUI requires EnvironmentObjects to be ObservableObjects, therefore this view is automatically refreshed when activeFlow changes in the AppFlowCoordinator. RootView’s body is annotated with @ViewBuilder which will enable the view to return a body with type depending on the current state (HStack is also a ViewBuilder). Other options are wrapping the views with AnyView or using Group. In our case the view types are LoginView and ContentView. Both views also define the transition animation what is used when view refresh is triggered in withAnimation closure in AppFlowCoordinator. Asymmetric enables defining different transitions when view is added and removed from the view hierarchy.
This file contains hidden or bidirectional Unicode text that may be interpreted or compiled differently than what appears below. To review, open the file in an editor that reveals hidden Unicode characters.
Learn more about bidirectional Unicode characters
This file contains hidden or bidirectional Unicode text that may be interpreted or compiled differently than what appears below. To review, open the file in an editor that reveals hidden Unicode characters.
Learn more about bidirectional Unicode characters
Updating currently visible flow with transition animations
Triggering navigation from SwiftUI view
Last piece we need to take a look at is how to trigger transition. As AppFlowCoordinator is in environment, any view can access the coordinator and call any of the navigation methods. When login finishes, LoginView can tell the coordinator to show the main content view.
This file contains hidden or bidirectional Unicode text that may be interpreted or compiled differently than what appears below. To review, open the file in an editor that reveals hidden Unicode characters.
Learn more about bidirectional Unicode characters
We took a look on how to navigate from one SwiftUI view to another by using a coordinator object. Coordinator stored the information about which view we should currently display on screen. We saw how easy it is to trigger navigation from any of the currently visible views.
Every app consists of different flows for achieving a specific goal. For example, there is a sequence of views for sign up. When sign up flow ends, we need to move to so called main view what represents the main functionality of the app. There are definitely a lot of different ways how to handle app navigation and each of the approach have their own pros and cons. With this in mind, the approach I am going to demonstrate this time, is how to use flow controllers and using responder chain to connect flows to each other.
Navigating from flow to flow
Flow controller is a UIResponder coordinating a single flow in an app. It handles showing views, injecting dependencies and storing intermediate values required to pass from one view controller to another. Navigation from one flow to another happens using responder chain. This also enables us to use sending actions to nil first responder in story boards and xib files. Using responder chain adds extra flexibility when restructuring an app or changing flows a lot. There is only a little code needed to set up new flows. It is a kind of lightweight approach to coordinator pattern where delegation is replaced with responder chain.
Setting up protocols
As a first step we define two protocols: one for defining entry points and the second one for accessing flow controllers from any responder in responder chain. Flow controllers are going to conform to specialised presenting protocol and responders (typically view controller), which trigger navigation, conform to one of the controlling protocols. FlowPresenting protocol is going to define a single function what is used for presenting a first view in the flow. I find examples to be the best way of learning new approaches, therefore let’s build a sample app with three flows: app, login and main flow.
This file contains hidden or bidirectional Unicode text that may be interpreted or compiled differently than what appears below. To review, open the file in an editor that reveals hidden Unicode characters.
Learn more about bidirectional Unicode characters
AppFlowController is the controller handling presenting new flows. It conforms to AppFlowPresenting protocol what defines entry points to all the different flows. In addition, it handles inserting active flow to responder chain which enables easy access to flow controller from any presented view controller. Finding a flow controller from responder chain is implemented using a generic function. This enables implementing new getters for other flow controllers with just one line.
This file contains hidden or bidirectional Unicode text that may be interpreted or compiled differently than what appears below. To review, open the file in an editor that reveals hidden Unicode characters.
Learn more about bidirectional Unicode characters
In the current sample app, AppFlowController is going to handle representing all of the flows in the app. This is because all the current flows are consisting of one branch in a so called tree of flows. If we would have a more complex application, other flow controllers would handle their own subset of flows and would insert those flows into responder chain (like AppFlowController is inserting LoginFlowController and MainFlowController into responder chain). This kind of architecture allows creating a tree like structure of flows and separating them from each other – there is not going to be a single controller handling all the flows.
This file contains hidden or bidirectional Unicode text that may be interpreted or compiled differently than what appears below. To review, open the file in an editor that reveals hidden Unicode characters.
Learn more about bidirectional Unicode characters
In the example app we do not use storyboard for initialising the first view (“Main Interface” field in target settings is empty). Instead, we set up a window ourself and use AppFlowController for presenting the first view. In addition, we inject a manager storing a set of dependencies view controllers might require. Having approach like this, we do not need singletons and instead, flow controllers insert dependencies into view controllers. Using dependency injection keeps the overall dependency graph nice and clean.
This file contains hidden or bidirectional Unicode text that may be interpreted or compiled differently than what appears below. To review, open the file in an editor that reveals hidden Unicode characters.
Learn more about bidirectional Unicode characters
LoginFlowController has similar set up as AppFlowController with exception of not inserting a subsequent flow into responder chain. In the sample app, login flow does not branch into several other login related flows. At the end of login flow, AppFlowController is used to present main content view. Due to generic function we added to UIResponder extension, login flow controller accessor consists of a single line.
This file contains hidden or bidirectional Unicode text that may be interpreted or compiled differently than what appears below. To review, open the file in an editor that reveals hidden Unicode characters.
Learn more about bidirectional Unicode characters
Let’s see how view controllers in the login flow trigger navigation. LoginViewController conforms to LoginFlowControlling. This makes loginFlowController accessor available and we can use it for triggering navigation. It should be noted that loginFlowController accessor returns an object conforming to LoginFlowPresenting and does not explicitly declare the type of LoginFlowController. This means that LoginViewController does not know about LoginFlowController, instead, it just knows that the returned object implements methods listed in LoginFlowPresenting protocol. Less coupling makes it easier to test and restructure app in the future.
Another important point to note here is that it is so easy to add navigation capability to any other view controller. Flow controller does not need to be injected and in the end, we just need to make two changes in the whole view controller – protocol extension takes care of adding getter to the interface and triggering navigation is just a single line of code.
This file contains hidden or bidirectional Unicode text that may be interpreted or compiled differently than what appears below. To review, open the file in an editor that reveals hidden Unicode characters.
Learn more about bidirectional Unicode characters
AccountDetailsViewController is the last view controller in the login flow and it should trigger navigation to the main flow. As seen in previous paragraph, triggering navigation requires only two changes. This is also the case here.
This file contains hidden or bidirectional Unicode text that may be interpreted or compiled differently than what appears below. To review, open the file in an editor that reveals hidden Unicode characters.
Learn more about bidirectional Unicode characters
This time we took a look on how to use flow controllers and responder chain to easily manage navigation from one view to another. In the end we implemented a scalable architecture where adding navigation trigger points just require a few changes. Scalability comes from the fact that flows can be arranged into tree like structure and there is no requirement to have a single object managing all the flows. Moreover, we added a dependency injection capability to flow controllers which make it so much easier to test components separately and not worrying about singletons.