Categories
Combine Foundation iOS Swift SwiftUI Xcode

Validating string in TextField with NumberFormatter in SwiftUI

I was looking into creating a view which has TextField with NumberFormatter. Typed text would show up in a separate label and when trying to enter non-numbers, the TextField would reject those characters. Although TextField component in SwiftUI has generic initialiser init(_:value:formatter:onEditingChanged:onCommit:) it does not seem to do what we need. Value binding does not update while typing, non-number characters are not discarded, and string is not reloaded when view reloads with different model data. Therefore, I decided to create a wrapper around TextField which deals with transforming numbers to strings and implements all the before mentioned features.

End result after creating a custom NumberTextField.

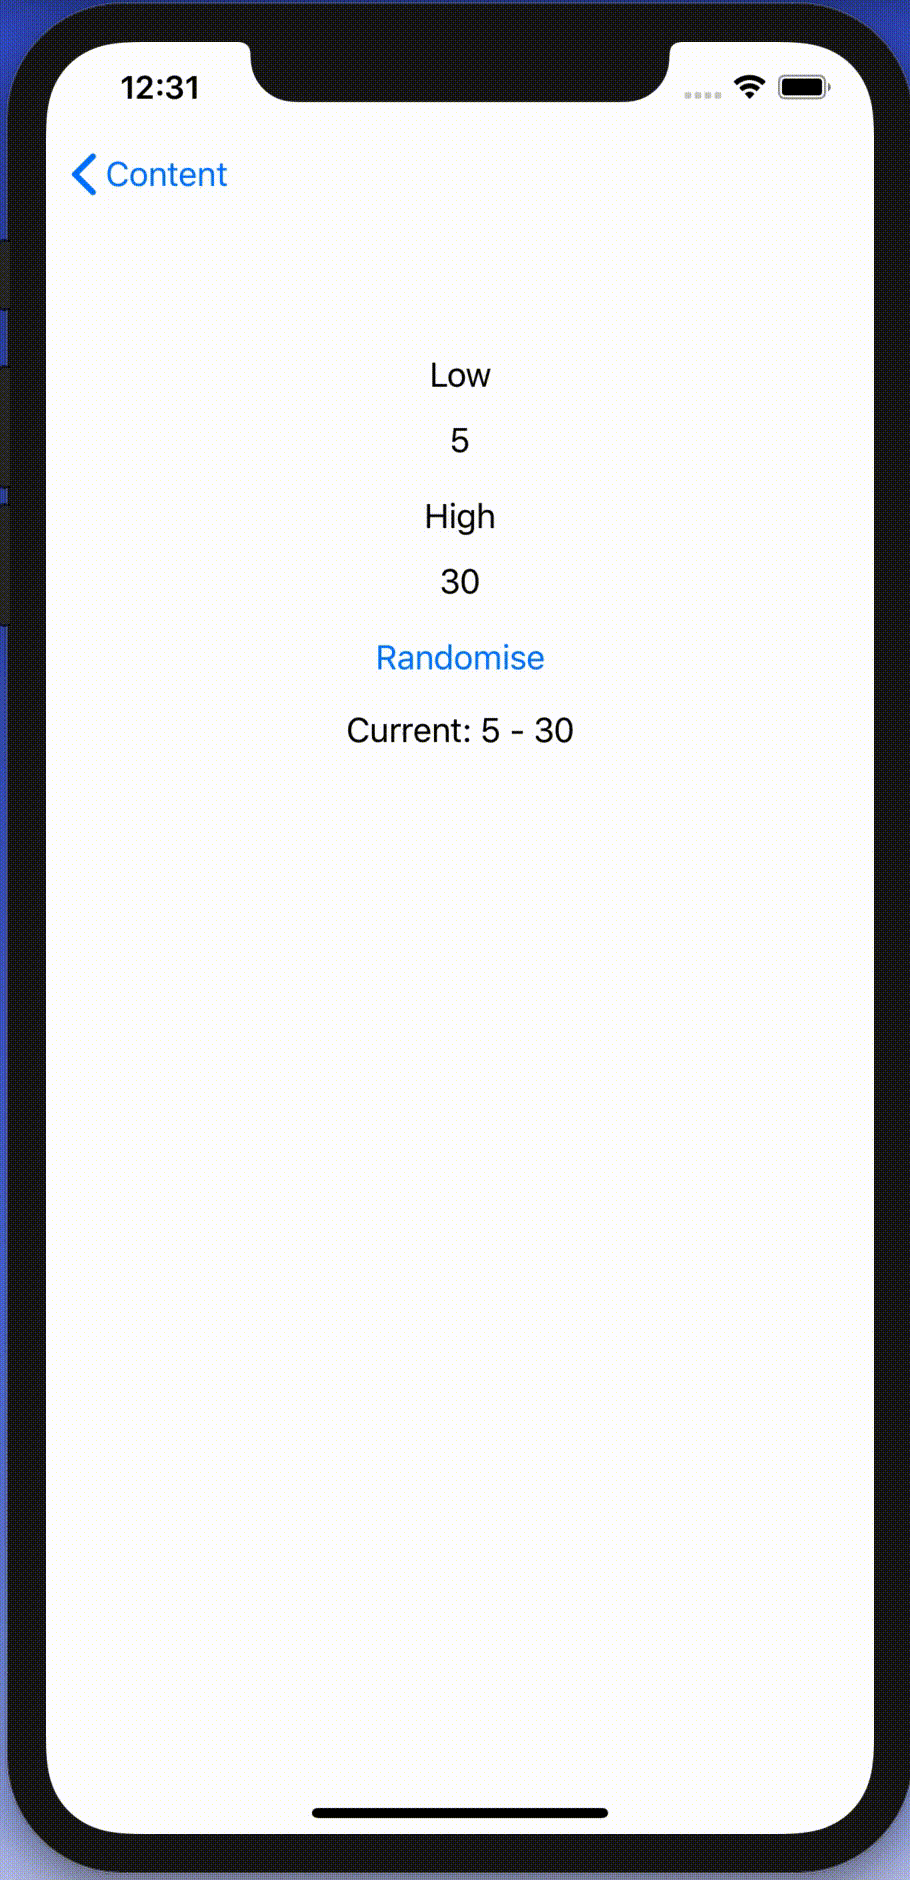
Content view with temperature limits

Example use-case is basic view for editing temperature limits where model type will force high value to be at least 10 units higher compared to low value. The model type also have separate properties for getting NSNumber instances what we use later (such conversion could also happen on SwiftUI level).

struct TemperatureLimits {
var low: Int = 5 {
didSet {
let high = max(self.high, low + 10)
guard self.high != high else { return }
self.high = high
}
}
var high: Int = 30 {
didSet {
let low = min(self.low, high – 10)
guard self.low != low else { return }
self.low = low
}
}
var lowNumber: NSNumber {
get { NSNumber(value: low) }
set { low = newValue.intValue }
}
var highNumber: NSNumber {
get { NSNumber(value: high) }
set { high = newValue.intValue }
}
}
Model type storing temperature limits which are forced to have 10 unit difference.

Content view has text fields, button for randomising limits and label for displaying current values. NumberTextField is a custom view which implements all the features what we listed in the beginning of the post.

import Combine
import SwiftUI
struct FormatterView: View {
@State var limits: TemperatureLimits
var body: some View {
VStack(spacing: 16) {
VStack {
Text("Low")
NumberTextField("Low", value: $limits.lowNumber, formatter: NumberFormatter.decimal)
}
VStack {
Text("High")
NumberTextField("High", value: $limits.highNumber, formatter: NumberFormatter.decimal)
}
Button(action: {
self.limits.low = Int.random(in: 0…40)
self.limits.high = Int.random(in: 50…100)
}, label: {
Text("Randomise")
})
Text("Current: \(limits.low) – \(limits.high)")
Spacer()
}.padding()
.multilineTextAlignment(.center)
}
}
extension NumberFormatter {
static var decimal: NumberFormatter {
let formatter = NumberFormatter()
formatter.allowsFloats = false
return formatter
}
}
View with custom NumberTextFields bound to temperature limits.

Creating NumberTextField with NSNumber binding and NumberFormatter

NumberTextField is a wrapper around TextField and internally handles NSNumber to String and String to NSNumber transformations. Transformations happen inside a separate class called StringTransformer which stores editable string in @Published property. @Published property is first populated with string value by transforming NSNumber to String using the formatter. Changes made by user are captured by subscribing to stringValue publisher (@Published properties provide publishers). String to NSNumber transformation is tried when user edits the string: if successful, NSNumber is send back to model using the value binding, if fails, stringValue is set back to previous value. Note that dropFirst skips initial update when setting up sink and receive operator is used for scheduling updates at later time when SwiftUI has finished current layout update cycle.

struct NumberTextField: View {
init(_ title: String, value: Binding<NSNumber>, formatter: NumberFormatter) {
self.title = title
self.stringTransformer = StringTransformer(value, formatter: formatter)
}
private let title: String
@ObservedObject private var stringTransformer: StringTransformer
var body: some View {
TextField(title, text: $stringTransformer.stringValue)
}
}
fileprivate extension NumberTextField {
final class StringTransformer: ObservableObject {
private var cancellable: AnyCancellable?
init(_ value: Binding<NSNumber>, formatter: NumberFormatter) {
// NSNumber -> String
stringValue = formatter.string(from: value.wrappedValue) ?? ""
// String -> NSNumber
cancellable = $stringValue.dropFirst().receive(on: RunLoop.main)
.sink(receiveValue: { [weak self] (editingString) in
if let number = formatter.number(from: editingString) {
value.wrappedValue = number
}
else if !editingString.isEmpty {
// Force current model value when editing value is invalid (invalid value or out of range).
self?.stringValue = formatter.string(from: value.wrappedValue) ?? ""
}
})
}
@Published var stringValue: String = ""
}
}
NumberTextField transforming NSNumber to String using NumberFormatter and vice versa.

Summary

TextField’s formatter initialiser does not seem to be operating as expected and therefore we built a custom view. It handles number to string transformations and refreshes the view when string can’t be transformed to number. Hopefully future SwiftUI iterations will fix the init(_:value:formatter:onEditingChanged:onCommit:) initialiser and NumberTextField is not needed at all.

If this was helpful, please let me know on Mastodon@toomasvahter or Twitter @toomasvahter. Feel free to subscribe to RSS feed. Thank you for reading.

Example project

SwiftUIFormattedTextField (Xcode 11.4.1)

Categories
iOS Swift SwiftUI

Revealing content behind keyboard in SwiftUI

By default SwiftUI view content gets behind a keyboard when editing text. Therefore let’s create a view modifier which can be easily added to any SwiftUI view and enables revealing content behind the keyboard with animation. In the end we will fix this broken looking view where TextField is behind the keyboard.

SwiftUI view with open keyboard hiding text field.

Observing keyboard notifications

I wrote about keyboard notifications a while ago in “Observing keyboard visibility on iOS”. We’ll also create a class named KeyboardObserver and its responsibility is to observe keyboardWillChangeFrameNotification, keyboardWillShowNotification and keyboardWillHideNotification and extracting values from the notification’s userInfo. In addition, we’ll add Info struct which holds animation duration, curve and end frame. Note that user info contains more values but we are only interested in those. With this set, we can subscribe to KeyboardObserver and get notified when keyboard changes. Next step is to use those values and reserving space for keyboard in SwiftUI view.

fileprivate final class KeyboardObserver: ObservableObject {
    struct Info {
        let curve: UIView.AnimationCurve
        let duration: TimeInterval
        let endFrame: CGRect
    }
    
    private var observers = [NSObjectProtocol]()
    
    init() {
        let handler: (Notification) -> Void = { [weak self] notification in
            self?.keyboardInfo = Info(notification: notification)
        }
        let names: [Notification.Name] = [
            UIResponder.keyboardWillShowNotification,
            UIResponder.keyboardWillHideNotification,
            UIResponder.keyboardWillChangeFrameNotification
        ]
        observers = names.map({ name in
            NotificationCenter.default.addObserver(forName: name,
                                                   object: nil,
                                                   queue: .main,
                                                   using: handler)
        })
    }

    @Published var keyboardInfo = Info(curve: .linear, duration: 0, endFrame: .zero)
}

fileprivate extension KeyboardObserver.Info {
    init(notification: Notification) {
        guard let userInfo = notification.userInfo else { fatalError() }
        curve = {
            let rawValue = userInfo[UIResponder.keyboardAnimationCurveUserInfoKey] as! Int
            return UIView.AnimationCurve(rawValue: rawValue)!
        }()
        duration = userInfo[UIResponder.keyboardAnimationDurationUserInfoKey] as! TimeInterval
        endFrame = userInfo[UIResponder.keyboardFrameEndUserInfoKey] as! CGRect
    }
}

Creating view modifier

View modifiers in SwiftUI transform the original view and return a new version of the original view. In the view modifier we’ll observe KeyboardObserver and add bottom padding to the original view based on the keyboard height and current safeAreaInsets. In addition, we’ll wrap it into animation block which tells SwiftUI to animate changes.

struct KeyboardVisibility: ViewModifier {
    @ObservedObject fileprivate var keyboardObserver = KeyboardObserver()

    func body(content: Content) -> some View {
        GeometryReader { geometry in
            withAnimation() {
                content.padding(.bottom, max(0, self.keyboardObserver.keyboardInfo.endFrame.height - geometry.safeAreaInsets.bottom))
                    .animation(Animation(keyboardInfo: self.keyboardObserver.keyboardInfo))
            }
        }
    }
}

fileprivate extension Animation {
    init(keyboardInfo: KeyboardObserver.Info) {
        switch keyboardInfo.curve {
        case .easeInOut:
            self = .easeInOut(duration: keyboardInfo.duration)
        case .easeIn:
            self = .easeIn(duration: keyboardInfo.duration)
        case .easeOut:
            self = .easeOut(duration: keyboardInfo.duration)
        case .linear:
            self = .linear(duration: keyboardInfo.duration)
        @unknown default:
            self = .easeInOut(duration: keyboardInfo.duration)
        }
    }
}

The view modifier uses GeometryReader for reading safeAreaInsets. It’s important to take this into account when keyboard is open, otherwise there will be unnecessary spacing.

View modifiers can be added to a view by using modifier function and passing an instance of view modifier to it. We’ll add a convenience method for it.

extension View {
    func keyboardVisibility() -> some View {
        return modifier(KeyboardVisibility())
    }
}

Using view modifier

Next step is to adding the view modifier to a content view. The view modifier should be added to the root view and it is recommended to use ScrollView for making sure all the content is viewable when keyboard is open. It’s time to fix the view mentioned in the beginning of the post. We’ll add keyboardVisibility view modifier to the root view.

struct ContentView: View {
    @State private var text: String = ""
    
    var body: some View {
        VStack(spacing: 16) {
            Spacer()
            Ellipse().foregroundColor(.red)
                .aspectRatio(contentMode: .fit)
                .frame(height: 200)
            Text("Welcome").font(.title)
            Text("Please enter your name")
            TextField("Name", text: $text)
                .textFieldStyle(RoundedBorderTextFieldStyle())
                .padding()
            Spacer()
        }.keyboardVisibility()
    }
}

KeyboardVisibility view modifier will make sure the content view has bottom spacing equal to keyboard height and the end result looks like this.

SwiftUI view with keyboard visibility view modifier.

Summary

We created a view modifier which is easy to add to existing views. It observers keyboard notifications and animates the content view along with keyboard.

If this was helpful, please let me know on Mastodon@toomasvahter or Twitter @toomasvahter. Feel free to subscribe to RSS feed. Thank you for reading.

Example project

SwiftUIKeyboardObserver (Xcode 11.4 beta 3)