This time we are going to look into how to embed custom view in UIScrollView and setting up autolayout constraints for different scenarios.
Setting up view controller with scroll view
We’ll gonna create a new view controller what contains UIScrollView as it’s subview. UIScrollView will cover the whole view area. Everything is set up in code as it is easier to represent the steps needed. It is easy to use those steps and setting up constraints in interface builder.
This file contains hidden or bidirectional Unicode text that may be interpreted or compiled differently than what appears below. To review, open the file in an editor that reveals hidden Unicode characters.
Learn more about bidirectional Unicode characters
Most common case is to have scroll view with vertically scrollable content. Embedded view’s leading, trailing, top and bottom layout anchors should be equal to scroll view’s content layout margin’s corresponding anchors. For making the view only scrollable in vertical axis, embedded view’s width should match with scroll view’s width. This is achieved by adding an extra width constraint to the embedded view. Width constraint should make the view width equal to scroll view’s width. When setting view’s up in interface builder, make sure to add at least one subview to the embedded view what has intrinsic content size (label, button etc) (also add constraints). Otherwise interface builder does not know what size the embedded view has.
This file contains hidden or bidirectional Unicode text that may be interpreted or compiled differently than what appears below. To review, open the file in an editor that reveals hidden Unicode characters.
Learn more about bidirectional Unicode characters
Horizontally scrollable view follows the same setup except instead of width constraint, we’ll add height constraint instead. When setting up the height constraint, scroll view’s safeAreaLayoutGuide’s heightAnchor should be used. This layout guide ignores the portion of the view what is covered by navigation bars, tab bars, toolbars, and other views.
This file contains hidden or bidirectional Unicode text that may be interpreted or compiled differently than what appears below. To review, open the file in an editor that reveals hidden Unicode characters.
Learn more about bidirectional Unicode characters
Case 3: Vertically and horizontally scrollable view
For making the embedded view to be scrollable in horizontal and vertical axis, we’ll only add leading, trailing, top and bottom constraints to scroll view’s contentLayoutGuide’s corresponding anchors. Embedded view should define intrinsicContentSize as this size is used by scroll view for knowing what size the view wants to be. This kind of layout is probably usable only for fixed size view’s. For example, building a custom grid view where the row and column count define the size of the view.
This file contains hidden or bidirectional Unicode text that may be interpreted or compiled differently than what appears below. To review, open the file in an editor that reveals hidden Unicode characters.
Learn more about bidirectional Unicode characters
Vertically and horizontally scrollable embedded view
Summary
We took a look on how to add constraints to embedded view in scroll view for getting a specific scrolling behaviour. In one sentence: leading, trailing, top, and bottom constraints to contentLayoutGuide and adding width or height constraint when necessary.
Let’s see how to replace multiple tokens in string. As an example problem to solve we will use this string: The quick <color_1> <animal_1> jumps over the lazy <animal_2>
String extension for replacing tokens
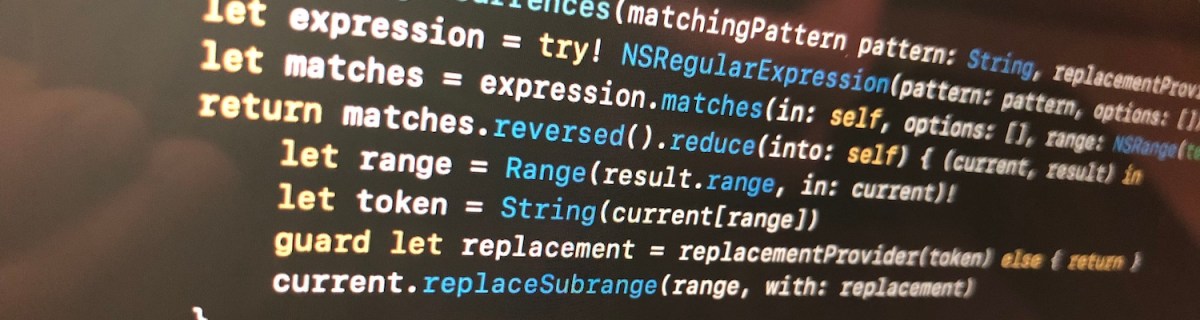
Token’s format is < text _ numbers > what can be turned into regular expression: <[:alpha:]+_{1}[:digit:]+>.
We’ll extend string and add a function what takes in regular expression and closure responsible of providing replacement strings. For finding tokens, we’ll use NSRegularExpression and get all the matches in the string. Next step is to reverse enumerate matches and replace tokens. Reverse enumerating is required it ensures that token ranges are constant. If we would start replacing from the first match, then all the succeeding ranges should be shifted based on the length difference of all the preceding tokens and replacements. In this case reduce is convenient because we can enumerate all the matches and then mutating the copy of the initial string with very few lines. Another aspect to note is that NSRegularExpression uses NSRange instead of <a rel="noreferrer noopener" aria-label="RangeRange<String.Index>. Therefore we need to convert ranges from one type to another making sure character indexes match. This function can now be used with custom logic when providing replacements. For example: we can have a simple mapping or even returning the same replacement string.
This file contains hidden or bidirectional Unicode text that may be interpreted or compiled differently than what appears below. To review, open the file in an editor that reveals hidden Unicode characters.
Learn more about bidirectional Unicode characters
String extension replacing tokens matching a pattern.
Summary
When we would like to do multiple replacements in a string, then one of the approaches is to get all the replacement ranges and then reverse enumerating the ranges and making replacements. In this way we can avoid having complex code trying to adjust based on the length difference of the source and replacement string.
iOS and macOS got a new framework in WWDC’19 named LinkPresentation. LinkPresentation enables fetching URL previews.
Adding LPLinkView for presenting preview
LPLinkView is a view subclass meant for rendering LPLinkMetadata. LPLinkMetadata contains information about the link: title, icon, image, video.
This file contains hidden or bidirectional Unicode text that may be interpreted or compiled differently than what appears below. To review, open the file in an editor that reveals hidden Unicode characters.
Learn more about bidirectional Unicode characters
Instances of LPLinkMetadata are fetched using LPLinkMetadataProvider for a given url. LPLinkMetadata is conforming to NSSecureCoding what enables a way of converting it to Data and storing the metadata on disk. Next time we need metadata for this url, we can use a locally cached data instead. Archiving and unarchiving is done with help of NSKeyedArchiver and NSKeyedUnarchiver and in the example archived data is stored in UserDefaults. In real apps it makes sense to store the data in separate files instead and not polluting UserDefaults with preview data.
This file contains hidden or bidirectional Unicode text that may be interpreted or compiled differently than what appears below. To review, open the file in an editor that reveals hidden Unicode characters.
Learn more about bidirectional Unicode characters
This file contains hidden or bidirectional Unicode text that may be interpreted or compiled differently than what appears below. To review, open the file in an editor that reveals hidden Unicode characters.
Learn more about bidirectional Unicode characters
Local LPMetadata storage using UserDefaults as storage
Summary
LinkPresentation framework adds a easy way of fetching previews for web pages. It provides a LPLinkView class making it extremely easy to render the preview.
This year Apple added CGAnimateImageAtURLWithBlock and CGAnimateImageDataWithBlock for animating GIFs and APNGs on all the platforms to the ImageIO framework. We can pass in URL or data and get callbacks when animation changes the current frame. In Xcode 11 beta 7 implicit bridging to Swift is disabled for those APIs and therefore we need to create a small wrapper around it in Objective-C.
Creating ImageFrameScheduler for managing CGAnimateImageAtURLWithBlock in Objective-C
Calling CGAnimateImageAtURLWithBlock starts the animation immediately. When animation frame changes, the handler block is called with frame index, current animation frame image and stop argument. When setting stop to YES, we can stop the animation. With this in mind we can create ImageFrameScheduler what takes in URL and has methods for starting and stopping the animation. Then we can expose this class to Swift and use it for managing the animation.
This file contains hidden or bidirectional Unicode text that may be interpreted or compiled differently than what appears below. To review, open the file in an editor that reveals hidden Unicode characters.
Learn more about bidirectional Unicode characters
This file contains hidden or bidirectional Unicode text that may be interpreted or compiled differently than what appears below. To review, open the file in an editor that reveals hidden Unicode characters.
Learn more about bidirectional Unicode characters
ImageAnimator conforming to ObservableObject in Swift
When updating views in SwiftUI, we can use ObservableObject protocol and @Published property wrapper what enables SwiftUI to get notified when the ObservableObject changes. This means that we need a model object written in Swift what stores our Objective-C class ImageFrameScheduler and exposes the current animation frame when animation is running. Whenever we update the property internally, property wrapper will take care of notifying SwiftUI to update the view.
This file contains hidden or bidirectional Unicode text that may be interpreted or compiled differently than what appears below. To review, open the file in an editor that reveals hidden Unicode characters.
Learn more about bidirectional Unicode characters
ContentView displaying animation frames in SwiftUI
Integrating ImageAnimator with ContentView is now pretty straight-forward, we check if animation frame image is available and display it. Animation is started when SwiftUI appears and stopped when it disappears.
This file contains hidden or bidirectional Unicode text that may be interpreted or compiled differently than what appears below. To review, open the file in an editor that reveals hidden Unicode characters.
Learn more about bidirectional Unicode characters
Although CGAnimateImageAtURLWithBlock and CGAnimateImageDataWithBlock are not directly usable in Swift, we can get away from it by adding a simple wrapper class in Objective-C. ImageFrameScheduler could be used in non-SwiftUI views by updating UIImageView when frame changes. In SwiftUI, views can use ImageAnimator for storing the current animation frame and using @Published property wrapper for letting SwiftUI view to know when to refresh.
Property wrappers allow property declaration to state what kind of property wrapper is used for implementing the property. We can use it for implementing transformations on properties like validating if string is email or not. This is what we will do: creating a property wrapper for email properties and validating emails using NSDataDetector. If value being set is email, we store it and if it is not, we set the property to nil instead.
Creating property wrapper
Property wrappers are types annotated with @propertyWrapper. The type needs to implement one property: wrappedValue. Emails are represented with strings, therefore our wrappedValue property is optional string. Optional is required, because string can contain invalid email and in that case we set the property to nil. Whenever we would like to use this property wrapper, we just need to add @EmailValidated in front of the property definition.
This file contains hidden or bidirectional Unicode text that may be interpreted or compiled differently than what appears below. To review, open the file in an editor that reveals hidden Unicode characters.
Learn more about bidirectional Unicode characters
Validating emails using regular expressions is not easy. Fortunately Apple provides API exactly for this: NSDataDetector. We can create an instance of NSDataDetector with specifying link as detected types. When matching emails, we use anchored option as we expect the string to only include email, nothing else. Anchored will tell the data detector to match starting with the first character. As firstMatch(in:options:range:) uses NSRange, we need to convert Swift’s range to NSRange because those ranges do not have one-to-one match. For this, we can use special NSRange initialiser taking Swift string and its range.
NSDataDetector represents links with URL, therefore we will see if match contains an URL and if URL’s scheme is mailto. If it is, we can extract the matched email and return it.
This file contains hidden or bidirectional Unicode text that may be interpreted or compiled differently than what appears below. To review, open the file in an editor that reveals hidden Unicode characters.
Learn more about bidirectional Unicode characters
For using the created property wrapper, all we need to do is to annotate property with @EmailValidated.
This file contains hidden or bidirectional Unicode text that may be interpreted or compiled differently than what appears below. To review, open the file in an editor that reveals hidden Unicode characters.
Learn more about bidirectional Unicode characters
We created a simple property wrapper for validating emails. We saw that creating a property wrapper for validating email with NSDataDetector requires only a little bit of code.
When writing code in Swift it is often needed to observe changes in other objects. We can use Apple’s key-value observation but it has some implications: requires to use NSObject and dynamic dispatch through Objective-C runtime. This time, let’s build a simple key-value observation in Swift what does not require to use NSObject at all. Although it is far from being as feature complete as Apple’s implementation, it delivers the basic use-case which is often all what we need.
Custom KeyValueObservable protocol
The approach we take here is defining a protocol, providing default implementations for all the functions. Then we can make any class to conform to this protocol, but as we need to store observation related information, then the class needs to define a property holding an instance of ObservationStore. Secondly, it is required to send key-value change notification manually using didChangeValue(for:).
Add observer function returns an instance of Observation what can be used for removing the added observation. If the observer does not need to be removed during the lifetime of the observer, it can be ignored. Observation is always cleaned up automatically next time any key value changes happen after observer is deallocated. This is due to the fact that observation handler captures observer weakly and during key-value changes, it is checked if the object is still alive or not.
This file contains hidden or bidirectional Unicode text that may be interpreted or compiled differently than what appears below. To review, open the file in an editor that reveals hidden Unicode characters.
Learn more about bidirectional Unicode characters
/// Adds observer for key path and returns observation token.
/// – Note: Observation token is only useful if it is needed to remove observation before observer is deallocated. When observer is deallocated, then observation is removed when next key value change is handled.
When adding observer, we create an observation handler what captures self and observer weakly. Handler returns boolean, what tells if the handler is still valid or not. Handler is not valid when observer has been deallocated since the last change. Otherwise handler is valid and should not be removed automatically.
This file contains hidden or bidirectional Unicode text that may be interpreted or compiled differently than what appears below. To review, open the file in an editor that reveals hidden Unicode characters.
Learn more about bidirectional Unicode characters
As mentioned before, ObservationStore is needed to added to every class conforming to KeyValueObservable protocol. It stores all the observations and restricts the access to modifying the observations directly from the observable class.
Observation is a simple struct containing an identifier and subtype defining the observation options. In this basic case, it just has initial option what assures handler is called immediately when adding an observer.
This file contains hidden or bidirectional Unicode text that may be interpreted or compiled differently than what appears below. To review, open the file in an editor that reveals hidden Unicode characters.
Learn more about bidirectional Unicode characters
In this small example a class Event conforms to KeyValueObservable and ViewController observers the title change and updates a label.
This file contains hidden or bidirectional Unicode text that may be interpreted or compiled differently than what appears below. To review, open the file in an editor that reveals hidden Unicode characters.
Learn more about bidirectional Unicode characters
This time we added basic support for observing key paths without using key-value observing APIs known already from Objective-C times. The added KeyValueObservable protocol is easy to add to existing classes but requires manually calling didChangeValue(for:) for every property change.
Inspiration came from Observers in Swift part 2 (Swift by Sundell).
iOS 13 added a new class named UIContextMenuInteraction what is used for attaching menus to views. When adding menu interaction to a view and user uses 3D Touch or long press gesture on devices not supporting it, a menu is presented alongside with the highlighted content view. Therefore depending on the available space, not all the menu items can fit into the menu.
Setting up UIContextMenuInteraction
UIContextMenuInteraction is initialised with a delegate. Delegate’s job is to create an instance of UIContextMenuConfiguration with provider block for creating a menu when needed. It also should be noted that delegate can return nil in what case no menu is shown.
This file contains hidden or bidirectional Unicode text that may be interpreted or compiled differently than what appears below. To review, open the file in an editor that reveals hidden Unicode characters.
Learn more about bidirectional Unicode characters
Action provider of UIContextMenuConfiguration is a function taking in suggested menu items and returning an instance of UIMenu. Suggested menu items are the ones provided by responders from responder chain. For example we could use it for sharing actions among multiple responders.
Every menu item is represented by UIAction or another UIMenu allowing to have nested menus. UIActions have title and optionally image and state icon if the state is on. In addition we can explicitly disable actions and set a destructive appearance.
This file contains hidden or bidirectional Unicode text that may be interpreted or compiled differently than what appears below. To review, open the file in an editor that reveals hidden Unicode characters.
Learn more about bidirectional Unicode characters
Let’s build a conversation view which shows a list of messages and has input text field with send button. Sent and received messages are managed by Conversation object. Conversation object manages a Session object which is simulating networking stack. This kind of setup allows us to look into how to propagate received messages from Session object to Conversation and then to the list view. We’ll jump into using types Combine and SwiftUI provide therefore if you need more information, definitely watch WWDC videos about Combine and SwiftUI.
Data layer
In the UI we are going to show a list of messages, therefore let’s define a struct for a Message. We’ll make the Message to conform to protocol defined in SwiftUI – Identifiable. We can add conformance by adding id property with type UUID what provides us unique identifier whenever we create a message. Identification is used by SwiftUI to identify messages and finding changes in the messages list.
This file contains hidden or bidirectional Unicode text that may be interpreted or compiled differently than what appears below. To review, open the file in an editor that reveals hidden Unicode characters.
Learn more about bidirectional Unicode characters
Session is owned by Conversation and simulates a networking stack dealing with sending and receiving messages. This like a place were we could use delegate pattern for forwarding received messages back to the Conversation. Instead of delegation pattern, we can use Combine’s PassthroughSubject. It enables us to publish new messages which we can then collect on the Conversation side. Great, but let’s see how to receive messages which are published by PassthroughSubject.
This file contains hidden or bidirectional Unicode text that may be interpreted or compiled differently than what appears below. To review, open the file in an editor that reveals hidden Unicode characters.
Learn more about bidirectional Unicode characters
Conversation is responsible of receiving messages from the Session and keeping the current history: list of messages. For receiving messages published by Session, we can use a subscriber called sink, which just gives access to values flowing through the channel. Subscribers are added directly to publishers, then publisher sends a subscription object back to the subscriber what subscriber can use for communicating with publisher. Here, communicating means requesting values from publisher. To recap: Session owns PassthroughSubject what Conversation starts to listen by attaching subscriber to it.
Conversation conforms to SwiftUI’s ObservableObject. When marking properties with @Published property wrapper, changes in those properties trigger updates in SwiftUI.
This file contains hidden or bidirectional Unicode text that may be interpreted or compiled differently than what appears below. To review, open the file in an editor that reveals hidden Unicode characters.
Learn more about bidirectional Unicode characters
In SwiftUI, views are described by value types conforming to View protocol. Every view return their content in the body property. Our UI is simple enough and requires to add navigation view, list and then input view. List is the table view construct which creates new rows whenever it needs to. As we made Message to conform to Identifiable, then we can pass the messages directly to the List.
This file contains hidden or bidirectional Unicode text that may be interpreted or compiled differently than what appears below. To review, open the file in an editor that reveals hidden Unicode characters.
Learn more about bidirectional Unicode characters
Input view contains text field and button for sending the entered message. Input text is local state owned by the view itself. @State is a property wrapper and internally it creates a separate storage where the input text is stored and read during view updates.
This file contains hidden or bidirectional Unicode text that may be interpreted or compiled differently than what appears below. To review, open the file in an editor that reveals hidden Unicode characters.
Learn more about bidirectional Unicode characters
Now we have a the whole picture put together. Conversation object manages messages and lets SwiftUI know when it changes by using @Published property wrapper. When property wrapper dispatches change to SwiftUI, it compares the changes in the view hierarchy and updates only what is needed.
Summary
We created a basic list view what displays messages in the conversation object. We used simple constructs for passing on the data down from the Session to the SwiftUI layer. The aim of the sample project was to try out some of the ways Combine and SwiftUI allow us to build views.
So far we have been using CommonCrypto when it has come to creating hashes of data. I even wrote about it some time ago and presented a thin layer on top of it making it more convenient to use. In WWDC’19 Apple presented a new framework called CryptoKit. And of course, it contains functions for hashing data.
SHA512, SHA384, SHA256, SHA1 and MD5
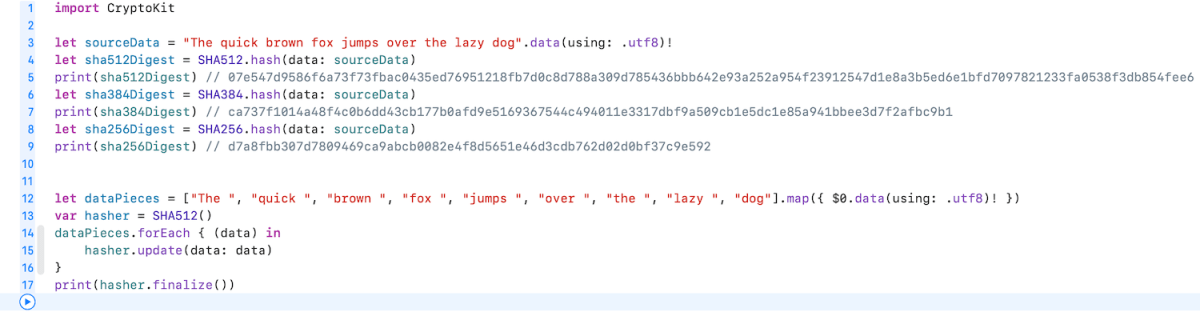
CryptoKit contains separate types for SHA512, SHA384 and SHA256. In addition, there are MD5 and SHA1 but those are considered to be insecure and available only because of backwards compatibility reasons. With CryptoKit, hashing data becomes one line of code.
This file contains hidden or bidirectional Unicode text that may be interpreted or compiled differently than what appears below. To review, open the file in an editor that reveals hidden Unicode characters.
Learn more about bidirectional Unicode characters
In case we do not have the whole data available in memory (e.g. really huge file), new types support creating hash by feeding data in piece by piece (just highlighting here how to use the hasher with incremental data).
This file contains hidden or bidirectional Unicode text that may be interpreted or compiled differently than what appears below. To review, open the file in an editor that reveals hidden Unicode characters.
Learn more about bidirectional Unicode characters
Apple has an excellent playground describing the common operations developers need when using CryptoKit. Highly recommend to check it out if you need something more than just creating hashes.
Summary
CryptoKit is long waited framework what is easy to use and does not require managing raw pointers what was needed to when using CommonCrypto. It now just takes some time when we can bump deployment targets and forget CommonCrypto.
Testing networking code might sound tricky at first but in reality, it just means using custom URLProtocol what returns data we would like to. This allows testing the networking module without mocking URLSession. Using this approach we could do so much more, even integrating a third party networking library.
Networking class wrapping URLSession
Firstly, let’s set up a simple WebClient class what uses URLSession for initiating networking requests. It has a fetch method for loading URLRequest and transforming the response to expected payload type using Codable. As payload can be any type, we use generics here. Note that we need to pass in the payload type as a variable because we need the exact type when decoding the JSON data. How can we test this as URLSession would try to send an actual request to designated URL? As unit tests should behave exactly the same all the time and should not depend on external factors, then using a separate test server is not preferred. Instead, we can intercept the request and provide the response with custom URLProtocol.
This file contains hidden or bidirectional Unicode text that may be interpreted or compiled differently than what appears below. To review, open the file in an editor that reveals hidden Unicode characters.
Learn more about bidirectional Unicode characters
URLProtocol is meant to be overridden. Firstly, we’ll need to override canInit(with:) and return true here allowing URLSession to use this protocol for any URL request. Secondly, it is required to override canonicalRequest(for:) where we can just return the same request. Thirdly, startLoading, where we have the loading logic which uses class property for returning appropriate response. This allows us to set this property in unit tests and then returning the result when URLSession handles the fetch request. Finally, URLProtocol also needs to define stopLoading method what we can just leave empty as this protocol is not asynchronous.
This file contains hidden or bidirectional Unicode text that may be interpreted or compiled differently than what appears below. To review, open the file in an editor that reveals hidden Unicode characters.
Learn more about bidirectional Unicode characters
Using TestURLProtocol for mocking network requests in unit tests
Setting up a unit test requires to set the TestURLProtocol’s loadingHandler and returning the data we would like to. Then we create URLSessionConfiguration and set our TestURLProtocol to protocolClasses. After that we can use this configuration for initialising URLSession and using this session in our WebClient which handles fetch requests. That is pretty much all we need to do for testing networking requests.
This file contains hidden or bidirectional Unicode text that may be interpreted or compiled differently than what appears below. To review, open the file in an editor that reveals hidden Unicode characters.
Learn more about bidirectional Unicode characters
Testing networking code at first might sound daunting. But actually it just boils down to using custom URLProtocol and providing response we need to in our test.