Sometimes we need to invoke an async function for fetching data before presenting a SwiftUI view. Therefore, a common flow is showing a spinner while the data is being fetched and then showing the main view. Moreover, if an error occurs, we show a failure view with a retry button. Let’s dive in how to build such view in a generic way.
As said before, our container view, let’s call it ContentPrepareView (similar naming to Apple’s ContentUnavailableView), has three distinct states: loading, failure, and success (named as “content” in the enum).
This file contains hidden or bidirectional Unicode text that may be interpreted or compiled differently than what appears below. To review, open the file in an editor that reveals hidden Unicode characters.
Learn more about bidirectional Unicode characters
We’ll go for a fully generic implementation where each of the view state corresponds to a view builder. This gives as flexibility if in some places we want to use custom loading views or different failure view. But on the other hand, most of the time we just want to use a common loading and failure views, that is why we set default values for loading and failure view builders (see below). In addition to view builders, we need an async throwing task closure which handles the data fetching/preparation. If we put it all together, then the ContentPrepareView becomes this:
This file contains hidden or bidirectional Unicode text that may be interpreted or compiled differently than what appears below. To review, open the file in an editor that reveals hidden Unicode characters.
Learn more about bidirectional Unicode characters
Since loading, failure and success views can be any kind of views, then our view needs to be a generic view. The body of the view has a switch-case for creating a view for the current view state. One thing to note here is that the onLoad view modifier is a custom one, and the idea is that it makes sure that the content preparation work only runs once per view life-time (onAppear() or task() can run multiple times). The reasoning is that we want to have an experience where we show the loading spinner only when the view is presented the first time, not when it appears again. The loadTask function is async and has responsibility of running the passed in async task closure and updating the current view state.
This file contains hidden or bidirectional Unicode text that may be interpreted or compiled differently than what appears below. To review, open the file in an editor that reveals hidden Unicode characters.
Learn more about bidirectional Unicode characters
In this example we used a custom FailureView and it is a small view wrapping Apple’s ContentUnavailableView. It sets a label, description and handles the creation of the retry button.
This file contains hidden or bidirectional Unicode text that may be interpreted or compiled differently than what appears below. To review, open the file in an editor that reveals hidden Unicode characters.
Learn more about bidirectional Unicode characters
Here is an example how to use the final ContentPrepareView. For demo purposes, it fails the first load and allows succeeding the second.
This file contains hidden or bidirectional Unicode text that may be interpreted or compiled differently than what appears below. To review, open the file in an editor that reveals hidden Unicode characters.
Learn more about bidirectional Unicode characters
CoreData is Apple’s object graph and persistence framework. It provides data sources for synchronising data with view. Let’s take a look on how to use those data sources in SwiftUI views. Starting with NSFetchedResultsController what is used for list and collection views, after that observing NSManagedObject directly from SwiftUI view and lastly subscribing to managed object context notifications.
NSFetchedResultsController
NSFetchedResultsController is used for providing data in table and collection views. It supports sorting and filtering data and arranging data into sections. We can use delegate for getting change callbacks. NSFetchedResultsControllerDelegate contains several methods:
This file contains hidden or bidirectional Unicode text that may be interpreted or compiled differently than what appears below. To review, open the file in an editor that reveals hidden Unicode characters.
Learn more about bidirectional Unicode characters
In SwiftUI we are not going to directly manipulate views. Only what we need to do is letting SwiftUI view know that data is about to change. Let’s take a look on simple app with list of items stored by CoreData. Data is represented by ColorItem where only stored value is hex string of the color (e.g. #AA22BB).
This file contains hidden or bidirectional Unicode text that may be interpreted or compiled differently than what appears below. To review, open the file in an editor that reveals hidden Unicode characters.
Learn more about bidirectional Unicode characters
ColorItems are managed by ContentView’s view model. View model creates NSFetchedResultsController, performs fetch and provides array of fetched ColorItems to the SwiftUI’s List. In addition, view model is delegate of the NSFetchedResultsController (requires view model to be NSObject subclass). As view model is ObservableObject, we can very easily let SwiftUI view know that it should refresh. We need to do two things: firstly, implementing controllerWillChangeContent delegate method and calling send() on objectWillChange publisher. Secondly, view model property must use @ObservedObject property wrapper in SwiftUI view. Result is that SwiftUI view subscribes to objectWillChange publisher and refreshes whenever publisher emits an event.
This file contains hidden or bidirectional Unicode text that may be interpreted or compiled differently than what appears below. To review, open the file in an editor that reveals hidden Unicode characters.
Learn more about bidirectional Unicode characters
And finally let’s see the ContentView implementation. NSManagedObject has objectID property what we can use in List for identifying every ColorItem. Cell is custom view what we’ll take a look at next.
This file contains hidden or bidirectional Unicode text that may be interpreted or compiled differently than what appears below. To review, open the file in an editor that reveals hidden Unicode characters.
Learn more about bidirectional Unicode characters
NSManagedObject implements ObservableObject protocol and therefore it is possible to use it together with @ObservedObject property wrapper and getting SwiftUI view refreshed automatically when any of the ColorItem properties change. NSFetchedResultsController required a little bit of code for setting up delegate but that is not the case with NSManagedObject.
This file contains hidden or bidirectional Unicode text that may be interpreted or compiled differently than what appears below. To review, open the file in an editor that reveals hidden Unicode characters.
Learn more about bidirectional Unicode characters
In addition, if there are cases where we would like to observe specific property, then Combine provides publisher for key path. Because NSManagedObject supports key-value observing we can use the publisher and subscribe to individual property changes.
This file contains hidden or bidirectional Unicode text that may be interpreted or compiled differently than what appears below. To review, open the file in an editor that reveals hidden Unicode characters.
Learn more about bidirectional Unicode characters
When we need to observe changes in persistent store we can observe notifications sent by the framework. As NotificationCenter supports publishers, we can subscribe to it, unpack data from notification and do something with the data. For making this easier we can introduce a separate type. It will unpack the user info dictionary and filter by type. This allows to easily observe, for example, ColorItem insertions. Or, if we would like to receive every possible change, we can specify NSManagedObject as the generic type.
This file contains hidden or bidirectional Unicode text that may be interpreted or compiled differently than what appears below. To review, open the file in an editor that reveals hidden Unicode characters.
Learn more about bidirectional Unicode characters
We took a look at how to use NSFetchedResultsController and NSManagedObject in SwiftUI views. We saw that integrating NSFetchedResultsController requires only a little bit of code and using NSManagedObject even less. In addition, we looked at subscribing to CoreData notifications and unpacking notification payload.
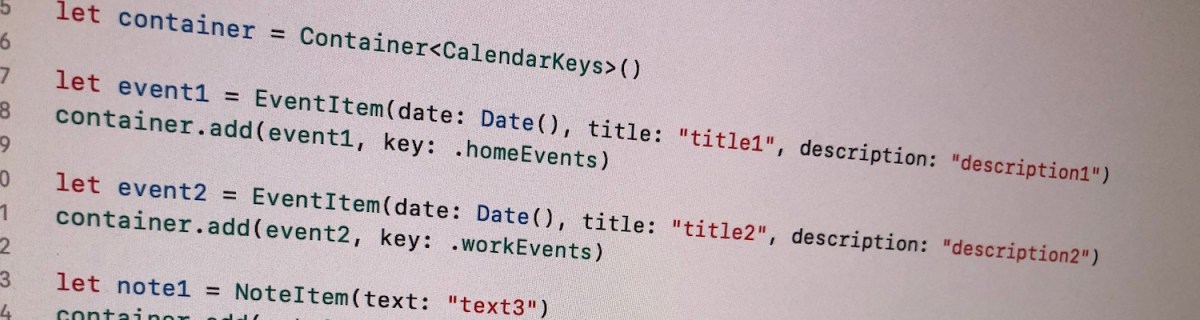
Let’s build a container where we can store collections of items conforming to a protocol. All the collections are identified by a case in enum. For making the container reusable, we’ll use protocols as requirements on keys and items in collections. Moreover, the container should be archivable and unarchivable.
Creating a reusable container
Container’s implementation wraps a dictionary and adds methods for conveniently adding an item for key. Key must implement Hashable and RawRepresentable: then it can be used in Dictionary and converting it to representation suitable for storing on disk.
Every item needs to implement ContainerItem protocol what requires to implement methods used when archiving and unarchiving the item. Thanks to Codable protocol in Swift, it is very simple to transform the item to data and back. ContainerItem provides default implementations for its own methods when the type is conforming to Codable. Therefore, when some type wants to implement ContainerItem, then it only needs to conform to ContainerItem and Codable and default implementations will do the rest.
This file contains hidden or bidirectional Unicode text that may be interpreted or compiled differently than what appears below. To review, open the file in an editor that reveals hidden Unicode characters.
Learn more about bidirectional Unicode characters
Archiving and unarchiving the container and it’s content
Let’s first extend the container with write method. As enum cases are used as keys in dictionary, then let’s implement write method for enums what have String as RawValue. (what should be a preferred way in this use case as its provides the most readable representation of the key). We can then map dictionary entries so that key is converted to String and value to array of JSON data objects. NSKeyedArchiver provides a simple way of storing Dictionary with archivable types (like String and array of Data).
For initialising the container from data on disk, we need to make sure that we convert JSON data back to the correct type. Therefore we can extend the container for this specific enum case and converting data back to the correct type. When using enums it is easy to switch over the possible cases and then converting list of data objects to list of known types.
This file contains hidden or bidirectional Unicode text that may be interpreted or compiled differently than what appears below. To review, open the file in an editor that reveals hidden Unicode characters.
Learn more about bidirectional Unicode characters
Wrapping dictionary with another type can be useful inmany cases where we have a known list of keys. Specialising generic types is an efficient way of adding more features to it and keeping type information intact. Thanks to Codable protocol we were able to make types archivable and unarchivable.
This file contains hidden or bidirectional Unicode text that may be interpreted or compiled differently than what appears below. To review, open the file in an editor that reveals hidden Unicode characters.
Learn more about bidirectional Unicode characters
Testing networking code might sound tricky at first but in reality, it just means using custom URLProtocol what returns data we would like to. This allows testing the networking module without mocking URLSession. Using this approach we could do so much more, even integrating a third party networking library.
Networking class wrapping URLSession
Firstly, let’s set up a simple WebClient class what uses URLSession for initiating networking requests. It has a fetch method for loading URLRequest and transforming the response to expected payload type using Codable. As payload can be any type, we use generics here. Note that we need to pass in the payload type as a variable because we need the exact type when decoding the JSON data. How can we test this as URLSession would try to send an actual request to designated URL? As unit tests should behave exactly the same all the time and should not depend on external factors, then using a separate test server is not preferred. Instead, we can intercept the request and provide the response with custom URLProtocol.
This file contains hidden or bidirectional Unicode text that may be interpreted or compiled differently than what appears below. To review, open the file in an editor that reveals hidden Unicode characters.
Learn more about bidirectional Unicode characters
URLProtocol is meant to be overridden. Firstly, we’ll need to override canInit(with:) and return true here allowing URLSession to use this protocol for any URL request. Secondly, it is required to override canonicalRequest(for:) where we can just return the same request. Thirdly, startLoading, where we have the loading logic which uses class property for returning appropriate response. This allows us to set this property in unit tests and then returning the result when URLSession handles the fetch request. Finally, URLProtocol also needs to define stopLoading method what we can just leave empty as this protocol is not asynchronous.
This file contains hidden or bidirectional Unicode text that may be interpreted or compiled differently than what appears below. To review, open the file in an editor that reveals hidden Unicode characters.
Learn more about bidirectional Unicode characters
Using TestURLProtocol for mocking network requests in unit tests
Setting up a unit test requires to set the TestURLProtocol’s loadingHandler and returning the data we would like to. Then we create URLSessionConfiguration and set our TestURLProtocol to protocolClasses. After that we can use this configuration for initialising URLSession and using this session in our WebClient which handles fetch requests. That is pretty much all we need to do for testing networking requests.
This file contains hidden or bidirectional Unicode text that may be interpreted or compiled differently than what appears below. To review, open the file in an editor that reveals hidden Unicode characters.
Learn more about bidirectional Unicode characters
Testing networking code at first might sound daunting. But actually it just boils down to using custom URLProtocol and providing response we need to in our test.
There are several ways how to create user interfaces on iOS: programmatically, xib per view or using storyboard for multiple views. Personally I tend to use xibs and programmatically created layouts more but sometimes I also use UIStoryboard – depends on the situation on hand. Therefore I like to present two small additions to UIStoryboard API what makes instantiating view controllers more compact and convenient to use.
This file contains hidden or bidirectional Unicode text that may be interpreted or compiled differently than what appears below. To review, open the file in an editor that reveals hidden Unicode characters.
Learn more about bidirectional Unicode characters
The approach I would like to present is a generic instantiate view controller method. It implies that in storyboard, the view controller’s identifier is set to the name of the view controller class.
When Storyboard ID for the view controller is set to the class name, it is now easy to derive the identifier from a type. It should be noted that in Swift, NSStringFromClass returns string with format <module name>.<class name>. Therefore it required to parse the returned string and taking only the class name part.
This file contains hidden or bidirectional Unicode text that may be interpreted or compiled differently than what appears below. To review, open the file in an editor that reveals hidden Unicode characters.
Learn more about bidirectional Unicode characters
In addition, with convenience method for getting storyboard, we can get to end result which is more compact and also avoids having identifier strings in the code.
This file contains hidden or bidirectional Unicode text that may be interpreted or compiled differently than what appears below. To review, open the file in an editor that reveals hidden Unicode characters.
Learn more about bidirectional Unicode characters
Every app consists of different flows for achieving a specific goal. For example, there is a sequence of views for sign up. When sign up flow ends, we need to move to so called main view what represents the main functionality of the app. There are definitely a lot of different ways how to handle app navigation and each of the approach have their own pros and cons. With this in mind, the approach I am going to demonstrate this time, is how to use flow controllers and using responder chain to connect flows to each other.
Navigating from flow to flow
Flow controller is a UIResponder coordinating a single flow in an app. It handles showing views, injecting dependencies and storing intermediate values required to pass from one view controller to another. Navigation from one flow to another happens using responder chain. This also enables us to use sending actions to nil first responder in story boards and xib files. Using responder chain adds extra flexibility when restructuring an app or changing flows a lot. There is only a little code needed to set up new flows. It is a kind of lightweight approach to coordinator pattern where delegation is replaced with responder chain.
Setting up protocols
As a first step we define two protocols: one for defining entry points and the second one for accessing flow controllers from any responder in responder chain. Flow controllers are going to conform to specialised presenting protocol and responders (typically view controller), which trigger navigation, conform to one of the controlling protocols. FlowPresenting protocol is going to define a single function what is used for presenting a first view in the flow. I find examples to be the best way of learning new approaches, therefore let’s build a sample app with three flows: app, login and main flow.
This file contains hidden or bidirectional Unicode text that may be interpreted or compiled differently than what appears below. To review, open the file in an editor that reveals hidden Unicode characters.
Learn more about bidirectional Unicode characters
AppFlowController is the controller handling presenting new flows. It conforms to AppFlowPresenting protocol what defines entry points to all the different flows. In addition, it handles inserting active flow to responder chain which enables easy access to flow controller from any presented view controller. Finding a flow controller from responder chain is implemented using a generic function. This enables implementing new getters for other flow controllers with just one line.
This file contains hidden or bidirectional Unicode text that may be interpreted or compiled differently than what appears below. To review, open the file in an editor that reveals hidden Unicode characters.
Learn more about bidirectional Unicode characters
In the current sample app, AppFlowController is going to handle representing all of the flows in the app. This is because all the current flows are consisting of one branch in a so called tree of flows. If we would have a more complex application, other flow controllers would handle their own subset of flows and would insert those flows into responder chain (like AppFlowController is inserting LoginFlowController and MainFlowController into responder chain). This kind of architecture allows creating a tree like structure of flows and separating them from each other – there is not going to be a single controller handling all the flows.
This file contains hidden or bidirectional Unicode text that may be interpreted or compiled differently than what appears below. To review, open the file in an editor that reveals hidden Unicode characters.
Learn more about bidirectional Unicode characters
In the example app we do not use storyboard for initialising the first view (“Main Interface” field in target settings is empty). Instead, we set up a window ourself and use AppFlowController for presenting the first view. In addition, we inject a manager storing a set of dependencies view controllers might require. Having approach like this, we do not need singletons and instead, flow controllers insert dependencies into view controllers. Using dependency injection keeps the overall dependency graph nice and clean.
This file contains hidden or bidirectional Unicode text that may be interpreted or compiled differently than what appears below. To review, open the file in an editor that reveals hidden Unicode characters.
Learn more about bidirectional Unicode characters
LoginFlowController has similar set up as AppFlowController with exception of not inserting a subsequent flow into responder chain. In the sample app, login flow does not branch into several other login related flows. At the end of login flow, AppFlowController is used to present main content view. Due to generic function we added to UIResponder extension, login flow controller accessor consists of a single line.
This file contains hidden or bidirectional Unicode text that may be interpreted or compiled differently than what appears below. To review, open the file in an editor that reveals hidden Unicode characters.
Learn more about bidirectional Unicode characters
Let’s see how view controllers in the login flow trigger navigation. LoginViewController conforms to LoginFlowControlling. This makes loginFlowController accessor available and we can use it for triggering navigation. It should be noted that loginFlowController accessor returns an object conforming to LoginFlowPresenting and does not explicitly declare the type of LoginFlowController. This means that LoginViewController does not know about LoginFlowController, instead, it just knows that the returned object implements methods listed in LoginFlowPresenting protocol. Less coupling makes it easier to test and restructure app in the future.
Another important point to note here is that it is so easy to add navigation capability to any other view controller. Flow controller does not need to be injected and in the end, we just need to make two changes in the whole view controller – protocol extension takes care of adding getter to the interface and triggering navigation is just a single line of code.
This file contains hidden or bidirectional Unicode text that may be interpreted or compiled differently than what appears below. To review, open the file in an editor that reveals hidden Unicode characters.
Learn more about bidirectional Unicode characters
AccountDetailsViewController is the last view controller in the login flow and it should trigger navigation to the main flow. As seen in previous paragraph, triggering navigation requires only two changes. This is also the case here.
This file contains hidden or bidirectional Unicode text that may be interpreted or compiled differently than what appears below. To review, open the file in an editor that reveals hidden Unicode characters.
Learn more about bidirectional Unicode characters
This time we took a look on how to use flow controllers and responder chain to easily manage navigation from one view to another. In the end we implemented a scalable architecture where adding navigation trigger points just require a few changes. Scalability comes from the fact that flows can be arranged into tree like structure and there is no requirement to have a single object managing all the flows. Moreover, we added a dependency injection capability to flow controllers which make it so much easier to test components separately and not worrying about singletons.
In this post we will go over basic usage of generics in Swift by building a simple singly linked list.
Introduction to generics
Generic code is code where the functionality is described without using specific types. Meaning, the code can use any types what match with constraints (if there are any). It’s best to take a look on an example. See how separate functions can be replaced with a single implementation.
This file contains hidden or bidirectional Unicode text that may be interpreted or compiled differently than what appears below. To review, open the file in an editor that reveals hidden Unicode characters.
Learn more about bidirectional Unicode characters
Generic implementation defines a placeholder for a type (in angle brackets), in those examples T was used (can be something else but it is the most common placeholder). If multiple type placeholders are needed, placeholders are separated with commas. In addition, it is possible to constrain the type, for example, requiring the type to conform to comparable protocol allowing to use comparisons in the generic function’s implementation. It’s the bare minimal knowledge required for getting started with generics. There is a lot more about it.
Singly linked list
Singly linked list is a data structure where every node knows about the next node, but not about the preceding node. The benefit of such data structure is efficiency when inserting and removing nodes. On the other hand it does not allow random access of nodes.
Defining a generic linked list is quite easy. First we need a LinkedList struct storing the first node. Node stores a value and the next node. When inserting or removing nodes from the list, next property is updated. Therefore node needs to have reference semantics for making sure all the objects are pointing at the correct next object (in value semantics new instances would be created when mutating the next property and it would break the continuity of the list).
This file contains hidden or bidirectional Unicode text that may be interpreted or compiled differently than what appears below. To review, open the file in an editor that reveals hidden Unicode characters.
Learn more about bidirectional Unicode characters
As said before, inserting and removing nodes is just a matter of updating the next properties. Therefore when inserting a node, its next node is the current node’s next node and the current node’s next node is the inserted node.
This file contains hidden or bidirectional Unicode text that may be interpreted or compiled differently than what appears below. To review, open the file in an editor that reveals hidden Unicode characters.
Learn more about bidirectional Unicode characters
This file contains hidden or bidirectional Unicode text that may be interpreted or compiled differently than what appears below. To review, open the file in an editor that reveals hidden Unicode characters.
Learn more about bidirectional Unicode characters
In this post we took a quick look at how to write generic code and applied that knowledge on generic version of singly linked list. It should be noted that here we used only the basics of generics and for example the linked list implementation could also benefit from associated types allowing to replace Node with for example, Element.
We will look into how to make a property observable using a separate class managing the observers. It is an alternative and simple way of observing property changes without using ReactiveSwift, Key-Value Observing or anything else similar. It can be an excellent glue between Model and View Model in MVVM or between View and Presenter when using VIPER architecture.
Creating a class Observable
This file contains hidden or bidirectional Unicode text that may be interpreted or compiled differently than what appears below. To review, open the file in an editor that reveals hidden Unicode characters.
Learn more about bidirectional Unicode characters
The class Observable holds a value what can be of any type. Now when the value is store by the class itself we can use Swift’s property observer and then calling change handlers. This allows creating an object with observable properties and observing those properties from other objects. Moreover, it is possible to remove any of the added observers.
Let’s take a look on an example of class “Pantry” what has a property holding array of jams. In the example we will add two observers: one reacting to changes and the other one what will also react to the initial value. When one of the observer is removed and the array of jams changes, only one of the observers is triggered.
This file contains hidden or bidirectional Unicode text that may be interpreted or compiled differently than what appears below. To review, open the file in an editor that reveals hidden Unicode characters.
Learn more about bidirectional Unicode characters