Last week, I spent quite a bit of time on investigating an issue which sometimes happened, sometimes did not. There was quite a bit of code involved running on multiple threads, so tracking it down was not so simple. No surprise to find that this was a concurrency issue. The issue lied in the implementation of guarding a mutable state with DispatchQueue. The goal of the blog post is to remind us again a pattern which looks nice at first but actually can cause issues along the road.
Let’s have a look at an example where we have a Storage class which holds data in a dictionary where keys are IDs and values are Data instances. There are multiple ways for guarding the mutable state. In the example, we are using a concurrent DispatchQueue. Concurrent queues are not as optimized as serial queues, but the reasoning here is that we store large data blobs and concurrent reading gives us a slight benefit over serial reading. With concurrent queues we must make sure all the reading operations have finished before we mutate the shared state, and therefore we use the barrier flag which tells the queue to wait until all the enqueued tasks are finished.
This file contains hidden or bidirectional Unicode text that may be interpreted or compiled differently than what appears below. To review, open the file in an editor that reveals hidden Unicode characters.
Learn more about bidirectional Unicode characters
The snippet above might look pretty nice at first, since all the logic around synchronization is in one place, and we can use the contents property in other functions without needing to think about using the queue. For validating that it works correctly, we can add a unit test.
This file contains hidden or bidirectional Unicode text that may be interpreted or compiled differently than what appears below. To review, open the file in an editor that reveals hidden Unicode characters.
Learn more about bidirectional Unicode characters
The test fails because we actually have a problem in the Storage class. The problem is that contents[id] = data does two operations on the queue: firstly, reading the current state using the property getter and then setting the new modified dictionary with the setter. Let’s walk this through with an example where thread A calls the store function and tries to add a new key “d” and thread B calls the store function at the same time and tries to add a new key “e”. The flow might look something like this:
A calls the getter and gets an instance of the dictionary with keys “a, b, c”. Before the thread A calls the setter, thread B already had a chance to read the dictionary as well and gets the same keys “a, b, c”. Thread A reaches the point where it calls the setter and inserts modified dictionary with keys”a, b, c, d” and just after that the thread B does the same but tries to insert dictionary with keys “a, b, c, e”. When the queue ends processing all the work items, the key “d” is going to be lost, since the thread B managed to read the shared dictionary state before the thread A modified it. The morale of the story is that when modifying a shared state, we must make sure that reading the initial state and setting a new value must be synchronized and can’t happen as separate work items on the synchronizing queue. This happened here, since using the dictionaries subscript first runs the getter and then the setter.
The suggestion how to fix such issues is to use a single queue and making sure that read and write happen within the same work item.
This file contains hidden or bidirectional Unicode text that may be interpreted or compiled differently than what appears below. To review, open the file in an editor that reveals hidden Unicode characters.
Learn more about bidirectional Unicode characters
An alternative approach to this Storage class’ implementation with new concurrency features in mind could be using the new actor type instead. But keep in mind that in that case we need to use await when accessing the storage since actors are part of the structured concurrency in Swift. Using the await keyword in turn requires having async context available, so it might not be straight-forward to adopt.
This file contains hidden or bidirectional Unicode text that may be interpreted or compiled differently than what appears below. To review, open the file in an editor that reveals hidden Unicode characters.
Learn more about bidirectional Unicode characters
While building my indie iOS app, I decided to go for a subscription type of approach. At first, I built a fully custom upsell view which showed all the subscription options and handled the purchase actions (not as straight-forward as it sounds). Later, I realized that since iOS 17 there is a SubscriptionStoreView which does all of this and allows some customization as well. The aim of the blog post it to demonstrate how to configure the SubscriptionStoreView and therefore saving time by not building a fully custom one.
Configuring the testing environment for subscriptions
Before we start using the SubscriptionStoreView, we will need to configure subscriptions with Xcode’s StoreKit configuration file. This allows us to test subscriptions without needing to set everything up on the App Store. Open the new file panel and select StoreKit Configuration File. After that, create a subscription group and some auto-renewable subscriptions. In the example app, I just created a “Premium” subscription group and added “Monthly” and “Yearly” auto-renewable subscriptions.
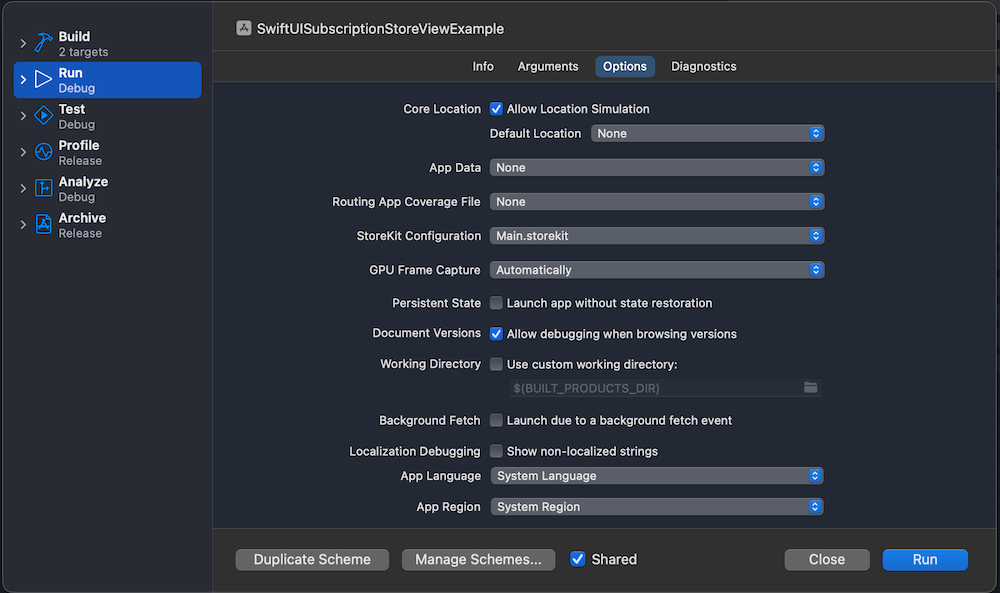
The last thing to do is setting this configuration file as the StoreKit configuration file to the current scheme.
Using the SubscriptionStoreView for managing subscriptions
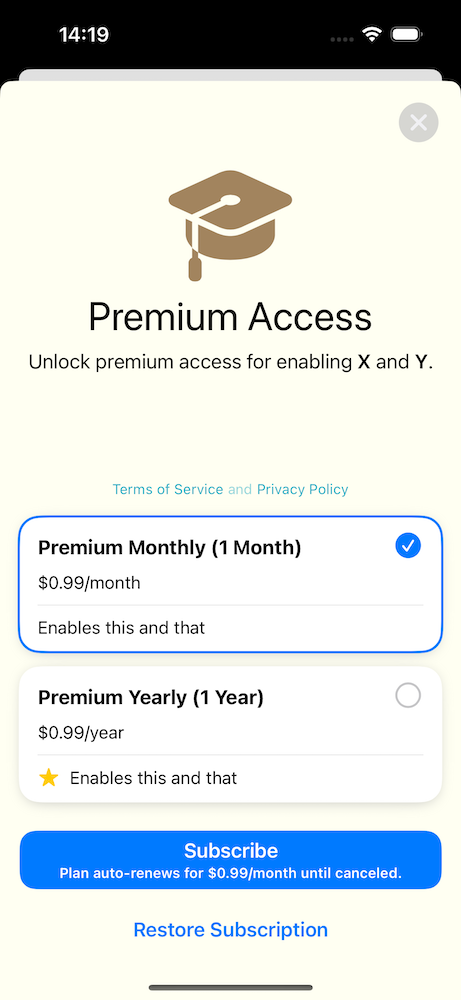
Now we are ready to go and display the SubscriptionStoreView. Since we are going to configure it a bit by inserting custom content into it, we’ll create a wrapping SubscriptionsView and use the StoreKit provided view from there. Let’s see an example first.
This file contains hidden or bidirectional Unicode text that may be interpreted or compiled differently than what appears below. To review, open the file in an editor that reveals hidden Unicode characters.
Learn more about bidirectional Unicode characters
The view above is pretty much the minimal we need to get going. App review requires having terms of service and privacy policy visible and also the restore subscription button as well.
There is quite a bit of more customization of what we can do. Adding these view modifiers will give us a slightly different view.
This file contains hidden or bidirectional Unicode text that may be interpreted or compiled differently than what appears below. To review, open the file in an editor that reveals hidden Unicode characters.
Learn more about bidirectional Unicode characters
Note: While playing around with subscriptions, an essential tool is in Xcode’s Debug > StoreKit > Manage Transactions menu.
Observing subscription changes
Our app also needs to react to subscription changes. StoreKit provides Transaction.currentEntitlements and Transaction.updates for figuring out the current state and receiving updates. A simple way for setting this up in SwiftUI is to create a class and inserting it into SwiftUI environment. On app launch, we can read the current entitlements and set up the observation for updates.
This file contains hidden or bidirectional Unicode text that may be interpreted or compiled differently than what appears below. To review, open the file in an editor that reveals hidden Unicode characters.
Learn more about bidirectional Unicode characters
Next, let’s insert it into the SwiftUI environment and update the current state. Wherever we need to read the state, we can access the Subscriptions class and read the hasPremium property. Moreover, thanks to the observation framework, the SwiftUI view will automatically update when the state changes.
This file contains hidden or bidirectional Unicode text that may be interpreted or compiled differently than what appears below. To review, open the file in an editor that reveals hidden Unicode characters.
Learn more about bidirectional Unicode characters
In the part 1 of the series, AsyncPhoto for displaying large photos in SwiftUI, we built a SwiftUI view which has a similar interface to Apple’s AsyncImage, but provides a way to use any kind of image data source. In the part 2 of the series, we’ll implement an in-memory cache for the AsyncPhoto. This is important for reducing any flickering caused by the nature of async image loading. An example to highlight where it comes useful is when we have a detail view which displays a thumbnail of a large photo. If we open the detail view multiple times for the same photo, we really do not want to see the loading spinner every single time. Another benefit is that we do not need to load a huge photo in memory and then spending CPU on scaling it down.
OK, let’s jump into it.
The aim of the cache is to cache the scaled down images. We never want to cache the original image data since it would make the memory usage to through the roof, and we would still need to use CPU to scale down the image. Before we start, we need to remember that in part 1 we designed the AsyncPhoto in a way where it has an ID, scaledSize properties and a closure for returning image data asynchronously. Therefore, the caching key needs to be created by using the ID and the scaled size, since we might want to display a photo in multiple AsyncPhoto instances with different sizes. Let’s create an interface for the caching layer. We’ll go for a protocol based approach, which allows replacing the caching logic with different concrete implementations. In this blog post we’ll go for a NSCache backed caching implementation, but anyone else could use other approaches as well, like LRUCache.
This file contains hidden or bidirectional Unicode text that may be interpreted or compiled differently than what appears below. To review, open the file in an editor that reveals hidden Unicode characters.
Learn more about bidirectional Unicode characters
The protocol only defines 3 functions for writing, reading, and creating a caching key. We’ll provide a default implementation for the cacheKey(for:size:) function. Since the same image data should be cached by size, the cache key combines id and size arguments. Since we are dealing with floats in a string, we’ll round the width and height.
The next step is to create a concrete implementation. In this blog post, we’ll go for NSCache which automatically evicts images from the cache in case of a memory pressure. The downside of a NSCache is that the logic in which order images are evicted is not defined. The implementation is straight-forward.
This file contains hidden or bidirectional Unicode text that may be interpreted or compiled differently than what appears below. To review, open the file in an editor that reveals hidden Unicode characters.
Learn more about bidirectional Unicode characters
We also added a shared instance since we want to use a single cache instance for all the AsyncPhoto instances. Let’s see how the AsyncPhoto implementation changes when we add a caching layer. The answer is, not so much.
This file contains hidden or bidirectional Unicode text that may be interpreted or compiled differently than what appears below. To review, open the file in an editor that reveals hidden Unicode characters.
Learn more about bidirectional Unicode characters
We added a new cache argument but also set the default value to the shared instance. The load() function tries to read a cached image as a first step, and the preparedScaledImage(for:) updates the cache. We rely on the cache implementation to keep the cache size small, therefore here is no code for manually evicting images from the cache when the ID changes. The main reason is that the AsyncPhoto instance does not have enough context for deciding this. For example, there might be other instances showing the photo for the old ID or maybe a moment later we want to display the photo for the old ID.
To recap, what we did. We defined an interface for caching images, created a NSCache based in-memory cache and hooked it up to the AsyncPhoto. We did all of this in a way that we did not need to change any existing code using AsyncPhoto instances.
There were some other tiny improvements, like using Task.isCancelled() to more quickly react to the ID change, setting the default placeholder colour to a light gray, and providing a default implementation for the content closure. Please check the example project for the full implementation. Here is the example project which reloads an avatar and as we can see at first, spinner is shown, but when images are cached, the change is immediate.
While working on one of my private projects which deals with showing large photos as small thumbnails in a list, I found myself needing something like AsyncImage but for any kind of data sources. AsyncImage looks pretty great, but sad it is limited to loading images from URL. It has building blocks like providing placeholder and progress views. In my case, I needed something where instead of the URL argument, I would have an async closure which returns image data. This would give me enough flexibility for different cases like loading a photo from a file or even doing what AsyncImage is doing, loading image data from a server. I would love to know why Apple decided to go for a narrow use-case of loading images from URL but not for more generic approach. In addition, I would like to pre-define the target image size which allows me to scale the image to smaller size and therefore saving memory usage which would increase a lot when dealing with large photos. Enough talk, let’s jump in.
This file contains hidden or bidirectional Unicode text that may be interpreted or compiled differently than what appears below. To review, open the file in an editor that reveals hidden Unicode characters.
Learn more about bidirectional Unicode characters
The AsyncPhoto type is a generic over 4 types: ID, Content, Progress, Placeholder. Last three are SwiftUI views and the ID is equatable. This allows us for notifying the AsyncPhoto when to reload the photo by calling the data closure. Basically the same way as the task(id:priority:_:) is working – if the id changes, work item is run again. Since we expect to deal with large photos, we want to scale images before displaying them. Since the idea is that the view does not change the size while it is loading, or displaying a placeholder, we’ll require to pre-define the scaled size. Scaled size is used for creating a thumbnail image and also setting the AsyncPhoto’s frame view modifier to equal to that size. We use a data closure here for giving a full flexibility on how to provide the large image data.
AsyncImage has a separate type AsyncImagePhase for defining different states of the loading process. Since we need to do the same then, let’s add AsyncPhoto.Phase.
This file contains hidden or bidirectional Unicode text that may be interpreted or compiled differently than what appears below. To review, open the file in an editor that reveals hidden Unicode characters.
Learn more about bidirectional Unicode characters
This allows us to use a switch statement in the view body and defining a local state for keeping track of in which phase we currently are. The view body implementation is pretty simple since we use view builders for content, progress and placeholder states. Since we want to have a constant size here, we use the frame modifier and the task view modifier is the one managing scheduling the reload when id changes.
This file contains hidden or bidirectional Unicode text that may be interpreted or compiled differently than what appears below. To review, open the file in an editor that reveals hidden Unicode characters.
Learn more about bidirectional Unicode characters
The load function is updating the phase state and triggering the heavy load of scaling the image.
This file contains hidden or bidirectional Unicode text that may be interpreted or compiled differently than what appears below. To review, open the file in an editor that reveals hidden Unicode characters.
Learn more about bidirectional Unicode characters
The prepareScaledImage is another function which wraps the work of fetching the image data and scaling it.
This file contains hidden or bidirectional Unicode text that may be interpreted or compiled differently than what appears below. To review, open the file in an editor that reveals hidden Unicode characters.
Learn more about bidirectional Unicode characters
I am using an UIImage extension for scaling the image data. The implementation goes like this:
This file contains hidden or bidirectional Unicode text that may be interpreted or compiled differently than what appears below. To review, open the file in an editor that reveals hidden Unicode characters.
Learn more about bidirectional Unicode characters
Here is an example of using AsyncPhoto from my test app, where I replaced photos with generated image data.
This file contains hidden or bidirectional Unicode text that may be interpreted or compiled differently than what appears below. To review, open the file in an editor that reveals hidden Unicode characters.
Learn more about bidirectional Unicode characters
Many apps use API keys when authenticating network requests. Although there are better ways of authenticating requests like OAuth with PKCE, but it might not always be possible. One thing what we must keep in mind is that it is fairly simple to extract strings from IPA files and therefore, if we store API keys in code, someone else can get access to these. This is of course a security issue. One of the approaches how to avoid it is using Apple’s on-demand resources with prefetching enabled. This means that as soon as we install the app, iOS will download additional resources separately and these resources can contain our API keys. This separation enables not putting any API keys into the IPA file. No one can go and inspect the IPA file any more and try to extract string constants. Let’s see how to set it up.
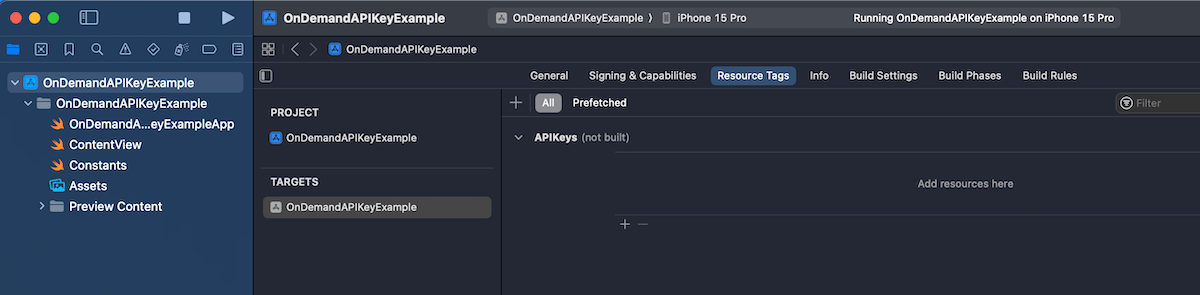
First step is that we create a prefetching enabled tag. Apple uses tags to identify on-demand resources. Open your Xcode project settings, app target and then “Resource Tags” tab. Let’s add a new resource tag named “APIKeys”.
The next step is to attach a resource to the tag. We’ll use a JSON file for our API keys, so go ahead and add a new JSON file for API keys. We’ll just create a key-value pairs in that file and assign a resource tag to the file, which can be found in the utilities area > file inspector tab. In our example, the tag has the same name as the file “APIKeys”.
So far we have created a resource tag and assigned a tag to the JSON file. The default behaviour is that the tag is treated as on-demand resource and only downloaded when it is required by the app. With API keys, it makes sense to download it along with the app binary when the user installs that app. Then on the first launch we can immediately store the API key in keychain for future usage. Prefetching can be enabled in the “Resource Tags” tab. Tap on the “Prefetched” button and drag the “APIKeys” tag under “Initial Install Tags”.
An important thing to note is that even though we have set that tag to be part of initial install tags there is still the possibility that the tag has been purged. This happens when the user installs the app and then waits a long time. In that case, the system needs to go and download it again when we want to access it. Therefore, the code accessing the tag could still take some time. Let’s see a simple function which accesses the JSON file through NSBundleResourceRequest API and makes the API keys available for the app.
This file contains hidden or bidirectional Unicode text that may be interpreted or compiled differently than what appears below. To review, open the file in an editor that reveals hidden Unicode characters.
Learn more about bidirectional Unicode characters
With a setup like this, we need to make sure that the loadAPIkeys function is called before we access mySecretAPIKey and mySecretAPIKey2. If we have a centralized place for network requests, let’s say some networking module which wraps URLSession then that could be an excellent place where to run this async code. Another way could be delaying showing the main UI before the function completes. Personally, I would go for the former and integrate it into the networking stack.
Sometimes we need to invoke an async function for fetching data before presenting a SwiftUI view. Therefore, a common flow is showing a spinner while the data is being fetched and then showing the main view. Moreover, if an error occurs, we show a failure view with a retry button. Let’s dive in how to build such view in a generic way.
As said before, our container view, let’s call it ContentPrepareView (similar naming to Apple’s ContentUnavailableView), has three distinct states: loading, failure, and success (named as “content” in the enum).
This file contains hidden or bidirectional Unicode text that may be interpreted or compiled differently than what appears below. To review, open the file in an editor that reveals hidden Unicode characters.
Learn more about bidirectional Unicode characters
We’ll go for a fully generic implementation where each of the view state corresponds to a view builder. This gives as flexibility if in some places we want to use custom loading views or different failure view. But on the other hand, most of the time we just want to use a common loading and failure views, that is why we set default values for loading and failure view builders (see below). In addition to view builders, we need an async throwing task closure which handles the data fetching/preparation. If we put it all together, then the ContentPrepareView becomes this:
This file contains hidden or bidirectional Unicode text that may be interpreted or compiled differently than what appears below. To review, open the file in an editor that reveals hidden Unicode characters.
Learn more about bidirectional Unicode characters
Since loading, failure and success views can be any kind of views, then our view needs to be a generic view. The body of the view has a switch-case for creating a view for the current view state. One thing to note here is that the onLoad view modifier is a custom one, and the idea is that it makes sure that the content preparation work only runs once per view life-time (onAppear() or task() can run multiple times). The reasoning is that we want to have an experience where we show the loading spinner only when the view is presented the first time, not when it appears again. The loadTask function is async and has responsibility of running the passed in async task closure and updating the current view state.
This file contains hidden or bidirectional Unicode text that may be interpreted or compiled differently than what appears below. To review, open the file in an editor that reveals hidden Unicode characters.
Learn more about bidirectional Unicode characters
In this example we used a custom FailureView and it is a small view wrapping Apple’s ContentUnavailableView. It sets a label, description and handles the creation of the retry button.
This file contains hidden or bidirectional Unicode text that may be interpreted or compiled differently than what appears below. To review, open the file in an editor that reveals hidden Unicode characters.
Learn more about bidirectional Unicode characters
Here is an example how to use the final ContentPrepareView. For demo purposes, it fails the first load and allows succeeding the second.
This file contains hidden or bidirectional Unicode text that may be interpreted or compiled differently than what appears below. To review, open the file in an editor that reveals hidden Unicode characters.
Learn more about bidirectional Unicode characters
Apple’s Charts library supports many chart types: bar, line, area, point, rectangle, but proper support for pie charts only came with iOS 17. It was possible to create pie charts before as well, but it required to take a long road and draw each of the sector yourself. iOS 17 brings us a new SectorMark mark type for pie charts. SectorMark represents a slice of the pie and comes with various properties for configuring the visual look of it. What we’ll be building is a pie chart on which we can tap, and then the sector or slice is animating to a larger size.
Before we start setting up the chart, let’s have a look at how the data is laid out. We’ll use a struct which has two properties: country and bags where bags represent a count of 60 kg bags of coffee beans exported from that country.
This file contains hidden or bidirectional Unicode text that may be interpreted or compiled differently than what appears below. To review, open the file in an editor that reveals hidden Unicode characters.
Learn more about bidirectional Unicode characters
The chart implementation is pretty compact in SwiftUI. It involves creating a Chart and adding SectorMarks with different configuration based on if the sector is selected or not.
This file contains hidden or bidirectional Unicode text that may be interpreted or compiled differently than what appears below. To review, open the file in an editor that reveals hidden Unicode characters.
Learn more about bidirectional Unicode characters
Above, we can see that we loop over an array of countries (CoffeeExport type) and create a SectorMark where the angle is set to the number of bags. The chart normalizes the data and calculates the corresponding angle for the sector. Therefore, the term angle might be slightly confusing at first since we pass in large numbers instead of the actual angle. SectorMark’s outerRadius in combination with angularInset is used for creating the selection effect where the sector has a spacing around it and is also drawn larger. If the sector is selected, then we use the full available plot area for drawing it, otherwise we add an inset to the available plot area which is the ratio of 0.9. The foregroundStyle(by:) view modifier ties the country name to the value.
User interaction is handled through the chartAngleSelection(value:) view modifier and whenever we tap on the chart, it sets the current value to the passed in binding. The value is a raw value used for creating SectorMarks. In our case it can be, for example, 1_000_000 or 123_456, depends on where we tap. The chart converts the actual angle to the number of bags for that angle for our data set. This means that we need to convert the raw value to one of the CoffeeExport types for figuring out which SectorMark is currently selected. We can just loop over the data and find the intersecting country. If the view model’s selectedCountry changes, SwiftUI view is refreshed with a bouncy spring animation.
This file contains hidden or bidirectional Unicode text that may be interpreted or compiled differently than what appears below. To review, open the file in an editor that reveals hidden Unicode characters.
Learn more about bidirectional Unicode characters
Last thing to note about the chart implementation is that we are passing in a list of custom colors since the default color list is not suitable for 11 sectors and colors would start to repeat. The chartForegroundStyleScale(domain:range:type:) just takes in a list of colors and these colors are then applied one by one to each of the sector mark. Since I know that there are going to be 11 sectors, then I defined 11 colors.
This file contains hidden or bidirectional Unicode text that may be interpreted or compiled differently than what appears below. To review, open the file in an editor that reveals hidden Unicode characters.
Learn more about bidirectional Unicode characters
Apps log a lot of information to the debug console in Xcode which at some point might get overwhelming and makes it difficult to understand what is going on. The information of what we are interested in when debugging an app might get overflown with information coming from other parts of the app. Everyone who have worked on apps which log a lot to console are more than happy to learn that Xcode 15 finally supports filtering console logs. No need to launch the Console.app any more if we want to get filtered console logging, we can forget that workaround. Let’s dive in how structured logging works alongside with Xcode 15.
For getting the full benefit of the new Xcode 15 update, we should be using Apple’s structured logging APIs. The logging APIs got an update in iOS 14 with the introduction of a Logger type. Before that, we used to use os_log functions. Here is an example of how to use the Logger type. My personal preference has been extending the Logger type in each of the module (target) with convenient static variables, which enables auto-completion.
import os

extension Logger {
    static let subsystem = Bundle.main.bundleIdentifier!

    static let networking = Logger(subsystem: subsystem, category: "Networking")
    static let presentation = Logger(subsystem: subsystem, category: "Presentation")
}
Let’s add some logging to a view model, which in turn uses a service class to fetch statements. The prepare method is called from view’s task view modifier.
@Observable final class ViewModel {
    let service: StatementService

    init(service: StatementService) {
        self.service = service
    }

    private(set) var statements = [Statement]()

    func prepare() async {
        Logger.networking.debug("Starting to fetch statements")
        do {
            self.statements = try await service.fetchStatements()
            Logger.networking.notice("Successfully fetched statements")
        }
        catch {
            Logger.networking.error("Failed to load statements with error: \(error)")
        }
    }
}
The debug console view in Xcode 15 looks like this by default when running our sample app.
If we want to inspect a single log line then we can click on it and pressing space which opens a quick look window.
Here we can see all the metadata attached to the log. Note the subsystem and category lines, which come from the information passed into the Logger’s initializer.
Often we want to see some of this metadata directly in the debug console view. This can be configured using “Metadata Options” picker.
If we want to jump to the source file and location then we need to hover on the log line and a jump button appears in the bottom right corner – very handy.
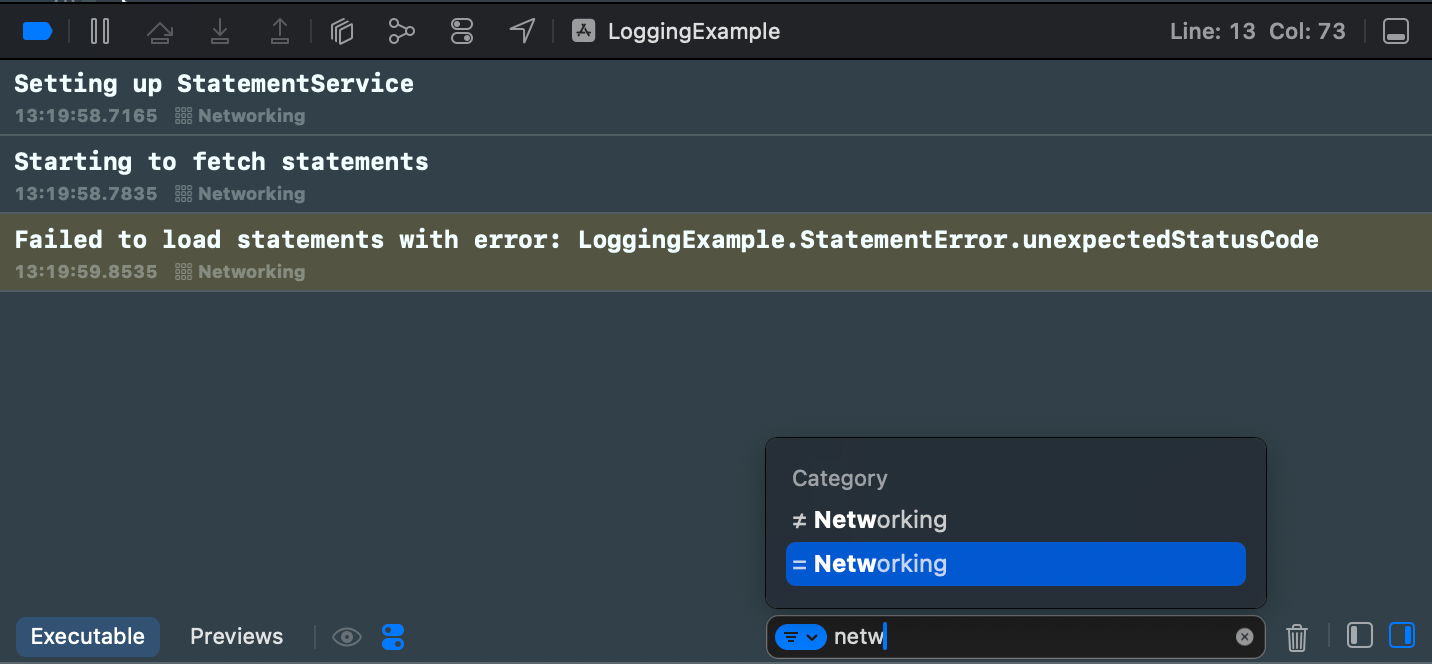
Logs can be filtered using the find bar. The find bar suggests filtering options. If I want to filter to log events which have category set to “Networking” then only thing I need to do is typing “netw” to the find bar, and already it provides me a quick way to apply this filter. Really, really handy.
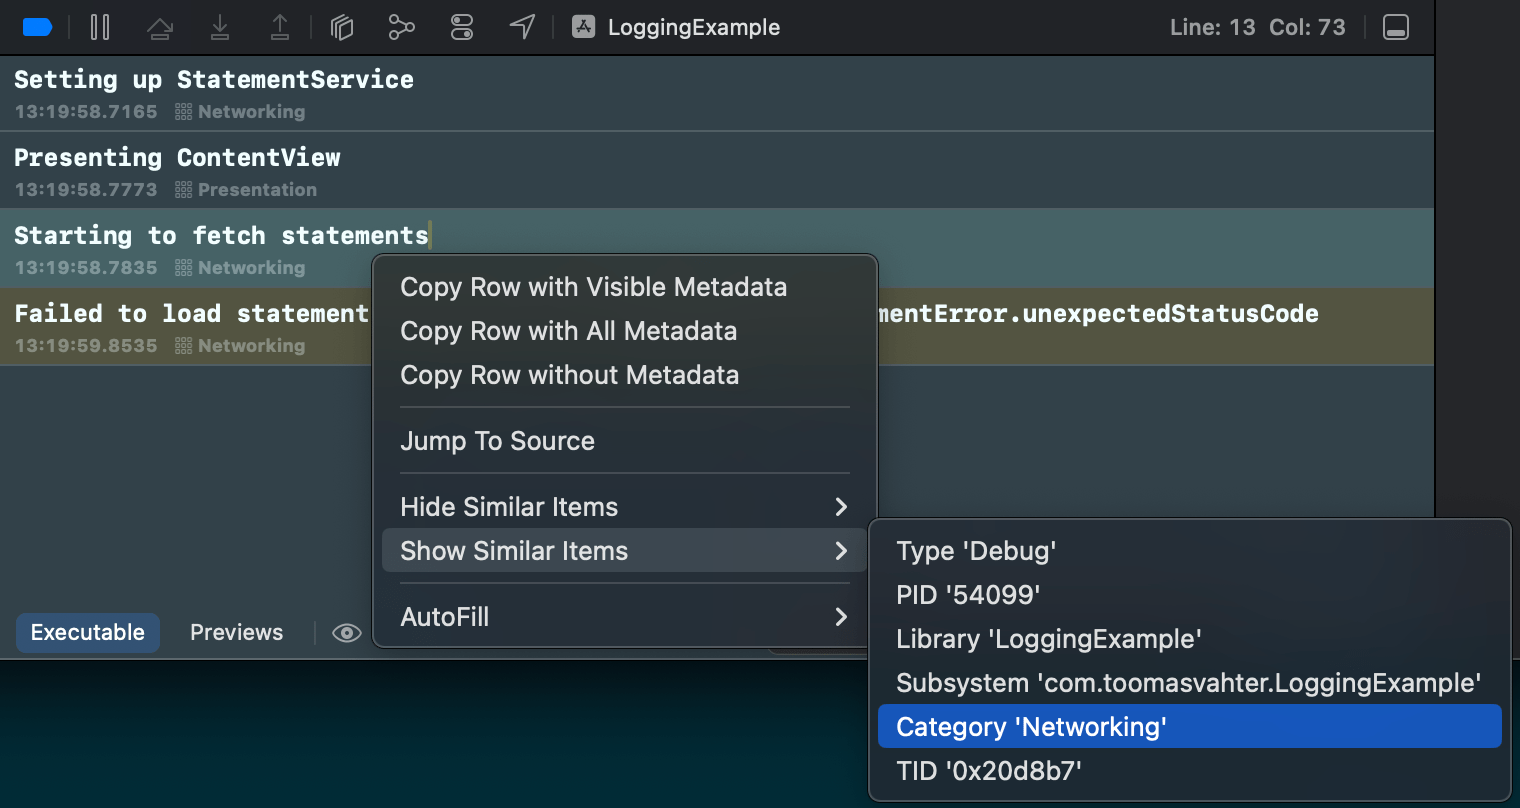
There is also a second way how to achieve the same filtering. Right-clicking a log entry and selecting Show Similar Items > Category ‘Networking’.
If we go to Apple’s documentation for URL’s init(string:) method, then this comes with a huge yellow banner describing new behaviour in iOS 17.
For apps linked on or after iOS 17 and aligned OS versions, URL parsing has updated from the obsolete RFC 1738/1808 parsing to the same RFC 3986 parsing as URLComponents. This unifies the parsing behaviors of the URL and URLComponents APIs. Now, URL automatically percent- and IDNA-encodes invalid characters to help create a valid URL.
Switching to the newer URL specification is a big deal, and in addition, the last sentence says that the new default is that URL(string:) tries to encode invalid characters. This is a big deal. This was not a case before. If we want to keep using the pre-iOS 17 behaviour, then we would need to replace URL(string:) with the new URL(string:encodingInvalidCharacters:) and passing false to the second argument. Apps which deals with URL strings definitely need to be tested thoroughly on iOS 17.
// iOS 16
URL(string: "my string") -> nil
// iOS 17
URL(string: "my string") -> my%20string
but
URL(string: "my string", encodingInvalidCharacters: false) -> nil