Categories
iOS Swift

An overview of the time profiler in Instruments

Instruments is an application bundled with Xcode. It enables to measure application performance in variety of ways. Performance is extremely important as it keeps application responsive and in other things less CPU usage also means longer battery life. Time profiler is one of the instruments which can be used for measuring your application. What it does is that it samples the application 1000 times per second and records function backtraces in each of the sample. It gives a pretty good overview of what the application was doing when the information is aggregated. On the other hand, sampling means that we do not get full information of what was going on. We can’t distinguish if a function was running a long time, or if it was called several times when it appears in several samples.

Running an app with time profiler

When profiling an application then it is recommended to run it always on the device for accurate results. Also, we’ll need to make sure to use release configuration as it contains all the compiler optimizations and reflects the App Store build. The profile action and its configuration can be seen in Product > Scheme > Manage Schemes, selecting a scheme and clicking on the edit.

Xcode edit scheme view showing build configuration setting set to release
Profile action for SignalPath scheme.

Profiling can be started with Product > Profile (command+I) which builds the application and opens Instruments. Instruments opens profiling template view where we should select Time Profiler. Clicking on the record button in the toolbar starts the application and starts profiling it. Sometimes it might be useful to enable deferred recording mode which delays the Instruments app to render recorded samples while recording is in progress. The setting for it is under Recording tab in the preferences.

Always use deferred mode in Instruments preferences
The setting for deferred mode in Instruments preferences.

Call tree view in Instruments

While the application is running it is being sampled. In every sample Instruments captures the full backtrace of every thread. Sampled data is then aggregated and can be viewed in call tree view. Just to reiterate that sampling also means that very fast functions might not show up at all as they already stopped executing before a new sample is captured. Another thing to note is that the time in the call tree view equals to the function count in samples times the sampling time. Therefore, it is not an exact duration of the function execution. Let’s take a look at an example trace.

Call tree view in Instruments
Call tree view in Instruments.

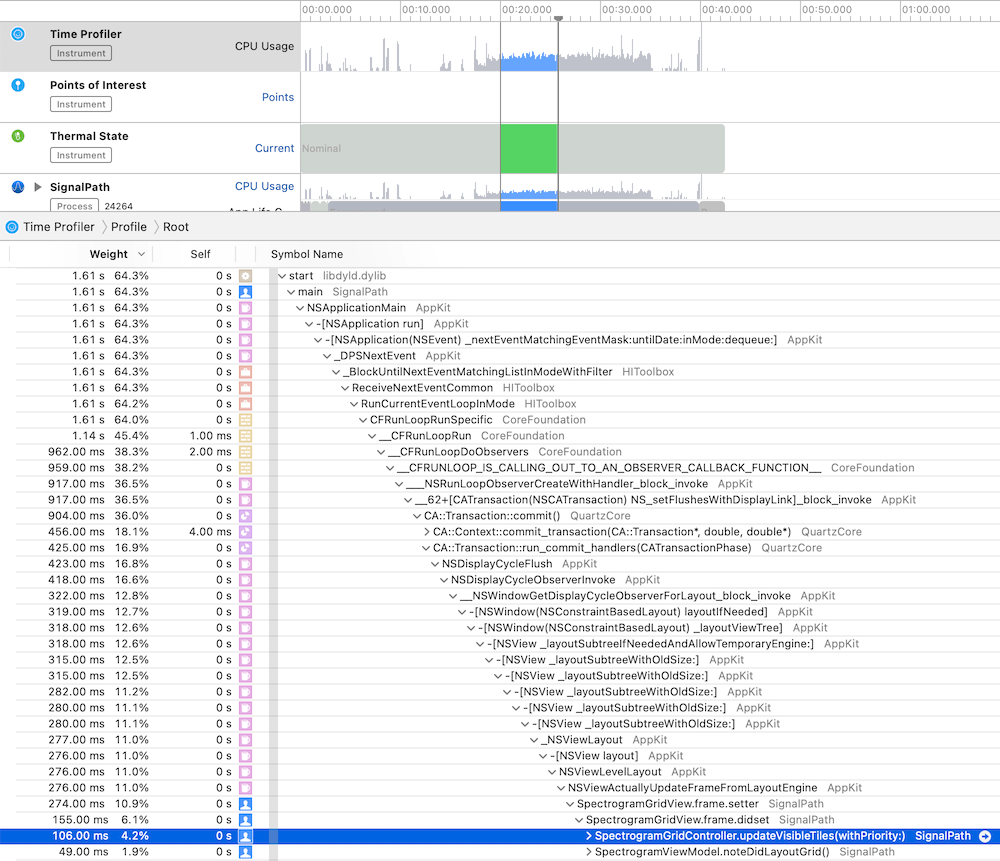
The call tree view contains several columns: weight, self and symbol name. The weight shows the percentage of samples that the particular call tree appeared in. The self column shows the time spent in that method itself. This excludes time spent in other methods it called itself. In summary, the work the method did itself. Just to reiterate, time equals to sample count times sampling time. In the symbol name column we can navigate the tree and see which methods were called. There can be a lot of information. Also, the backtrace can be pretty long. For making it easier one can hold option while clicking on disclosure triangles which will trigger a smart expansion of the related backtraces. Another thing we can do is using call tree filtering options.

Call tree filtering options in Instruments
Call tree options.

“Separate by State” option divides the data into different app states: running, backgrounded etc. “Separate by Thread” shows data for every thread separately. This is on by default as this is most of the time what we want: to see what thread was doing what. “Invert Call Tree” reverses the tree view and shows backtraces which end up calling a specific method. In other words, when a function is called from several code paths, then this option enables to see all of those code paths. “Hide System Libraries” is what I typically enable for only revealing all of my own methods. “Flatten Recursion” makes recursive functions to show up once in the call stack and “Top Functions” reveals methods which require the most work.

Another useful view is the “Heaviest Stack Trace” view which displays the call stack which needed the most work.

Something to keep in mind is that from time to time we could encounter tail call elimination which is a compiler optimization. The downside is that in some cases it will make time profiler to show a function being called by a parent method of the actual calling method. In those cases we can use CFLAGS="-fno-optimize-sibling-calls" build setting which takes away the performance gain but gives more accurate backtraces. For learning more about it, I suggest watching the WWDC video Profiling in Depth which talks about it in much greater detail.

Summary

The time profiler is an excellent tool to look into the work app is doing. It gives a detail insight on the call stack level. If we know the basics of using the time profiler we can find really quickly the areas in the app which could be more performant. Better performance means less battery usage and snappier user interfaces for users.

If this was helpful, please let me know on Mastodon@toomasvahter or Twitter @toomasvahter. Feel free to subscribe to RSS feed. Thank you for reading.

Categories
Swift Swift Package

Measuring collections with Apple’s Swift Collections Benchmark

Apple’s swift-collections package contains data structure implementations which have more specific use-cases and therefore not fitting into the Foundation. Along with collections Swift package Apple also released swift-collections-benchmark package which implements benchmarking. As like with any other Swift package we can use the benchmarking package for our own purposes as well. Therefore, in this blog post let’s take a look on how to use the benchmarking package.

Step one is to create a new Swift package with executable target which will be used to run benchmarks. In Xcode’s File menu we can select New > Swift Package. In the created package we will want to do some changes in the Package.swift file. We’ll need to add swift-collections-benchmark dependency and change the package type to executable instead of library.

// swift-tools-version:5.4
import PackageDescription
let package = Package(
name: "SwiftBenchmark",
products: [
.executable(
name: "SwiftBenchmark",
targets: ["SwiftBenchmark"]),
],
dependencies: [
.package(url: "https://github.com/apple/swift-collections-benchmark", from: "0.0.1"),
],
targets: [
.executableTarget(
name: "SwiftBenchmark",
dependencies: [.product(name: "CollectionsBenchmark", package: "swift-collections-benchmark")])
]
)
view raw Package.swift hosted with ❤ by GitHub
Package.swift file after changing the default library template to executable.

Secondly, we need to add main.swift file to the package or use the @main keyword. In this example I went for main.swift. When that is set as well, we can start using the benchmarking package and writing benchmarks for collections. For trying out the benchmarking I am going to use raywenderlicht/swift-algorithms-club’s queue implementations. It provides two examples of queues where one is a thin wrapper around the array type and the other one is an optimized version which looks into improving performance when dequeuing elements from the queue.

Setting up a benchmark requires defining a benchmark object and adding benchmark tasks to it and then calling main() on the benchmark object. Every added task will show up as a separate line on the chart when we render results. The package has some input generators defined and also allows adding more if we need to. Check the registerInputGenerator function on the Benchmark type for more information. But OK, back to benchmarks. The snippet below shows how to define a benchmark for dequeue operation over a variety of input sizes where the max input size is currently limited to 128000.

var queueBenchmark = Benchmark(title: "Queue")
queueBenchmark.add(title: "QueueSimple", input: [Int].self, maxSize: 128_000) { input in
return { timer in
var queue = QueueSimple<Int>()
input.forEach({ queue.enqueue($0) })
timer.measure {
for _ in 0..<input.count {
let value = queue.dequeue()
blackHole(value)
}
}
}
}
queueBenchmark.add(title: "QueueOptimized", input: [Int].self, maxSize: 128_000) { input in
return { timer in
var queue = QueueOptimized<Int>()
input.forEach({ queue.enqueue($0) })
timer.measure {
for _ in 0..<input.count {
let value = queue.dequeue()
blackHole(value)
}
}
}
}
queueBenchmark.main()
view raw main.swift hosted with ❤ by GitHub

When everything is set we can go ahead and run the benchmark. First navigate to the package’s folder and use the swift run command as shown below. When benchmarking finishes we can use the generated file, in this case “results”, to render a chart.

▶ swift run -c release SwiftBenchmark run results –cycles 3
[2/2] Linking SwiftBenchmark
* Build Completed!
Running 2 tasks on 76 sizes from 1 to 1M:
QueueSimple
QueueOptimized
Output file: /Users/toomas/Desktop/SwiftBenchmark/results
Appending to existing data (if any) for these tasks/sizes.
Collecting data:
1.2.4…8…16…32…64…128…256…512…1k…2k…4k…8k…16k…32k…64k…128k…256k…512k…1M — 15.1s
1.2.4…8…16…32…64…128…256…512…1k…2k…4k…8k…16k…32k…64k…128k…256k…512k…1M — 15s
1.2.4…8…16…32…64…128…256…512…1k…2k…4k…8k…16k…32k…64k…128k…256k…512k…1M — 15.1s
Finished in 45.2s
▶ swift run -c release SwiftBenchmark render results chart.png && open chart.png
view raw run.sh hosted with ❤ by GitHub

Like expected, the optimized queue performs much better in larger input sizes. Perfect!

If this was helpful, please let me know on Mastodon@toomasvahter or Twitter @toomasvahter. Feel free to subscribe to RSS feed. Thank you for reading.

Categories
Swift Swift Package

Running tests in Swift package with GitHub actions

Some time ago I published a tiny Swift package IndexedDataStore which tackles a problem of storing data blobs on disk. It could the image data or anything else. When working with Swift packages then it is extremely easy to build and run tests on macOS but when we want to build and run tests on iOS simulator then we need to drop using swift build and swift test commands. Fortunately xcodebuild can help here and we can build and run tests without generating a project file ourselves with swift package generate-xcodeproj. Something I would like to mention about the generate-xcodeproj command is that it generates a project which does not contain resource files. The aim of this blog post is to configure a GitHub action which runs unit-tests both on macOS and iOS.

GitHub actions need to be in the repostory’s .github/workflows folder. GitHub workflows are defined in YAML files which need to be in that folder. Let’s jump into it and start creating a worflow which runs tests on macOS and iOS. GitHub workflows must define a name, in our case, name: CI. Secondly we’ll need to define when the workflow should be triggered. Running the workflow whenever pull request is created of when something was pushed to main branch will suffice.

name: CI

on:
  push:
    branches: [ main ]
  pull_request:
    branches:
      - '*'

The next step is creating a job and defining a number of steps. Jobs require a name, then which resource it needs to use. The first step is the repository checkout followed by running swiftlint which is already part of the enviornment. The linting step uses the default configuration file .swiftlint.yml at the repository root. At this point we are ready to build and run tests.

jobs:
  unit_tests:
    runs-on: macos-latest
    steps:
    - name: Repository checkout
      uses: actions/checkout@v2
    - name: Lint
      run: swiftlint

The simplest way to build and test Swift packages is to use swift build and swift test commands which builds and runs tests on macOS. Unfortunately there is not a way to use those commands and setting the deplyoment to iOS. Therefore we’ll need to use xcodebuild command instead. It will know how to deal with Swift packages and therefore we only need to define scheme and destination arguments. It also makes sense to separate building (build-for-testing) from running tests (test-without-building) as it makes it easier to see where a failure happened. We can make the xcodebuild output a little bit cleaner by using xcpretty. In addition it is also reasonable to use set -o pipefail which makes the pipeline to use an occured error code as the final code of the whole pipeline. Finally, we’ll disable any buffering by setting NSUnbufferedIO to YES.

jobs:
  unit_tests:
    runs-on: macos-latest
    steps:
    - name: Repository checkout
      uses: actions/checkout@v2
    - name: Lint
      run: swiftlint
    - name: Build for macOS
      run: swift build -v
    - name: Run macOS tests
      run: swift test -v
    - name: Build for iOS
      run: set -o pipefail && env NSUnbufferedIO=YES xcodebuild build-for-testing -scheme IndexedDataStore -destination "platform=iOS Simulator,OS=latest,name=iPhone 12" | xcpretty
    - name: Run iOS tests
      run: set -o pipefail && env NSUnbufferedIO=YES xcodebuild test-without-building -scheme IndexedDataStore -destination "platform=iOS Simulator,OS=latest,name=iPhone 12" | xcpretty

This completes our workflow and we can check in the YAML file which gets then picked up by GitHub. All the actions can be see under the Actions section on GitHub.

Summary

We looked into how to add a GitHub workflow for running tests both on macOS and iOS. Although swift build does not support building the package for iOS we could still do that with xcodebuild.

If this was helpful, please let me know on Mastodon@toomasvahter or Twitter @toomasvahter. Feel free to subscribe to RSS feed. Thank you for reading.

Categories
iOS Swift

Code coverage for Swift Packages with Fastlane

Package.swift file in Swift packages describes the package contents including other dependencies, build targets and so on. Double-clicking a Package.swift file opens Xcode with that package and one can build and run tests. When adding continues integration to a Swift package then we would like to build, test, and also create a code coverage report. Fastlane is an excellent tool for such tasks and therefore let’s take a look on how to achieve that for packages with iOS target.

Code coverage support needs to be explicitly set and this can be done by using Swift Package Manager’s generate-xcodeproj command with having code coverage turned on. SPM then creates a Xcode project which has a slightly different scheme name with “-Package” suffix. The generated project file can then be used to run tests with Fastlane’s run_tests action. After running test we can use a tool like xcov for generating an HTML page with a code coverage report. One of the great features of the xcov is the ability to force a minimum code coverage percentage.

This approach works fine when we do not have any resource files in the package which are required for running tests. The problem is that the generate-xcodeproj command creates a project file without resource files. In those cases we would need to either use a separate standalone project or workspace file which has code coverage turned on.

Down below, we can see an example Fastfile which has a lane called “test_report” which generates a project file, runs tests and uses xcov for generating code coverage report. Additionally, it will delete the generated project file and any related folders.

require 'fileutils'
default_platform(:ios)
platform :ios do
desc "Run tests and create a unit-test report"
lane :test_report do
spm(
command: 'generate-xcodeproj',
enable_code_coverage: true
)
run_tests(
project: 'SPMPackage.xcodeproj',
scheme: 'SPMPackage-Package',
device: 'iPhone 12',
output_directory: './fastlane/UnitTests',
clean: true
)
xcov(
project: 'SPMPackage.xcodeproj',
scheme: 'SPMPackage-Package',
output_directory: './fastlane/CodeCoverage',
include_targets: 'SPMPackage.framework',
minimum_coverage_percentage: 80.0
)
if ENV['CI'] != 'true'
sh 'open ./UnitTests/report.html'
sh 'open ./CodeCoverage/index.html'
end
end
before_all do
FileUtils.remove_dir './CodeCoverage', true
FileUtils.remove_dir './UnitTests', true
end
after_all do
FileUtils.remove_dir './../SPMPackage.xcodeproj', true
end
end
view raw Fastfile.rb hosted with ❤ by GitHub

If this was helpful, please let me know on Mastodon@toomasvahter or Twitter @toomasvahter. Feel free to subscribe to RSS feed. Thank you for reading.

Categories
iOS macOS Swift

Custom string interpolation in Swift

ExpressibleByStringInterpolation is a protocol which makes it possible to compose strings with expressions evaluated at runtime. Interpolated strings are created with adding a \(some code) to a string. Those expressions are evaluated and a final string is created. This protocol, among other things, enables customizing strings what are created by those expressions. At the end of the post we have created a custom interpolation type which handles encodable and string representable types.

ExpressibleByStringInterpolation is a protocol which enables a type to be initialized with string interpolation. The protocol inherits from multiple other protocols, when going from top to down then it looks like this: ExpressibleByStringLiteral, ExpressibleByExtendedGraphemeClusterLiteral, and ExpressibleByUnicodeScalarLiteral. So it is a total of 4 levels of inheritance. That is important to know because if we add the protocol to a custom type then Xcode tells us about many functions the custom type needs to implement. Many of these functions already provide default implementation.

Let’s start with adding custom types Entry add EntryStorage. The storage type just keeps a collection of entries. The entry, for now, contains a string value, but we will expand the type in a way that the storage’s add function can be called with a string interpolation: storage.add("Entry (index)"). It will be very similar to OSLogMessage in Apple’s os framework.

struct EntryStorage {
private(set) var entries: [Entry] = []
mutating func add(_ entry: Entry) {
entries.append(entry)
}
}
struct Entry {
private(set) var value: String
}

With this set, let’s add ExpressibleByStringInterpolation conformance to the Entry type along with a custom interpolation type: EntryInterpolation. ExpressibleByStringInterpolation protocol comes with an associatedtype StringInterpolation which is by default set to DefaultStringInterpolation. If we want to use custom interpolation type then we can implement the init(stringInterpolation: EntryInterpolation) with the custom type and Swift will understand that we’ll be using our own type here. No need to add typealias StringInterpolation = EntryInterpolation (although we could for clarity). The custom EntryInterpolation type needs to conform to protocol StringInterpolationProtocol. The protocol requires us to implement an init method and a appendLiteral function. The custom type will have a property for storing multiple interpolated values because it needs to represents all the expressions in a single string. For example: "Text (expression1) more text (expression2)".

struct Entry: ExpressibleByStringInterpolation {
// typealias StringInterpolation = EntryInterpolation
private(set) var value: String
init(stringLiteral value: String) {
self.value = value
}
init(stringInterpolation: EntryInterpolation) {
self.value = stringInterpolation.values.joined()
}
}
struct EntryInterpolation: StringInterpolationProtocol {
private(set) var values: [String]
init(literalCapacity: Int, interpolationCount: Int) {
self.values = []
}
mutating func appendLiteral(_ literal: StringLiteralType) {
values.append(literal)
}
}

With this implementation we can write code which looks like this:

var entryStorage = EntryStorage()
entryStorage.add("Entry 1")

Note that the add method takes an argument of the type Entry but here we are passing a string to the function. This works because the Entry type conforms to the ExpressibleByStringLiteral protocol which the ExpressibleByStringInterpolation includes.

Now we have basics set up and we can go and add additional functions to the EntryInterpolation type. At first, we’ll add a generic function enabling us to create interpolated strings with expressions which return a type conforming to the CustomStringConvertible protocol. There are numerous types which implement this protocol and therefore we get a support of interpolating each of those. For example, Int and Array types conform to it.

extension EntryInterpolation {
mutating func appendInterpolation<T: CustomStringConvertible>(_ value: T) {
values.append(value.description)
}
}
let index = 2
let items = ["Item 1", "Item 2"]
entryStorage.add("Entry \(index): items=\(items)")
// Entry 2: items=["Item 1", "Item 2"]

Sometimes we might want to pass in encodable types directly with customizable formats. Note how the interpolated expression gets a support to the custom format argument. That is because Swift converts each of the expressions to calls to appendInterpolation which can have additional arguments.

extension EntryInterpolation {
mutating func appendInterpolation<T: Encodable>(_ value: T, jsonFormat: JSONEncoder.OutputFormatting = [.prettyPrinted, .sortedKeys]) {
let encoder = JSONEncoder()
encoder.outputFormatting = jsonFormat
let data = try? encoder.encode(value)
values.append(String(data: data ?? Data(), encoding: .utf8) ?? "invalid")
}
}
struct User: Encodable {
let name: String
let age: Int
}
let user = User(name: "Appleseed", age: 20)
entryStorage.add("Entry 3: \(user, jsonFormat: .prettyPrinted)")
entryStorage.add("Entry 3: \(user, jsonFormat: .sortedKeys)")
// Entry 3: {
// "name" : "Appleseed",
// "age" : 20
//}
//Entry 3: {"age":20,"name":"Appleseed"}

It is worth taking a look on the interface of the OSLogInterpolation type and all the appendInterpolation functions it implements. As seen so far, it is pretty easy to extend a custom interpolation type with functions like these.

If this was helpful, please let me know on Mastodon@toomasvahter or Twitter @toomasvahter. Feel free to subscribe to RSS feed. Thank you for reading.

Project

SwiftStringInterpolationPlayground (Xcode 12.4)

Categories
macOS Swift SwiftUI

Reading Fastfiles with document based SwiftUI app on macOS

WWDC’20 brought an addition to SwiftUI apps which enables to create document based applications in SwiftUI. Along with DocumentGroup API two new protocols were added: FileDocument and ReferenceFileDocument. The first one is meant for value types and the latter one for class type document types. For seeing how much effort it takes to create a document based SwiftUI app, let’s create a small macOS app which reads Fastlane’s Fastfiles.

Mac app window showing a list of lanes from a Fastfile
The final applications which displays a list of lanes.

Xcode comes with a pretty nice template for document based application. For this specific case we will go with macOS’ document app template.

A template picker in Xcode showing macOS document app template being selected.
Xcode template picker.

The default template is set up in a way that it can be used for reading and writing text documents. Let’s go and modify the created app. Fastfiles in Fastlane do not have any file extensions and therefore we’ll need to use public.data Uniform Type Identifiers (UTI) type which enables the app to open it. This has a side-effect as well, now the app can open lots of other files as well, so we should probably add a validation step which makes sure we are trying to read a Fastfile. As the app is going to deal with public.data UTI types and the app itself does not define any custom UTI types then Document Types and Imported Type Identifiers in the Info.plist can be removed.

Like mentioned before, SwiftUI brought a new way of creating document based applications. Document types are presented either with value or reference type. FileDocument is a protocol which adds an init method with read support, a write method and supported UTI type declarations for reading and writing. It is a pretty compact protocol when thinking about the interface UIDcoument has. Something to keep in mind is that every implemented method in the document must be thread-safe because reading and writing always happens on background threads. But let’s take a look at the implementation of a document which represents a Fastfile document:

struct FastfileDocument: FileDocument {
let fastfileContents: String
init(contents: String) {
self.fastfileContents = contents
}
init(configuration: ReadConfiguration) throws {
// TODO: validate the file name
guard let data = configuration.file.regularFileContents else { throw CocoaError(.fileReadCorruptFile) }
guard let string = String(data: data, encoding: .utf8) else { throw CocoaError(.fileReadCorruptFile) }
fastfileContents = string
}
static var readableContentTypes: [UTType] {
return [UTType("public.data")!]
}
func fileWrapper(configuration: WriteConfiguration) throws -> FileWrapper {
let data = fastfileContents.data(using: .utf8)!
return FileWrapper(regularFileWithContents: data)
}
// MARK: Accessing Lanes
func lanes() -> [Lane] {
return FastfileParser.lanes(in: fastfileContents)
}
}
struct Lane: Equatable, Identifiable {
let name: String
let documentation: String
var id: String {
return name
}
}

The FastfileParser was covered by the previous blog post if you would like to take a look: Adding prefixMap for expensive operations in Swift. In summary, the document just reads the whole Fastfile into the memory and provides a method for parsing lanes. Note that the protocol requires to have a write method defined as well although, at least for now, we are not going to use it. Having the document created, the next step is building a small UI which shows a list of lanes.

DocumentGroup is a new scene type which manages everything around creating, viewing, and saving documents. Therefore, for viewing a document we’ll need to create a DocumentGroup for viewing and provide a SwiftUI view which can display the document. DocumentGroup takes care of showing the open panel and coordinating the view creation. The example SwiftUI app looks like this:

@main
struct LaneControlApp: App {
var body: some Scene {
DocumentGroup(viewing: FastfileDocument.self) { file in
LaneListView(viewModel: LaneListView.ViewModel(document: file.document))
}
}
}
view raw App.swift hosted with ❤ by GitHub

A list view for showing the list of lanes is pretty straight-forward: LaneListView uses the List view component and displays individual rows with the LaneRowView. The row view shows the name of the lane and the description found in the Fastfile document.

struct LaneListView: View {
@StateObject var viewModel: ViewModel
var body: some View {
List {
ForEach(viewModel.lanes) { lane in
LaneRowView(lane: lane)
}
}
.frame(minWidth: 200, minHeight: 200)
}
final class ViewModel: ObservableObject {
let lanes: [Lane]
init(document: FastfileDocument) {
lanes = document.lanes()
}
}
}
struct LaneRowView: View {
let lane: Lane
var body: some View {
VStack(spacing: 8) {
Text(lane.name)
.font(.headline)
if !lane.documentation.isEmpty {
Text(lane.documentation)
.font(.subheadline)
.multilineTextAlignment(.center)
}
}
.frame(maxWidth: .greatestFiniteMagnitude)
.foregroundColor(.white)
.padding(12)
.background(Color.accentColor)
.cornerRadius(12)
}
}

Summary

DocumentGroup, FileDocument, and ReferenceFileDocument APIs are the building blocks for building document based apps with SwiftUI. Getting a simple document based app up and running does not require much code at all.

If this was helpful, please let me know on Mastodon@toomasvahter or Twitter @toomasvahter. Feel free to subscribe to RSS feed. Thank you for reading.

Categories
Swift

Adding prefixMap for expensive operations in Swift

Swift Foundation contains a lot of useful functions on collection types. In the context of this blog post we are interested in map(_:) and prefix(while:). Map is used for transforming collection elements and prefix(while:) for getting a sequence containing initial elements until the predicate is true. In some cases the predicate used in the prefix(while:) can be expensive, or we just want to combine the information in prefix and map functions. One of such examples is when we use NSRegularExpression. More specifically, let’s take an example of processing a list of strings while the regular expression has matches and then extracting a range from the string. A concrete example could be parsing Fastlane’s Fastfile for visualization purposes.

Fastlane is used a lot in the iOS community for automating development related tasks. Lanes are added to a Fastfile where every individual lane has a name and optionally a description.

desc 'Build and upload app store build'
desc 'Captures screenshots, builds the app, uploads to app store, and posts a message to slack'
lane :appstore do
capture_screenshots
build_app
upload_to_app_store
slack
end
view raw Fastfile hosted with ❤ by GitHub

If we would like to extract the lane name and description from the Fastfile then we can use regular expressions. The flow could be something like this: firstly, we can read the Fastfile contents, divide the file into lines and match lines with regular expressions. Second step is finding lines which contain a lane keyword. Then we could loop over preceding lines and collect lines which contain description. All in all, the logic for getting description could look like this:

let descExpression = try! NSRegularExpression(pattern: "^\\s*desc [\"']{1}([^\"]*)[\"']{1}", options: [])
// …
let description = (0..<lineIndex)
.reversed()
.prefixMap({ index -> String? in
// Get a line
let line = lines[index]
// Use regular expression
guard let match = descExpression.firstMatch(in: line) else { return nil }
// Regular expression contains a capture group, therefore looking for 2 ranges
guard match.numberOfRanges >= 2 else { return nil }
// When there are matches then extract description
guard let range = Range(match.range(at: 1), in: line) else { return nil }
return String(line[range])
})
.reversed()
.joined(separator: "\n")

Now when we have seen a case where prefixMap can be useful, it is time to look into how it is implemented. The transform passed into the prefixMap function can return nil and the nil value means that the looping should be stopped and all the transformed elements should be returned. And yes, the implementation is pretty straight-forward.

// Swift Foundation
func prefix(while predicate: (Self.Element) throws -> Bool) rethrows -> Self.SubSequence
func map<T>(_ transform: (Self.Element) throws -> T) rethrows -> [T]
// prefixMap (new)
extension Collection {
@inlinable func prefixMap<T>(_ transform: (Self.Element) throws -> T?) rethrows -> [T] {
var result = [T]()
for element in self {
if let transformedElement = try transform(element) {
result.append(transformedElement)
}
else {
break
}
}
return result
}
}

Summary

Foundation types can be extended with new functions easily. Although we could use prefix(while:) first followed with a map(_:) but sometimes we’ll just need to combine functionalities into a single function.

If this was helpful, please let me know on Mastodon@toomasvahter or Twitter @toomasvahter. Feel free to subscribe to RSS feed. Thank you for reading.

Project

PrefixMapPlayground (Xcode 12.4)

Categories
iOS macOS Swift

Building a memory cache for a file reader in Swift

In the previous blog post Reading data from a file with DispatchIO I built a small FileReader which enabled reading data from a file for random byte ranges. Signal Path uses a similar file reader but in addition it also caches read data in some interactions where there are a lot of read requests active, for example, while recording. Therefore, in this blog post we’ll build a small file data cache which stores data chunks for byte ranges. The cache needs to be performant, otherwise it would be faster to just read the data from the file if it is slow.

Defining an interface for the cache

The interface of the FileMemoryCache needs to provide a way for retrieving data, storing data, and limiting the overall memory usage.

final class FileMemoryCache {
init(byteCountLimit: Int)
/// Returns data for the byte range
func data(for byteRange: CountableRange<Int>) -> DispatchData?
/// Caches data for the byte range and evicts older data when exceeding byte count limit
func set(_ data: DispatchData, byteRange: CountableRange<Int>)
/// Removes everything from the cache
func removeAll()
}

Storing and retrieving cached data

The strategy of caching is to use a sorted array where the array is sorted by the first index of a byte range. Items in the array are structs containing a byte range and data. Having a sorted array makes it easier to merge data chunks when retrieving data for a longer byte range than the individual array items provide. As the aim is to keep it as fast as possible then data is merged only when cache is accessed which reduces the need to copy memory multiple times. The downside is that the cache can store overlapping chunks of data which reduces the efficiency. But on the other hand it is fast. Sorted array also enables to use binary search if linear search happens to be too slow with large amount of cached data chunks.

final class FileMemoryCache {
private var sortedItems = [StorageItem]()
struct StorageItem {
let byteRange: CountableRange<Int>
let data: DispatchData
}
}

Let’s start with the store method which takes a data and a byte range it corresponds to. For keeping the array sorted, we’ll use the first index of the byte range as the attribute for sorting. We’ll also make sure that the current item at the insertion index does not already contain the byte range we are trying to cache. If it does contain, we can safely ignore the current store request as the data is already cached. Additionally, we’ll check if the previous item in the array as it might also contain the byte range.

func set(_ data: DispatchData, byteRange: CountableRange<Int>) {
if let insertionIndex = sortedItems.firstIndex(where: { $0.byteRange.startIndex >= byteRange.startIndex }) {
let canDiscard: Bool = {
guard !sortedItems[insertionIndex].byteRange.contains(byteRange) else { return true }
guard insertionIndex > sortedItems.startIndex else { return false }
return sortedItems[insertionIndex.advanced(by: -1)].byteRange.contains(byteRange)
}()
if !canDiscard {
sortedItems.insert(StorageItem(byteRange: byteRange, data: data), at: insertionIndex)
}
}
else {
sortedItems.append(StorageItem(byteRange: byteRange, data: data))
}
}

When it comes to retrieving data then we’ll need to find intersecting cached data chunks and merge them if needed. Therefore, the first step is to collect cached data chunks which intersect with the requested range. For keeping it as simple as possible, will just loop over the array without using binary search and collect the items which are intersecting. The next step after that is to make sure the whole requested byte range is already present in the cache. This can be checked quite easily with IndexSet which contains indexes for every requested bytes. By removing byte indexes in intersecting ranges, the index set becomes empty. It means that every byte index is cached.

func data(for byteRange: CountableRange<Int>) -> DispatchData? {
// Find items which intersect with the search range
guard let firstIntersectingItemIndex = sortedItems.firstIndex(where: { byteRange.intersects($0.byteRange) }) else { return nil }
let intersectingItems = sortedItems[firstIntersectingItemIndex…].prefix(while: { byteRange.intersects($0.byteRange) })
// Check if the whole range is covered
var byteIndexesInCache = IndexSet(integersIn: byteRange)
intersectingItems.forEach({ byteIndexesInCache.remove(integersIn: $0.byteRange) })
guard byteIndexesInCache.isEmpty else { return nil }
// …
}

We’ll need to copy intersecting byte indexes into a final contiguous data. It could be that the whole cached data chunk can be copied over or just a part of it. After figuring out which part of the cached data chunk to copy, the next step is to calculate the byte index in the resulting memory region which starts with the zero byte index. The implementation can be seen below which includes byte range index conversions.

func data(for byteRange: CountableRange<Int>) -> DispatchData? {
// …
guard let byteRangePointer = malloc(byteRange.count) else { return nil }
for storageItem in intersectingItems {
let rangeToCopyInData: CountableRange<Int> = {
switch (byteRange.contains(storageItem.byteRange.startIndex), byteRange.contains(storageItem.byteRange.endIndex – 1)) {
case (true, true):
// Everything: |+++++++++++++|
return 0..<storageItem.byteRange.count
case (false, true):
// End: |—++++++++++|
return byteRange.startIndex – storageItem.byteRange.startIndex..<storageItem.byteRange.count
case (true, false):
// Start: |++++++++++—|
return 0..<byteRange.endIndex – storageItem.byteRange.startIndex
case (false, false):
// Middle: |—+++++++—|
return byteRange.startIndex – storageItem.byteRange.startIndex..<byteRange.endIndex – storageItem.byteRange.startIndex
}
}()
// Find the byte range in the allocated memory range where to copy the cached data section
let destinationByteIndex = storageItem.byteRange.startIndex – byteRange.startIndex + rangeToCopyInData.startIndex
let destinationPointer = byteRangePointer.advanced(by: destinationByteIndex)
let destinationBufferPointer = UnsafeMutableRawBufferPointer(start: destinationPointer, count: rangeToCopyInData.count)
storageItem.data.copyBytes(to: destinationBufferPointer, from: rangeToCopyInData)
// Ignore remaining intersections because everything is copied
if destinationByteIndex + rangeToCopyInData.count >= byteRange.endIndex {
break
}
}
let byteRangeBufferPointer = UnsafeRawBufferPointer(start: byteRangePointer, count: byteRange.count)
return DispatchData(bytesNoCopy: byteRangeBufferPointer, deallocator: .free)
}

Summary

We built a simple cache for storing data chunks for byte ranges. We used a sorted array for storing individual data chunks which made it easier to merge them into one when the cache is accessed. Make sure to check the full implementation on GitHub which also includes evicting cached data.

If this was helpful, please let me know on Mastodon@toomasvahter or Twitter @toomasvahter. Feel free to subscribe to RSS feed. Thank you for reading.

Example Project

FileReaderPlayground (Xcode 12.4)

Categories
Swift

Reading data from a file with DispatchIO

Signal Path is an app which works with large files, even in several gigabytes. The app reads ranges from the file and visualizes the data. Signal Path heavily relies on DispatchIO for having efficient access to data in a file. The aim of the blog post is to build a FileReader class which wraps DispatchIO and provides a similar functionality.

DispatchIO manages a file descriptor and coordinates file accesses. DispatchIO object can be created by providing a path to the file and specifying the stream type: stream or random access. In the context of this post we are interested in random access as we would like to read random ranges of bytes from a file. Therefore, let’s start with defining an interface for the FileReader.

final class FileReader {
init(fileURL: URL)
/// Opens the I/O channel with random access semantics
func open()
/// Closes the opened I/O channel
func close()
/// Reads data at byte range.
func read(byteRange: CountableRange<Int>, queue: DispatchQueue = .main, completionHandler: @escaping (DispatchData?) -> Void)
}
The interface for DispatchIO wrapping class.

The interface is pretty straight-forward with functions to open and close the file and with an asynchronous read function. DispatchIO returns read data as DispatchData which is a contiguous block of memory and what also can be cast into Data if needed.

We can use an init method on DispatchIO which has path argument when dealing with file paths. Note that the queue parameter on DispatchIO just specifies which queue is used for the cleanup handler, most of the cases .main will suffice. After creating the channel we can additionally control if data is returned once or partially with multiple handler callbacks. In our case, we would like to get a single callback, and therefore we need to set the low limit to Int.max. Then the read data is returned in with a single callback.

func open() -> Bool {
guard channel == nil else { return true }
guard let path = (fileURL.path as NSString).utf8String else { return false }
channel = DispatchIO(type: .random, path: path, oflag: 0, mode: 0, queue: .main, cleanupHandler: { error in
print("Closed a channel with status: \(error)")
})
// Load the whole requested byte range at once
channel?.setLimit(lowWater: .max)
guard self.channel != nil else { return false }
print("Opened a channel at \(fileURL)")
return true
}
func close() {
channel?.close()
channel = nil
}

Reading from a file requires having an opened channel and defining a byte range.

func read(byteRange: CountableRange<Int>, queue: DispatchQueue = .main, completionHandler: @escaping (DispatchData?) -> Void) {
if let channel = channel {
channel.read(offset: off_t(byteRange.startIndex), length: byteRange.count, queue: queue, ioHandler: { done, data, error in
print(done, data?.count ?? -1, error)
completionHandler(data)
})
}
else {
print("Channel is closed")
completionHandler(nil)
}
}

And the file reader can be used like this:

let fileURL = Bundle.main.url(forResource: "DataFile", withExtension: nil)!
let reader = FileReader(fileURL: fileURL)
if reader.open() {
reader.read(byteRange: 0..<20) { data in
if let data = data {
print("Read bytes: \(data.map({ UInt8($0) }))")
}
else {
print("Failed to read data")
}
}
}
else {
print("Failed to open")
}

Summary

DispatchIO provides an efficient way for accessing raw bytes in a file. Wrapping it into a FileReader class gives us a compact interface for working with file data. Please checkout the playground which contains the full implementation and the example: FileReaderPlayground.

If this was helpful, please let me know on Mastodon@toomasvahter or Twitter @toomasvahter. Feel free to subscribe to RSS feed. Thank you for reading.

Example Project

FileReaderPlayground (Xcode 12.4)

Categories
Foundation iOS macOS Swift

Measurement, Unit, Dimension, and MeasurementFormatter on iOS

I was looking at formatters provided by Foundation framework and this time I would like to put some attention on MeasurementFormatter. Like the name says, it is used for creating localized strings of some sort of measurements. Measurements are represented by a generic struct Measurement where the generic UnitType describes the unit represented by it. Apple provides an Unit subclass Dimension which in turn has a many subclasses on its own. At the time of writing there are 22 dimensional units available with each of those having multitude of related units. For example, UnitDuration provides units for seconds, minutes, and hours. The full list of Apple provided dimensions are available in a table here: Dimension.

Using MeasurementFormatter

MeasurementFormatter is simple to use. If we change the unitStyle property then we can configure how the unit is spelled in the localized string.

let formatter = MeasurementFormatter()
let unitStyles: [Formatter.UnitStyle] = [.short, .medium, .long]
for unitStyle in unitStyles {
formatter.unitStyle = unitStyle
let measurement = Measurement(value: 9.8, unit: UnitAcceleration.gravity)
print(formatter.string(from: measurement))
}
// Prints:
// 9.8Gs
// 9.8 G
// 9.8 g-force
Basic usage of MeasurementFormatter.

MeasurementFormatter also has an unitOptions property which controls the way how the final string is composed when taking account the current locale. For example, if locale is set to en_US then UnitTemperature measurement is formatted in Fahrenheits. If locale is set to en_GB then the measurement returns Celsius.

let formatter = MeasurementFormatter()
formatter.locale = Locale(identifier: "en_US")
print(formatter.string(from: Measurement(value: 293, unit: UnitTemperature.kelvin)))
// 67.73°F
formatter.locale = Locale(identifier: "en_GB")
print(formatter.string(from: Measurement(value: 293, unit: UnitTemperature.kelvin)))
// 19.85°C
MeasurementFormatter selecting output unit based on the locale.

In case we would like to make sure the same unit is used, then we can use the providedUnit option.

let formatter = MeasurementFormatter()
formatter.unitOptions = [.providedUnit]
formatter.locale = Locale(identifier: "en_US")
print(formatter.string(from: Measurement(value: 293, unit: UnitTemperature.kelvin)))
// 293 K
Forcing the formatter to use the provided unit.

Another thing to note is that the Measurement type also supports comparing measurements and mathematical operations. For example, we can add two measurements.

let measurement1 = Measurement(value: 3.2, unit: UnitElectricCurrent.amperes)
let measurement2 = Measurement(value: 0.02, unit: UnitElectricCurrent.kiloamperes)
print(measurement1 + measurement2)
// 23.2 A
A sum of two measurements.

Creating additional units

MeasurementFormatter is built in a way that it can support custom units as well. We could create a pseudo unit for a children’s game named UnitBanana.

class UnitBanana: Dimension {
override static func baseUnit() -> Self {
return UnitBanana.banana as! Self
}
static let banana = UnitBanana(symbol: "bana", converter: UnitConverterLinear(coefficient: 1.0))
}
let formatter = MeasurementFormatter()
formatter.unitOptions = .providedUnit
print(formatter.string(from: Measurement(value: 2, unit: UnitBanana.banana)))
// 2 bana
Pseudo-unit called UnitBanana.

Summary

MeasurementFormatter and Measurement types create a powerful combination which can be used for creating localized strings of values with an unit. Next time when you need to present a value with an unit, then check out the MeasurementFormatter first.

If this was helpful, please let me know on Mastodon@toomasvahter or Twitter @toomasvahter. Feel free to subscribe to RSS feed. Thank you for reading.