Swift package manager supports creating command and build plugins. In this blog post we’ll take a closer look at build plugins since these enable us to tap into the package build process and add extra steps like generating some code for the package. Command plugins, on the other hand, add extra commands which we can invoke from the command line or from Xcode since Xcode automatically exposes these commands in the UI. The example problem we are going to tackle is creating a build plugin which takes in a JSON and outputs some Swift code which in turn is used by the package. For making things more interesting, we’ll hook up a custom executable target which contains custom logic for generating that code. In many other cases, we could use existing tools like Sourcery and skip our own executable target.
Plugins run in a sandbox environment, so they can only write to a pluginWorkDirectory. So in our case we’ll write our generated code in that folder and tell the build command to include the generated file while building the target. This wasn’t immediately clear for me that this happens automatically if I set the generated file path as an output file of the build command. But let’s start with setting up a build plugin and then adding the executable target which the build plugin ends up calling and which generates the code.
We’ll name the build plugin as “ToomasKitPlugin” since the example package is named as “ToomasKit”. Plugins need to be defined in the Package.swift where we also let the Swift build system know which target runs the plugin. The final Package.swift looks like this which includes a library with its target and testing target, plugin, and executable target.
This file contains hidden or bidirectional Unicode text that may be interpreted or compiled differently than what appears below. To review, open the file in an editor that reveals hidden Unicode characters.
Learn more about bidirectional Unicode characters
Here we can see that the plugin goes under the targets section and since we are interested in creating build plugins the capability is set to buildTool. The other option is command plugin, which was mentioned before. Also, we add a plugin dependency since the plugin ends up calling an executable which we will create ourselves. Secondly, we need to add the plugin to the library target, since Swift build system needs to know which target runs this plugin. Time to create the build plugin. Plugins go, by default, to <PackageRoot>/Plugins folder and since our plugin is named as ToomasKitPlugin the full path is <PackageRoot>/Plugins/ToomasKitPlugin. Build tool plugins need to conform to BuildToolPlugin protocol, and we also need to annotate the struct with @main for letting Swift know which type is the entry point of the plugin. Build tool plugins need to implement a createBuildCommands function which returns a list of build commands to run. At the time of writing the post there are available pre-build and build commands where the former runs every single time we build and the latter only when there is a change in input or output files which the command refers to. In our case, the input file is a JSON file and the output is the generated Swift file. The JSON file is part of the package target, so we can get a path to the file using the target.directory API. The output can only be written to pluginWorkDirectory since plugins run in a sandbox. All the paths which are added to outputFiles get included with the build. Since we are generating Swift code the package will use, we add it to outputFiles. Now when we have the plugin configured, let’s take a look at the CodeGenerator implementation, which is an executable target the plugin runs.
This file contains hidden or bidirectional Unicode text that may be interpreted or compiled differently than what appears below. To review, open the file in an editor that reveals hidden Unicode characters.
Learn more about bidirectional Unicode characters
The CodeGenerator executable target takes in two paths: input and output, where the input is the JSON file and output is the final generated Swift file. It will then decode the JSON, generate an enum based on the JSON content and writes it to the output file. This is just a simple example, but I would like to highlight the fact that using swift-argument-parser probably makes sense for a little bit more complicated executables.
This file contains hidden or bidirectional Unicode text that may be interpreted or compiled differently than what appears below. To review, open the file in an editor that reveals hidden Unicode characters.
Learn more about bidirectional Unicode characters
If we build the package, we can see that the plugin runs our CodeGenerator, the generated Swift file gets included with the package, and we can use the generated code in other files. Exactly what we wanted.
While using SwiftUI for building UIs, sooner or later we would like to write some unit-tests as well. Of course, we could always go for UI-tests, but these are much slower and therefore not so scalable if we would just want to have a basic verification for our view. It is easy to get going with writing unit-tests for UIKit code, but it is much more difficult for SwiftUI views. Currently, there seems to be two main ways: snapshot testing using the pointfreeco’s library or inspecting views with ViewInspector. Today, we are not going to compare these libraries and instead just take a look at how to get going with ViewInspector.
Although ViewInspector supports using bindings etc for updating the view while running the unit-test, I personally feel like these kinds of tests where we interact with the view is probably better for UI-tests. Therefore, in this blog post, we just take a look at a basic SwiftUI view and how to inspect it in a unit-tests.
Here we have a basic SwiftUI view which uses a view model to provide data for the view. The style property is driving the title of the view. A pretty simple example to demonstrate the usage of the ViewInspector library.
This file contains hidden or bidirectional Unicode text that may be interpreted or compiled differently than what appears below. To review, open the file in an editor that reveals hidden Unicode characters.
Learn more about bidirectional Unicode characters
Time to add two unit-tests where we first configure the view model and then verify. It is also possible to write a test where we dynamically change the style property, but that requires some extra code for supporting it. The first step after adding the library and only adding to the unit-testing target is to opt-in the custom view for inspection. Without the ContentView extension the library is not able to inspect any views. In the example below, we are just using the find method for looking for a Text with specific string, which depends on the style property. I feel like this library is really nice for these kinds of unit-tests where we create a view and just verify what it is displaying.
This file contains hidden or bidirectional Unicode text that may be interpreted or compiled differently than what appears below. To review, open the file in an editor that reveals hidden Unicode characters.
Learn more about bidirectional Unicode characters
In summary, I think that ViewInspector is a really nice library for unit-testing SwiftUI views. Since it requires more work to support reacting to view updates dynamically I feel like, at least for now, I am going to use it for static views and use UI-tests instead for tests simulating user interaction.
Why does my CI never finish and post a message to the merge request? Logged in to CI and oh, my merge job had been running for 23 minutes already, although typically it finishes in 4 minutes. What was going on? Nothing else than on unit-test marked with async was still waiting for an async function to finish. So what can we to avoid this? Let’s first create a Swift package which will be demonstrating the issue.
This file contains hidden or bidirectional Unicode text that may be interpreted or compiled differently than what appears below. To review, open the file in an editor that reveals hidden Unicode characters.
Learn more about bidirectional Unicode characters
This file contains hidden or bidirectional Unicode text that may be interpreted or compiled differently than what appears below. To review, open the file in an editor that reveals hidden Unicode characters.
Learn more about bidirectional Unicode characters
This test passes after 100 seconds, but clearly, we do not want to wait so long if something takes way too much time. Instead, we want to fail the test when it is still running after 5 seconds.
Exploring XCTestCase executionTimeAllowance
XCTestCase has a property called executionTimeAllowance what we can set. Ideally I would like to write something like executionTimeAllowance = 5 and Xcode would fail the test with a timeout failure after 5 seconds.
This file contains hidden or bidirectional Unicode text that may be interpreted or compiled differently than what appears below. To review, open the file in an editor that reveals hidden Unicode characters.
Learn more about bidirectional Unicode characters
But if we read the documentation, then it mentions that the value set to this property is rounded up to the nearest minute value. In addition, this value is not used if you do not enable it explicitly: “To use this setting, enable timeouts in your test plan or set the -test-timeouts-enabled option to YES when using xcodebuild.”. If we are working on a Swift package, then I am actually not sure how to set it in the Package.swift so that it gets set when running the test from Xcode or from a command line.
Custom test execution with XCTestExpectation
One way to avoid never finishing tests is to use good old XCTestExpectation. We can set up a method which runs the async work and then waits for the test expectation with a timeout. If a timeout occurs, the test fails. If the async function throws an error, we can capture it, fail the test with XCTFail.
This file contains hidden or bidirectional Unicode text that may be interpreted or compiled differently than what appears below. To review, open the file in an editor that reveals hidden Unicode characters.
Learn more about bidirectional Unicode characters
One of the cases where we would like to build debug and release configurations differently is when we want to enable some extra features. A concrete example could be a debug view which has a list of commands or displays additional information. In this blog post, we are going to take a look at a Xcode project which only links a local Swift package in debug builds.
The project setup
In the example project, we have an iOS app and a local Swift package “DebugFeatures”. The Swift package description also contains swiftSettings which defines a DEBUG compilation condition when the package is built with debug configuration. This is just an extra measure to make sure we do not compile any of the code in this package accidentally in release configuration.
This file contains hidden or bidirectional Unicode text that may be interpreted or compiled differently than what appears below. To review, open the file in an editor that reveals hidden Unicode characters.
Learn more about bidirectional Unicode characters
Since it is a compilation condition, then we should also wrap our code in the package with if/endif DEFINE.
This file contains hidden or bidirectional Unicode text that may be interpreted or compiled differently than what appears below. To review, open the file in an editor that reveals hidden Unicode characters.
Learn more about bidirectional Unicode characters
The next step is to change app project settings and make sure we do not link the package in release builds. The simplest way for this is to first add the package as the app dependency in “Frameworks, Libraries, and Embedded Content”.
App target’s libraries.
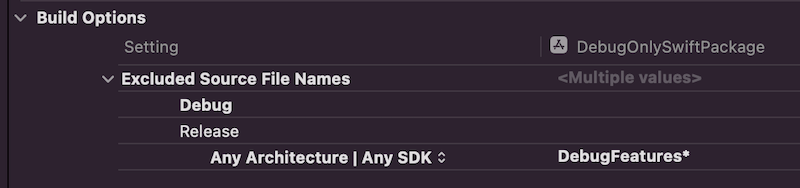
Then we’ll open build settings and look for “Excluded Source File Names” and configure release builds to ignore “DebugFeatures*”.
Build settings configured to ignore the package in release builds.
To verify this change, we can make a release build with shift+command+i (Product -> Build For -> Profiling which builds release configuration). If we check the latest build log with command+9 and clicking on the top most build item, scrolling to app target’s linker step, we can see that Xcode did not link “DebugFeatures”. Exactly what we wanted to achieve.
Output of the linker step of the app target.
Summary
This is one way how to link some package only for debug builds. Although it sounds a bit unexpected that “Excluded Source File Names” also removes the package from the linking phase, but I am happy it does since it means only changing one build setting to get it working like this.
Swift 5.5 brought us a new feature which allows creating Swift package collections (SE-0291). In this blog post we’ll go through required steps and create a package collection with Augmented Code packages. At the time of writing, there is only one package: IndexedDataStore.
Install Swift Package Collection Generator
First, we’ll need to install a tool which Apple created for package collections. It is called Swift Package Collection Generator. We’ll need to clone the repository, build it and then either using the built tools in their current location or also installing them to /usr/local/bin for easy access later on.
When the tool is installed, then the next step is to create a definition for the collection. Supported keys in that JSON file are available here: PackageCollectionsModel/Formats/v1.md.
Next step is to feed that JSON into the package-collection-generate tool which fetches additional metadata for these packages (–auth-token argument with GitHub personal access token must be used if the GitHub access is not already set up with SSH).
Before we go ahead and sign the package collection, we’ll need to prepare certificates. Open Keychain Access and then from the main menu Keychain Access > Certificate Assistant > Request Certificate from a Certificate Authority. Use your email and name and check the “Saved to disk” option. The next step is uploading the certificate request file to Apple. Uploading is done in Certificates, Identifiers & Profiles by tapping on the plus button and selecting Swift Package Collection Certificate. After clicking on the Continue button, we can upload the certificate request file we created with the Keychain Access. After that, we’ll download the certificate and double-clicking on the certificate file adds it to Keychain Access. Before we can sign the collection, the next step is exporting the private key from Keychain Access. Look for “Swift Package Collection” certificate, expand the item which reveals the private key, right-click on it and export it (set a password). Keychain Access creates .p12 file, which we’ll need to convert to .pem (set a password when asked). In the example below, I saved the exported private key to swift_package.p12.
When the command is successful, we have an output-signed.json file, which we can share and add to Xcode.
Adding a new package collection
A new package collection can be added in Xcode by navigating to File > Add Packages sheet and clicking on the plus button and selecting Add Swift Package Collection. Xcode asks for a https URL of the collection. One option is to upload the signed collection json file to GitHub and then passing in an URL to the raw representation of the file. The URL to Augmented Code’s package collection is available here.
I have written before about running tests and getting code coverage data for Swift packages in Running tests in Swift package with GitHub actions and Code coverage for Swift Packages with Fastlane. In this post, I am going to revisit the problem and use only tools from Xcode: xcodebuild and xccov. One downside of the approach in Code coverage for Swift Packages with Fastlane is that it required to generate Xcode project which is a deprecated feature in Xcode 12.5, and also it used xcov for forcing code coverage which does not seem to be maintained. Therefore, take two is here. I have a tiny Swift package on GitHub called IndexedDataStore, and we’ll add min code coverage requirement with GitHub action to that package.
Generating xcresult bundle with code coverage information
IndexedDataStore Swift package already has a GitHub action set up which runs tests for macOS and iOS platforms. As we’ll need to run several commands, then we’ll add a new ci-ios-code-coverage.sh script to Scripts folder and then the GitHub action will just invoke that script. This allows to run the same commands easily in the local development environment. Let’s take a look at the first half of the script, which builds and runs tests and generates a result bundle with code coverage information.
This file contains hidden or bidirectional Unicode text that may be interpreted or compiled differently than what appears below. To review, open the file in an editor that reveals hidden Unicode characters.
Learn more about bidirectional Unicode characters
Building and running tests with code coverage enabled.
The pre-clean section of the script makes sure that we do not have files present. The RESULT_BUNDLE is created by xcodebuild and RESULT_JSON later when processing the bundle. Although we could skip deleting the RESULT_JSON then on the other hand RESULT_BUNDLE must always be deleted or otherwise xcodebuild will log a warning and wouldn’t create a new one. The run tests section is separated into two steps: build the package for testing and then running tests without building. An alternative would be to use test argument instead of build-for-testing and test-without-building. The current setup makes it easier to see which step failed: was it a build error or a test error. Code coverage is enabled by passing enableCodeCoverage=YES and specifying a path where the result bundle should be created with resultBundlePath. Other things to note is that we are using set -o pipefail for making sure the script wouldn’t ignore any errors and would fail immediately. Also, we’ll pipe xcodebuild’s output to xcpretty for a bit nicer output in logs. If we run this piece of script then we end up with a CodeCoverage.xcbundle which contains code coverage information in the package root.
Extracting line coverage and forcing min coverage
For extracting code coverage information from the CodeCoverage.xcresult bundle we can use Apple’s xccov command line tool which was built exactly for that. The first step is that we’ll convert CodeCoverage.xcresult to CodeCoverage.json file with xccov.
CodeCoverage.json
The second step is to parse the create json file which lists all the targets and their code coverage. I am not fully sure why, but it contains two targets with the same name IndexedDataStore. One target contains correct code coverage, but the other one is just an empty target but with the same name. Therefore we’ll need to filter out the empty one which luckily is not so difficult with jq command line tool. The jq command first takes an array for key targets and then finds a target which has a name “IndexedDataStore” and value for key executableLines is greater than 0. After that, we can access the key lineCoverage in the found target. Finally, we’ll convert the code coverage to percentages, but as the value is in float then we’ll need to use the bc command.
This file contains hidden or bidirectional Unicode text that may be interpreted or compiled differently than what appears below. To review, open the file in an editor that reveals hidden Unicode characters.
Learn more about bidirectional Unicode characters
After extracting the code coverage, we can proceed with forcing a minimum code coverage. Yet again, we’ll use bc command when comparing two float values and then checking if the comparison was true. If code coverage is too low, we’ll print red error message and in case it was enough, we’ll print success message in green colour.
This file contains hidden or bidirectional Unicode text that may be interpreted or compiled differently than what appears below. To review, open the file in an editor that reveals hidden Unicode characters.
Learn more about bidirectional Unicode characters
Success message when min code coverage is 50%.Error message when min code coverage requirement is 90%.
Calling the script from GitHub action
The created script can now be called from a GitHub action.
This file contains hidden or bidirectional Unicode text that may be interpreted or compiled differently than what appears below. To review, open the file in an editor that reveals hidden Unicode characters.
Learn more about bidirectional Unicode characters
In this blog post we revisited code coverage set up for Swift packages. By using xcodebuild and xccov we created code coverage setup for Swift packages.
Apple’s swift-collections package contains data structure implementations which have more specific use-cases and therefore not fitting into the Foundation. Along with collections Swift package Apple also released swift-collections-benchmark package which implements benchmarking. As like with any other Swift package we can use the benchmarking package for our own purposes as well. Therefore, in this blog post let’s take a look on how to use the benchmarking package.
Step one is to create a new Swift package with executable target which will be used to run benchmarks. In Xcode’s File menu we can select New > Swift Package. In the created package we will want to do some changes in the Package.swift file. We’ll need to add swift-collections-benchmark dependency and change the package type to executable instead of library.
This file contains hidden or bidirectional Unicode text that may be interpreted or compiled differently than what appears below. To review, open the file in an editor that reveals hidden Unicode characters.
Learn more about bidirectional Unicode characters
Package.swift file after changing the default library template to executable.
Secondly, we need to add main.swift file to the package or use the @main keyword. In this example I went for main.swift. When that is set as well, we can start using the benchmarking package and writing benchmarks for collections. For trying out the benchmarking I am going to use raywenderlicht/swift-algorithms-club’s queue implementations. It provides two examples of queues where one is a thin wrapper around the array type and the other one is an optimized version which looks into improving performance when dequeuing elements from the queue.
Setting up a benchmark requires defining a benchmark object and adding benchmark tasks to it and then calling main() on the benchmark object. Every added task will show up as a separate line on the chart when we render results. The package has some input generators defined and also allows adding more if we need to. Check the registerInputGenerator function on the Benchmark type for more information. But OK, back to benchmarks. The snippet below shows how to define a benchmark for dequeue operation over a variety of input sizes where the max input size is currently limited to 128000.
This file contains hidden or bidirectional Unicode text that may be interpreted or compiled differently than what appears below. To review, open the file in an editor that reveals hidden Unicode characters.
Learn more about bidirectional Unicode characters
When everything is set we can go ahead and run the benchmark. First navigate to the package’s folder and use the swift run command as shown below. When benchmarking finishes we can use the generated file, in this case “results”, to render a chart.
This file contains hidden or bidirectional Unicode text that may be interpreted or compiled differently than what appears below. To review, open the file in an editor that reveals hidden Unicode characters.
Learn more about bidirectional Unicode characters
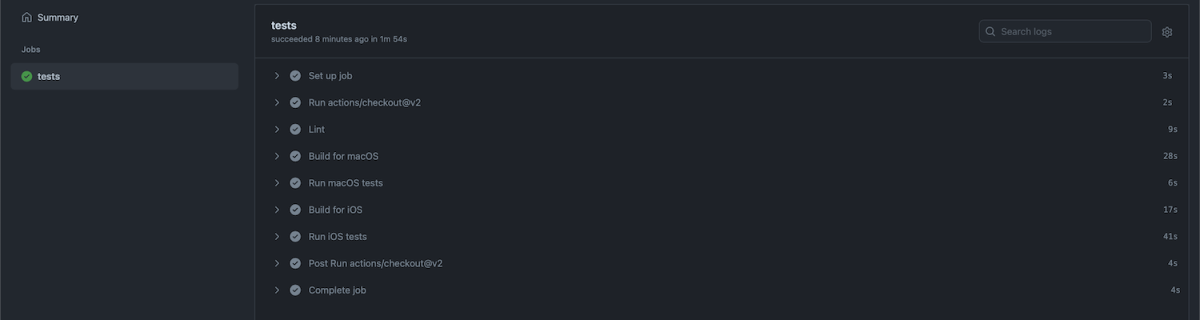
Some time ago I published a tiny Swift package IndexedDataStore which tackles a problem of storing data blobs on disk. It could the image data or anything else. When working with Swift packages then it is extremely easy to build and run tests on macOS but when we want to build and run tests on iOS simulator then we need to drop using swift build and swift test commands. Fortunately xcodebuild can help here and we can build and run tests without generating a project file ourselves with swift package generate-xcodeproj. Something I would like to mention about the generate-xcodeproj command is that it generates a project which does not contain resource files. The aim of this blog post is to configure a GitHub action which runs unit-tests both on macOS and iOS.
GitHub actions need to be in the repostory’s .github/workflows folder. GitHub workflows are defined in YAML files which need to be in that folder. Let’s jump into it and start creating a worflow which runs tests on macOS and iOS. GitHub workflows must define a name, in our case, name: CI. Secondly we’ll need to define when the workflow should be triggered. Running the workflow whenever pull request is created of when something was pushed to main branch will suffice.
name: CI

on:
  push:
    branches: [ main ]
  pull_request:
    branches:
      - '*'
The next step is creating a job and defining a number of steps. Jobs require a name, then which resource it needs to use. The first step is the repository checkout followed by running swiftlint which is already part of the enviornment. The linting step uses the default configuration file .swiftlint.yml at the repository root. At this point we are ready to build and run tests.
The simplest way to build and test Swift packages is to use swift build and swift test commands which builds and runs tests on macOS. Unfortunately there is not a way to use those commands and setting the deplyoment to iOS. Therefore we’ll need to use xcodebuild command instead. It will know how to deal with Swift packages and therefore we only need to define scheme and destination arguments. It also makes sense to separate building (build-for-testing) from running tests (test-without-building) as it makes it easier to see where a failure happened. We can make the xcodebuild output a little bit cleaner by using xcpretty. In addition it is also reasonable to use set -o pipefail which makes the pipeline to use an occured error code as the final code of the whole pipeline. Finally, we’ll disable any buffering by setting NSUnbufferedIO to YES.
jobs:
  unit_tests:
    runs-on: macos-latest
    steps:
    - name: Repository checkout
      uses: actions/checkout@v2
    - name: Lint
      run: swiftlint
- name: Build for macOS
run: swift build -v
- name: Run macOS tests
run: swift test -v
- name: Build for iOS
run: set -o pipefail && env NSUnbufferedIO=YES xcodebuild build-for-testing -scheme IndexedDataStore -destination "platform=iOS Simulator,OS=latest,name=iPhone 12" | xcpretty
- name: Run iOS tests
run: set -o pipefail && env NSUnbufferedIO=YES xcodebuild test-without-building -scheme IndexedDataStore -destination "platform=iOS Simulator,OS=latest,name=iPhone 12" | xcpretty
This completes our workflow and we can check in the YAML file which gets then picked up by GitHub. All the actions can be see under the Actions section on GitHub.
Summary
We looked into how to add a GitHub workflow for running tests both on macOS and iOS. Although swift build does not support building the package for iOS we could still do that with xcodebuild.