Categories
iOS Swift SwiftUI Xcode

Getting started with mocking networking in UI-tests on iOS

It is important to have stable unit-tests and UI-tests since no-one wants to encounter failures in tests which happen non-deterministically. Many of the iOS apps rely on networking, and therefore the content depends on what is fetched from servers. The last thing what we want to see is that an API outage or instability affects UI-tests. This time we’ll take a look at how to mock networking in UI-tests which differs from mocking networking in unit-tests since the whole app is going to be running as is and is controlled by a separate UI-testing runner app. A while ago I also covered unit-testing part in Testing networking code with custom URLProtocol on iOS, please take a look at that post for more information since we’ll be using the same custom URL protocol approach.

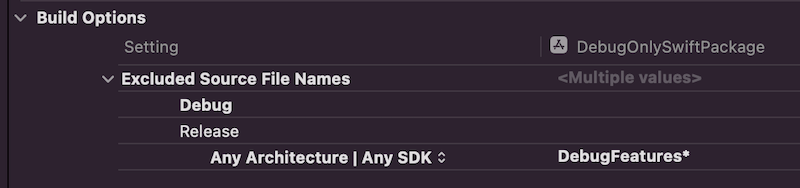
The main difference between unit-tests and UI-tests is that with unit-tests Xcode injects the unit-testing code into the app and then runs tests. UI-testing on the other hand rely on a separate test runner app which uses accessibility APIs for driving the user-interface in the app. This means that our network mocking code needs to be bundled with the app when we build it. The approach we are going to use is setting up a separate “UITestingSupport” Swift package, which is included only in debug builds. This library contains mocked data and configures the custom URL protocol and handles any network requests. Please see Linking a Swift package only in debug builds for more information on how to only link a package in debug builds.

I’ll be using a sample app “UITestingNetworking” for demonstrating how to set it up. The app has an app target and a local Swift package with a name “UITestingSupport”.

Xcode project layout with UITestingSupport package.

The first piece of the “UITestingSupport” package is a custom URLProtocol. All it does is providing a way to return either error or URLResponse and Data for a URLRequest. It is a simplified protocol. In an actual app we would want to control which requests are handled by it and which are not. Either because it is way too difficult to mock all the network request in all the tests at first, or we might also want to have some tests using an actual data coming from servers.

final class UITestingURLProcotol: URLProtocol {
override class func canInit(with request: URLRequest) -> Bool {
return true // TODO: only return true for requests we have mocked data
}
override class func canonicalRequest(for request: URLRequest) -> URLRequest {
return request
}
struct ResponseData {
let response: URLResponse
let data: Data
}
static var responseProvider: ((URLRequest) -> Result<ResponseData, Error>)?
override func startLoading() {
guard let client else { fatalError() }
if let responseProvider = Self.responseProvider {
switch responseProvider(request) {
case .success(let responseData):
client.urlProtocol(self, didReceive: responseData.response, cacheStoragePolicy: .notAllowed)
client.urlProtocol(self, didLoad: responseData.data)
client.urlProtocolDidFinishLoading(self)
case .failure(let error):
client.urlProtocol(self, didFailWithError: error)
client.urlProtocolDidFinishLoading(self)
}
}
else {
let error = NSError(domain: "UITestingURLProcotol", code: -1)
client.urlProtocol(self, didFailWithError: error)
}
}
override func stopLoading() {}
}

The second piece of the library is a UITestingNetworkHandler class which the app code will call, and it configures the custom URLProtocol and starts providing responses based on the “responseProvider” callback.

public final class UITestingNetworkHandler {
public static func register() {
URLProtocol.registerClass(UITestingURLProcotol.self)
UITestingURLProcotol.responseProvider = { request in
guard let url = request.url else { fatalError() }
switch (url.host, url.path) {
case ("augmentedcode.io", "/api/example"):
let response = HTTPURLResponse(url: url, statusCode: 200, httpVersion: nil, headerFields: nil)!
let data = "MyMockedData".data(using: .utf8)!
return .success(UITestingURLProcotol.ResponseData(response: response, data: data))
default:
fatalError("Unhandled")
}
}
}
}
Simple example of providing response for a URLRequest.

The example above just handles one network request. For larger apps we probably want to have more component based implementation here since this file would otherwise grow a lot based on how many cases we want to handle. Another thing to note is that in some tests we want to mimic network request failures and in others successful requests but with different response data. This is not shown above, but can be implemented by providing the expected configuration flag through environment variables. XCUIApplication has a launchEnvironent property what we can set and then reading that value in the UITestingNetworkHandler with Process environment property. I’m thinking something like “MyAppAPIExampleResponseType” which equals to a number or some identifier.

The last piece is to call the register code when we are running the app in UI-tests.

@main
struct UITestingNetworkingApp: App {
var body: some Scene {
WindowGroup {
ContentView()
#if DEBUG
.onAppear(perform: {
guard CommandLine.arguments.contains("–uitesting") else { return }
UITestingNetworkHandler.register()
})
#endif
}
}
}
view raw App.swift hosted with ❤ by GitHub
Calling register only in debug builds and when a launch argument is set by the runner app.

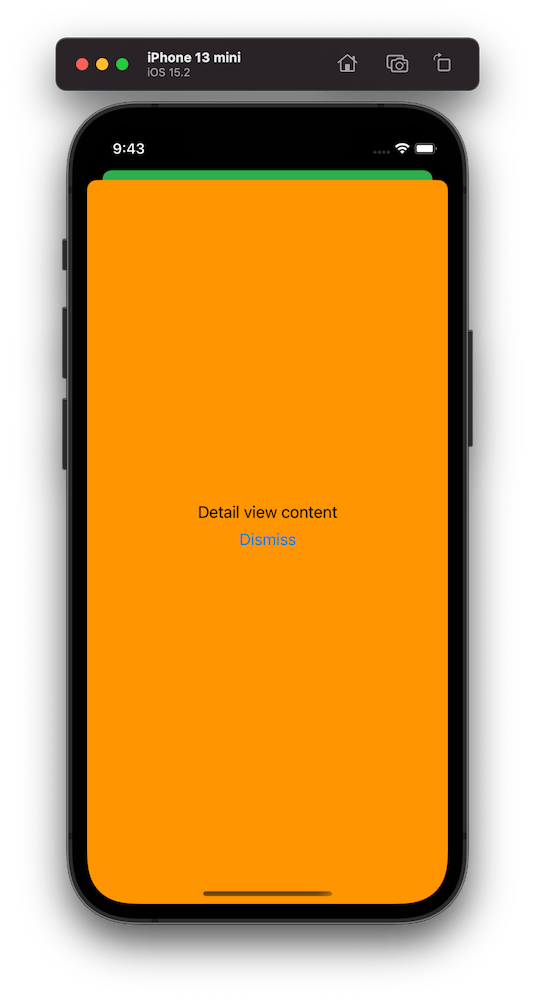
And finally, an example UI-test which taps a button which in turn fetches some data from the network and then just displays the raw data in the app.

class UITestingNetworkingUITests: XCTestCase {
override func setUpWithError() throws {
continueAfterFailure = false
}
func testExample() throws {
let app = XCUIApplication()
app.launchArguments = ["–uitesting"]
app.launch()
app.buttons["Load Data"].tap()
XCTAssertEqual(app.staticTexts.element.label, "MyMockedData")
}
}
An example UI-test which sets launch argument which enables network mocking in the app.

If this was helpful, please let me know on Mastodon@toomasvahter or Twitter @toomasvahter. Feel free to subscribe to RSS feed. Thank you for reading.

Example Project

UITestingNetworking (GitHub)

Categories
Xcode

Looking into Xcode 14 beta 1

It is a WWDC week and the first day is over. I am eager to see what Xcode 14 is about to bring and therefore let’s dive into Xcode’s release notes where I pick out some of the changes which caught my interest.

Bitcode is deprecated

Turns out that bitcode is deprecated. In the release notes we can read that bitcode for iOS, tvOS, and watchOS is turned off by default. In addition, bitcode uploads are going to be rejected when using Xcode 14. That is the one I did not expect to change, but it did.

Single 1024*1024 app icon

Whoever has dealt with app icons are going to be happy to hear that in Xcode 14 we can just use a single image for the app icon. Of course, the option is going to be there for using separate images for each of the sizes who need it.

Better parallelism in build system

Release notes mention that Xcode 14 can build targets in parallel with their Swift target dependencies. Sounds like we can hope for faster builds.

Recommended deployment targets

There are new build settings like RECOMMENDED_IPHONEOS_DEPLOYMENT_TARGET etc. Not sure yet what are the default values, since I did not find them in Xcode beta 1. But still, interesting addition.

Shell script sandboxing

There is a new build setting ENABLE_USER_SCRIPT_SANDBOXING for turning on sandboxing in shell script build phases.

LLDB swift-healthcheck

It is a frustrating when using a debugger and then any expression is resolving. Seems like there is a way to investigate these issues and possibly solve them with the new swift-healthcheck command. I am gonna definitely check it out.

Interface builder is not forgotten

The platforms State of the Union mentioned Swift and SwiftUI being the future of building apps. But on the other hand, there are multiple changes happening in Interface builder as well. More options and more supported views.

Swift packages and localization

At my work, we have struggled with Swift packages which contain localization. The only way for importing and exporting localizations was having Xcode project only for that. Happy to see that xcodebuild -importLocalizations and -exportLocalizations work with Swift packages.

Better reloading for SwiftUI previews

Many items about improving SwiftUI previews and reloading them when making edits. Sounds like there is going to be less need to trigger render preview manually. That is really nice.

Xcode Server is deprecated

As Xcode Cloud is not any more in beta, Apple is removing Xcode Server from Xcode 14.

That is a quick overview of things coming with Xcode 14. There is so much more. Feel free to dig into Xcode 14 release notes yourself as well.

If this was helpful, please let me know on Mastodon@toomasvahter or Twitter @toomasvahter. Feel free to subscribe to RSS feed. Thank you for reading.

Categories
iOS Xcode

CollectionOfOne in Swift

The Swift standard library includes a peculiar struct CollectionOfOne. It just represents a single value as a collection. Since it represents only a single value, then it is more efficient than creating an Array with a single element, which involves in allocating a buffer. Also, all the collection functions require inspecting the buffer whereas CollectionOfOne can hard-code many of these, like count which is always one. It can make a difference in performance critical code, but most of the time it does not make a real difference if we create a CollectionOfOne instance or an Array with one element.

let first = ["a", "b", "c"]
let second = CollectionOfOne("d")
print(first + second)
// ["a", "b", "c", "d"]
An example of appending a single element to an array.

If this was helpful, please let me know on Mastodon@toomasvahter or Twitter @toomasvahter. Feel free to subscribe to RSS feed. Thank you for reading.

Categories
Swift SwiftUI Xcode

LibraryContentProvider in Xcode

LibraryContentProvider protocol in Xcode is a way for adding custom views and view modifiers to the Xcode library, which enables drag and dropping them to the SwiftUI preview. Xcode automatically looks for types implementing the protocol and then adds items to the library. It takes so little code that it makes sense to do it if you are using the library for building views.

As an example, we’ll add a custom SwiftUI view SubtitledButton to the library.

struct SubtitledButton: View {
let title: LocalizedStringKey
let subtitle: LocalizedStringKey
let action: () -> Void
var body: some View {
Button(action: action, label: {
VStack(spacing: 4) {
Text(title)
Text(subtitle)
.font(.footnote)
}
})
}
}

The only thing we need to do is creating a new type which conforms to LibraryContentProvider and then returning the button as a LibraryItem.

struct LibraryContent: LibraryContentProvider {
var views: [LibraryItem] {
return [
LibraryItem(SubtitledButton(title: "Title",
subtitle: "Subtitle",
action: {}),
title: "SubtitledButton",
category: .control)
]
}
}

After adding the new type, Xcode updates the library automatically.

Xcode library view with SubtitledButton showing up.
Xcode library with SubtitledButton.

If this was helpful, please let me know on Mastodon@toomasvahter or Twitter @toomasvahter. Feel free to subscribe to RSS feed. Thank you for reading.

Categories
Swift Swift Package Xcode

Linking a Swift package only in debug builds

One of the cases where we would like to build debug and release configurations differently is when we want to enable some extra features. A concrete example could be a debug view which has a list of commands or displays additional information. In this blog post, we are going to take a look at a Xcode project which only links a local Swift package in debug builds.

The project setup

In the example project, we have an iOS app and a local Swift package “DebugFeatures”. The Swift package description also contains swiftSettings which defines a DEBUG compilation condition when the package is built with debug configuration. This is just an extra measure to make sure we do not compile any of the code in this package accidentally in release configuration.

.target(
name: "DebugFeatures",
swiftSettings: [
.define("DEBUG", .when(configuration: .debug))
]
),
view raw Package.swift hosted with ❤ by GitHub

Since it is a compilation condition, then we should also wrap our code in the package with if/endif DEFINE.

#if DEBUG
import SwiftUI
public struct DebugView: View {
public init() {}
public var body: some View {
Text("Debug View")
}
}
#endif
view raw DebugView.swift hosted with ❤ by GitHub

Linking the package only in debug builds

The next step is to change app project settings and make sure we do not link the package in release builds. The simplest way for this is to first add the package as the app dependency in “Frameworks, Libraries, and Embedded Content”.

App target's libraries containing DebugFeatures package.
App target’s libraries.

Then we’ll open build settings and look for “Excluded Source File Names” and configure release builds to ignore “DebugFeatures*”.

Build settings configured to ignore the package in release builds.

To verify this change, we can make a release build with shift+command+i (Product -> Build For -> Profiling which builds release configuration). If we check the latest build log with command+9 and clicking on the top most build item, scrolling to app target’s linker step, we can see that Xcode did not link “DebugFeatures”. Exactly what we wanted to achieve.

Output of the linker step of the app target showing that DebugeFeatures package was not linked.
Output of the linker step of the app target.

Summary

This is one way how to link some package only for debug builds. Although it sounds a bit unexpected that “Excluded Source File Names” also removes the package from the linking phase, but I am happy it does since it means only changing one build setting to get it working like this.

Example project

DebugOnlySwiftPackage (Xcode 13.3.1)

If this was helpful, please let me know on Mastodon@toomasvahter or Twitter @toomasvahter. Feel free to subscribe to RSS feed. Thank you for reading.

Categories
iOS Swift UIKit

Building a list view with collection view in UIKit

UICollectionViewCompositionalLayout was an important change to how we create collection view layouts. In iOS14 Apple added a new static function to this class which creates a layout object for list views. Meaning, it is very easy to create a list views which look like a table view we are familiar with. The static list() function takes a configuration object UICollectionLayoutListConfiguration which allows further to configure the appearance of the header view. For example, supplementary header views are enabled here. In this blog post, we’ll create a list view with a collection view and use cell registration and diffable data source APIs.

List view created with diffable data source and collection view.

Generating data for the list view

Firstly, we’ll generate some data types which we want to display in the list view. The aim is to represent each Palette type with one section, and each PaletteColor is a row in the section.

struct Palette: Hashable {
let name: String
let colors: [PaletteColor]
// other properties
static let fancy = Palette(name: "Fancy", colors: [
PaletteColor(name: "Red", color: .systemRed),
PaletteColor(name: "Blue", color: .systemBlue),
PaletteColor(name: "Cyan", color: .systemCyan),
PaletteColor(name: "Mint", color: .systemMint),
PaletteColor(name: "Pink", color: .systemPink),
PaletteColor(name: "Teal", color: .systemTeal),
PaletteColor(name: "Green", color: .systemGreen),
PaletteColor(name: "Brown", color: .systemBrown)
])
static let secondary = Palette(name: "Secondary", colors: [
PaletteColor(name: "Label", color: .secondaryLabel),
PaletteColor(name: "Fill", color: .secondarySystemFill)
])
}
struct PaletteColor: Hashable {
let name: String
let color: UIColor
// other properties
}
view raw ListView.swift hosted with ❤ by GitHub

Configuring a collection view instance

We’ll create the collection view instance with a layout object which is configured to display lists. We go for insetGrouped appearance and turn on header views.

final class ListViewController: UIViewController {
private func makeCollectionView() -> UICollectionView {
var configuration = UICollectionLayoutListConfiguration(appearance: .insetGrouped)
configuration.headerMode = .supplementary
let layout = UICollectionViewCompositionalLayout.list(using: configuration)
let view = UICollectionView(frame: .zero, collectionViewLayout: layout)
view.backgroundColor = .systemBackground
view.translatesAutoresizingMaskIntoConstraints = false
return view
}
private lazy var collectionView = makeCollectionView()
override func loadView() {
title = "Palettes"
view = UIView(frame: .zero)
view.addSubview(collectionView)
NSLayoutConstraint.activate([
collectionView.leadingAnchor.constraint(equalTo: view.leadingAnchor),
collectionView.trailingAnchor.constraint(equalTo: view.trailingAnchor),
collectionView.topAnchor.constraint(equalTo: view.topAnchor),
collectionView.bottomAnchor.constraint(equalTo: view.bottomAnchor)
])
viewModel.reloadContent(in: dataSource)
}
}
view raw ListView.swift hosted with ❤ by GitHub

Configuring collection view data source and cell registration

The UICollectionViewDiffableDataSource is used for managing the data and also provides cells on demand. We’ll need to define section and item types when creating the data source. With the data we want to display, we’ll use String as a section type and PaletteColor as the item type when the section is just the name of the Palette’s name. In addition, we’ll use the cell and supplementary view registration APIs which keep the logic of creating different cells with a model object in the same place, which I find it to be really nice. Cells and supplementary views we’ll configure using the content configuration APIs which describe the data the cell or supplementary view displays. For list views, there is a specialized UIListContentConfiguration type which supports a variety of appearances. In many cases we do not need any custom cell classes at all since UIListContentConfiguration and UICollectionViewListCell takes care of it for us.

final class ListViewController: UIViewController {
let viewModel: ViewModel
init(viewModel: ViewModel) {
self.viewModel = viewModel
super.init(nibName: nil, bundle: nil)
}
required init?(coder: NSCoder) {
fatalError("init(coder:) has not been implemented")
}
private func makeDataSource() -> UICollectionViewDiffableDataSource<String, PaletteColor> {
let cellRegistration = UICollectionView.CellRegistration<UICollectionViewListCell, PaletteColor> { [viewModel] cell, indexPath, paletteColor in
var configutation = UIListContentConfiguration.cell()
configutation.image = viewModel.cellImage(for: paletteColor)
configutation.text = viewModel.cellTitle(for: paletteColor)
cell.contentConfiguration = configutation
}
let headerRegistration = UICollectionView.SupplementaryRegistration<UICollectionViewListCell>(elementKind: UICollectionView.elementKindSectionHeader) { [viewModel] supplementaryView, elementKind, indexPath in
var configutation = UIListContentConfiguration.groupedHeader()
configutation.text = viewModel.headerTitle(in: indexPath.section)
supplementaryView.contentConfiguration = configutation
}
let dataSource = UICollectionViewDiffableDataSource<String, PaletteColor>(collectionView: collectionView, cellProvider: { collectionView, indexPath, paletteColor in
collectionView.dequeueConfiguredReusableCell(using: cellRegistration, for: indexPath, item: paletteColor)
})
dataSource.supplementaryViewProvider = { collectionView, elementKind, indexPath in
collectionView.dequeueConfiguredReusableSupplementary(using: headerRegistration, for: indexPath)
}
return dataSource
}
private lazy var dataSource = makeDataSource()
}
view raw ListView.swift hosted with ❤ by GitHub

Applying a snapshot

The final missing piece is creating a snapshot and applying it to the collection view data source which then tells the collection view what to render. If we would generate a new snapshot with slightly different data then the collection view only renders the changes between snapshots. No need to do this manually on our own.

extension ListViewController {
@MainActor final class ViewModel {
let palettes: [Palette]
init(palettes: [Palette]) {
self.palettes = palettes
}
func reloadContent(in dataSource: UICollectionViewDiffableDataSource<String, PaletteColor>) {
var snapshot = NSDiffableDataSourceSnapshot<String, PaletteColor>()
snapshot.appendSections(palettes.map(\.name))
palettes.forEach({ palette in
snapshot.appendItems(palette.colors, toSection: palette.name)
})
dataSource.apply(snapshot)
}
}
}
view raw ViewModel.swift hosted with ❤ by GitHub

Summary

Diffable data sources with new cell registration APIs make a huge difference in how we implement collection views. Although it might take a bit of time to see how all the new APIs work together, I do not want to go back. Please check the example project for full code.

Example project

UIKitExampleDiffableListView (Xcode 13.3.1)

If this was helpful, please let me know on Mastodon@toomasvahter or Twitter @toomasvahter. Feel free to subscribe to RSS feed. Thank you for reading.

Categories
Swift

Is existential any a performance problem in Swift?

Swift 5.6 was released in March with Xcode 13.3 and among other changes it introduces a new keyword – any. The Swift evolution proposal for it is SE-0335: existential any. Existential types are used for storing an any kind of value which conforms to a specific protocol. Therefore, whenever we use protocol for defining a property type or function argument, then we are encountering existential types. In Swift 5.6, using the any keyword is optional, but it is expected to be required in Swift 6.

protocol Computable {
func compute() -> Int
}
struct DataCore {
let dataProcessors: Computable
}
// becomes
struct Core {
let dataProcessor: any Computable
}

The evolution proposal’s motivation paragraph mentions that “Existential types in Swift have significant limitations and performance implications.” (SE-0335) and “Existential types are also significantly more expensive than using concrete types.” (SE-0335). Which can lead to thinking that one should try to avoid existential types, meaning protocols, because of performance implications. One might even ask if we should always try to use generics over protocols?

// Should I use this?
struct Core {
let dataProcessor: any Computable
}
// or should I inject dependencies using generics?
struct Core2<T: Computable> {
let dataProcessor: T
}

My answer is to continue using protocols as we have so far. Yes, the protocol based approach needs a tiny bit more CPU cycles as Swift needs to do dynamic dispatch and look up the exact type which conforms to the protocol in runtime, but dynamic dispatch is nothing new. Objective-C was all about dynamic dispatch, and we rarely needed to think about it, only when dealing with performance critical code it could have showed up. Therefore, when reading about existential any it is possible that we get a feeling like we should, because of performance, replace everything, what is possible, with generics. But that should not be a case. Performance becomes relevant only in areas where we need to call a loooot of functions in a very short time. As a silly micro benchmark, I set up a code which created a million structs which require more than 3 word buffer (makes Swift to use heap memory) and then calling a function on these values. I was seeing that 2 ms of CPU time was spent in “__swift_project_boxed_opaque_existential_1”. If I then compared it with generics based implementation, then it was 3 ms faster (7 ms vs 4 ms). But to reiterate, a million values were involved. In summary, there is no need to go and refactor old code which uses existential any and replace it with generics only because of generics being faster. Both have their own use-cases.

A snapshot of the generics based implementation in Time Profiler.
A snapshot of the existential any based implementation in Time Profiler.

If this was helpful, please let me know on Mastodon@toomasvahter or Twitter @toomasvahter. Feel free to subscribe to RSS feed. Thank you for reading.

Categories
Swift

Static DocC documentation for Swift packages

Swift 5.6 released with Xcode 13.3 implements evolution proposals extensible built tools (SE-0303) and its extension command plugins (SE-0332). This opens up plugins for Swift packages. Along with that, Apple released DocC command plugin for Swift packages, which supports generating static webpages containing the documentation of the package.

Swift-DocC plugin

Apple’s Swift-DocC plugin comes with pretty rich documentation which covers many aspects of the documentation generation process. Something to keep in mind still is that the generated website can’t just be opened with Safari like we might have been used to when using Jazzy. The plugin has a separate preview command if we want to open the documentation locally. That command starts a local web server which renders the site.

Getting started with Swift-DocC plugin

As an example, we’ll take my IndexedDataStore Swift package and see what are the steps to generate and preview the documentation. But before that, for local usage, I would like to highlight the fact that Xcode’s Product menu contains a “Build Documentation” command which generates documentation and adds it to the Developer Documentation window.

Xcode product menu with build documentation menu item.
Xcode documentation viewer with locally built documentation.


OK, back to generating HTML webpages ourselves. The very first thing we need to do is adding the docc plugin as a dependency to our Swift package. If we have done that, then we have access to new commands which the plugin defines.

dependencies: [
  .package(url: "https://github.com/apple/swift-docc-plugin", from: "1.0.0"),
],

Let’s take a look at the preview command at first which generates documentation, spins up a local web server which renders it.

swift package --disable-sandbox preview-documentation --target IndexedDataStore
Building for debugging...
Build complete! (0.13s)
Template: /Applications/Xcode.app/Contents/Developer/Toolchains/XcodeDefault.xctoolchain/usr/share/docc/render
========================================
Starting Local Preview Server
	 Address: http://localhost:8000/documentation/indexeddatastore
========================================
The generated documentation site.

The other command is the one which generates the static documentation webpage, which we can then commit to GitHub and let the GitHub pages to render.

swift package \
    --allow-writing-to-directory ./docs \
    generate-documentation \
    --target IndexedDataStore \
    --disable-indexing \
    --output-path ./docs \
    --transform-for-static-hosting \
    --hosting-base-path IndexedDataStore

Since plugin commands run under a sandboxed environment, we’ll need to explicitly define which folder is writable with the --allow-writing-to-directory argument. The --disable-indexing argument disables generating index, which is used by Xcode or other IDEs. The --transform-for-static-hosting removes the need to have any routing rules on the web server. And finally, --hosting-base-path defines the base-path of the documentation. Meaning, if the GitHub repository name is IndexedDataStore then we should pass in IndexedDataStore. Otherwise, relative links in the generated webpage are incorrect. The full format of the URL when it is pushed to a branch and GitHub pages is configured to read from the pushed branch with relative path set to /docs is: https://<username>.github.io/<repository-name>/documentation/<target-name> .

GitHub pages configuration where the branch is set to docc-documentation and relative path to /docs.

For IndexedDataStore, it is https://laevandus.github.io/IndexedDataStore/documentation/indexeddatastore/. Note that the target name is in lowercase. The link won’t work since I switched GitHub pages back to the Jazzy documentation, which is auto-generated on merge.

If this was helpful, please let me know on Mastodon@toomasvahter or Twitter @toomasvahter. Feel free to subscribe to RSS feed. Thank you for reading.

Categories
iOS Swift SwiftUI UIKit

UIKit navigation with SwiftUI views

Recently I was asked a question about creating an app which has SwiftUI views but no navigation logic in it. Instead, UIKit controls how views are presented. It is a fair question since SwiftUI views have navigation support, but not everything is there if we need to support previous iOS versions as well, or we have a case of an app which have both UIKit and SwiftUI views. Therefore, let’s take a look at on one approach, how to handle navigation on the UIKit side but still use SwiftUI views.

UIHostingController presenting SwiftUI view

SwiftUI views are presented in UIKit views with UIHostingController which just takes in the SwiftUI view. UIHostingController is a UIViewController subclass, therefore it can be used like any other view controller in the view hierarchy. For getting things started, let’s configure SceneDelegate to use an object named FlowCoordinator which will handle navigation logic and then ask it to present a simple SwiftUI view.

final class SceneDelegate: UIResponder, UIWindowSceneDelegate {
var window: UIWindow?
private lazy var flowController = FlowCoordinator(window: window!)
func scene(_ scene: UIScene, willConnectTo session: UISceneSession, options connectionOptions: UIScene.ConnectionOptions) {
guard let windowScene = scene as? UIWindowScene else { return }
window = UIWindow(windowScene: windowScene)
flowController.showRootView()
window?.makeKeyAndVisible()
}
}
final class FlowCoordinator {
private let window: UIWindow
init(window: UIWindow) {
self.window = window
}
func showRootView() {
let swiftUIView = ContentView()
let hostingView = UIHostingController(rootView: swiftUIView)
window.rootViewController = UINavigationController(rootViewController: hostingView)
}
}
struct ContentView: View {
var body: some View {
VStack {
Text("Hello, World!")
}.frame(maxWidth: .infinity, maxHeight: .infinity)
.background(.green)
}
}
A simple iOS app showing a green view which is rendered with SwiftUI but presented with UIKit
A simple app showing a green view which is rendered with SwiftUI but presented with UIKit.

Inserting the FlowCoordinator into SwiftUI view

The next step is that we want to allow SwiftUI view to control what is presented on the screen. For example, let’s add a button to the SwiftUI view which should present a sheet with another SwiftUI view. The button action needs to be able to talk to the flow coordinator, which controls what is presented on the screen. One way to insert the FlowCoordinator into SwiftUI environment is by conforming to ObservableObject and using the environmentObject() view modifier. Alternative is using EnvironmentValues and defining a key. For more information please check Injecting dependencies using environment values and keys in SwiftUI.

final class FlowCoordinator: ObservableObject {}
let swiftUIView = ContentView()
.environmentObject(self) // self is FlowCoordinator
struct ContentView: View {
@EnvironmentObject var flowController: FlowCoordinator
var body: some View {
VStack(spacing: 8) {
Text("Root view")
Button("Present Sheet", action: flowController.showDetailView)

Presenting a sheet

The sheet presentation code goes into the FlowCoordinator and as an example we show a DetailView which has a button for dismissing itself. Yet again, SwiftUI view just passes the handling to the FlowCoordinator.

final class FlowCoordinator: ObservableObject {
// …
func showDetailView() {
let detailView = DetailView()
.environmentObject(self)
let viewController = UIHostingController(rootView: detailView)
window.rootViewController?.present(viewController, animated: true, completion: nil)
}
func closeDetailView() {
// Needs to be more sophisticated later when there are more views
window.rootViewController?.presentedViewController?.dismiss(animated: true, completion: nil)
}
}
struct DetailView: View {
@EnvironmentObject var flowController: FlowCoordinator
var body: some View {
VStack(spacing: 8) {
Text("Detail view content")
Button("Dismiss", action: flowController.closeDetailView)
}.frame(maxWidth: .infinity, maxHeight: .infinity)
.background(.orange)
}
}
A simple iOS app showing an orange sheet which is rendered with SwiftUI but presented with UIKit
A simple app showing an orange sheet which is rendered with SwiftUI but presented with UIKit.

Summary

We created a simple sample app which uses UIKit navigation logic but renders views with SwiftUI views. This kind of setup could be useful for apps which mix UIKit and SwiftUI. But I believe that even in case of that we could still use SwiftUI navigation in sub-flows but could keep using this approach for handling root view navigation.

Example Project

UIKitNavigationWithSwiftUIViews (Xcode 13.2.1)

If this was helpful, please let me know on Mastodon@toomasvahter or Twitter @toomasvahter. Feel free to subscribe to RSS feed. Thank you for reading.

Categories
Swift

A few examples of async await in Swift

Async await was added to Swift 5.5 and brought a new way how to write asynchronous code. Functions can be annotated with an async keyword, which enables them to be called with the await keyword. When an async function is being awaited, the execution of the current context is suspended and is resumed when the async function finishes. There are a lot more details in the SE-0296. In this blog post, we’ll take a look at a few examples of async await.

Wrapping completion handler based function

We can add a separate async functions for completion hander code. Which is nice since we do not reimplement everything we have using completion handlers. Take a look at a bit longer explanation in Adding async await to existing completion handler based code.

public func storeData(_ dataProvider: @escaping () -> Data?, identifier: Identifier = UUID().uuidString) async throws -> Identifier {
return try await withCheckedThrowingContinuation({ continuation in
self.storeData(dataProvider, identifier: identifier) { result in
continuation.resume(with: result)
}
})
}
Wrapping a completion handler function which uses the Result type.

Calling async function from non-async context

When using the await keyword then the current asynchronous context suspends until the awaited async function finishes. Suspension can only happen if we are in an asynchronous context. Therefore, a function without the async keyword can’t use await directly. Fortunately, we can create asynchronous contexts easily with a Task. One example of this is when we use MVVM in SwiftUI views and the view model has different methods we want to call when, for example, a user taps on a button

func refreshDocuments() {
Task(priority: .userInitiated) {
do {
self.documents = try await fetcher.fetchAllDocuments()
}
catch {
// Handle error
}
}
}
Creating a Task for enabling to use await on an async function.

Running tasks concurrently

Sometimes we have several independent tasks we need to complete. Let’s take an example when we want to preload messages for conversations. The code snippet below takes an array of conversations and then starts loading messages for each of the conversation. Since conversations are not related to each other, we can do this concurrently. This is what a TaskGroup enables us to do. We create a group and add tasks to it. Tasks in the group can run at the same time, which can be a time-saver.

func preloadMessages(for conversations: [Conversation]) async {
await withThrowingTaskGroup(of: Void.self) { taskGroup in
for conversation in conversations {
taskGroup.addTask {
try await self.preloadMessages(for: conversation)
}
}
}
}

Retrying a task with an exponential delay

This is especially related to networking code, where we might want to retry a couple of times before giving up and displaying an error. Additionally, we might want to wait before each request, and probably we want to wait a bit longer with each delay. Task has a static function detached(priority:operation:) so let’s create a similar retried() static function. In addition to priority and operation, we have arguments for defining how many times to retry and how much to delay, where the delay is increased exponentially with each retry. The first retry attempt is delayed by default 1 second, then the next 2 seconds, the third 4 seconds and so on. If the task happens to be cancelled while waiting, then the Task.sleep(nanoseconds:) throws CancellationError.

extension Task {
static func retried(times: Int, backoff: TimeInterval = 1.0, priority: TaskPriority? = nil, operation: @escaping @Sendable () async throws -> Success) -> Task where Failure == Error {
Task(priority: priority) {
for attempt in 0..<times {
do {
return try await operation()
}
catch {
let exponentialDelay = UInt64(backoff * pow(2.0, Double(attempt)) * 1_000_000_000)
try await Task<Never, Never>.sleep(nanoseconds: exponentialDelay)
continue
}
}
return try await operation()
}
}
}
Retrying a Task with an exponential delay.

self.documents = try await Task.retried(times: 3) {
try await self.fetcher.fetchAllDocuments() // returns [Documents]
}.value
Example of Task.retried() with accessing the returned value.

If this was helpful, please let me know on Mastodon@toomasvahter or Twitter @toomasvahter. Feel free to subscribe to RSS feed. Thank you for reading.