I have numerous times needed to show some sort of collection view which adjusts its height based on the content. Most of the time it has been a dynamic list within some more complex scrollable UI. Therefore, in this post, we’ll take a look at how to set up a collection view which has its height set to the content height. On the screenshot below, we have a collection view with light grey background and two sections.
Collection view with height fitting size.
The approach for making this working is pretty simple, which involves adding a height constraint with the constant value set to collection view content height. Content height can be retrieved from the layout object. The constraint’s constant value can be updated in viewWillLayoutSubviews.
This file contains hidden or bidirectional Unicode text that may be interpreted or compiled differently than what appears below. To review, open the file in an editor that reveals hidden Unicode characters.
Learn more about bidirectional Unicode characters
Instruments is an application bundled with Xcode. It enables to measure application performance in variety of ways. Performance is extremely important as it keeps application responsive and in other things less CPU usage also means longer battery life. Time profiler is one of the instruments which can be used for measuring your application. What it does is that it samples the application 1000 times per second and records function backtraces in each of the sample. It gives a pretty good overview of what the application was doing when the information is aggregated. On the other hand, sampling means that we do not get full information of what was going on. We can’t distinguish if a function was running a long time, or if it was called several times when it appears in several samples.
Running an app with time profiler
When profiling an application then it is recommended to run it always on the device for accurate results. Also, we’ll need to make sure to use release configuration as it contains all the compiler optimizations and reflects the App Store build. The profile action and its configuration can be seen in Product > Scheme > Manage Schemes, selecting a scheme and clicking on the edit.
Profile action for SignalPath scheme.
Profiling can be started with Product > Profile (command+I) which builds the application and opens Instruments. Instruments opens profiling template view where we should select Time Profiler. Clicking on the record button in the toolbar starts the application and starts profiling it. Sometimes it might be useful to enable deferred recording mode which delays the Instruments app to render recorded samples while recording is in progress. The setting for it is under Recording tab in the preferences.
The setting for deferred mode in Instruments preferences.
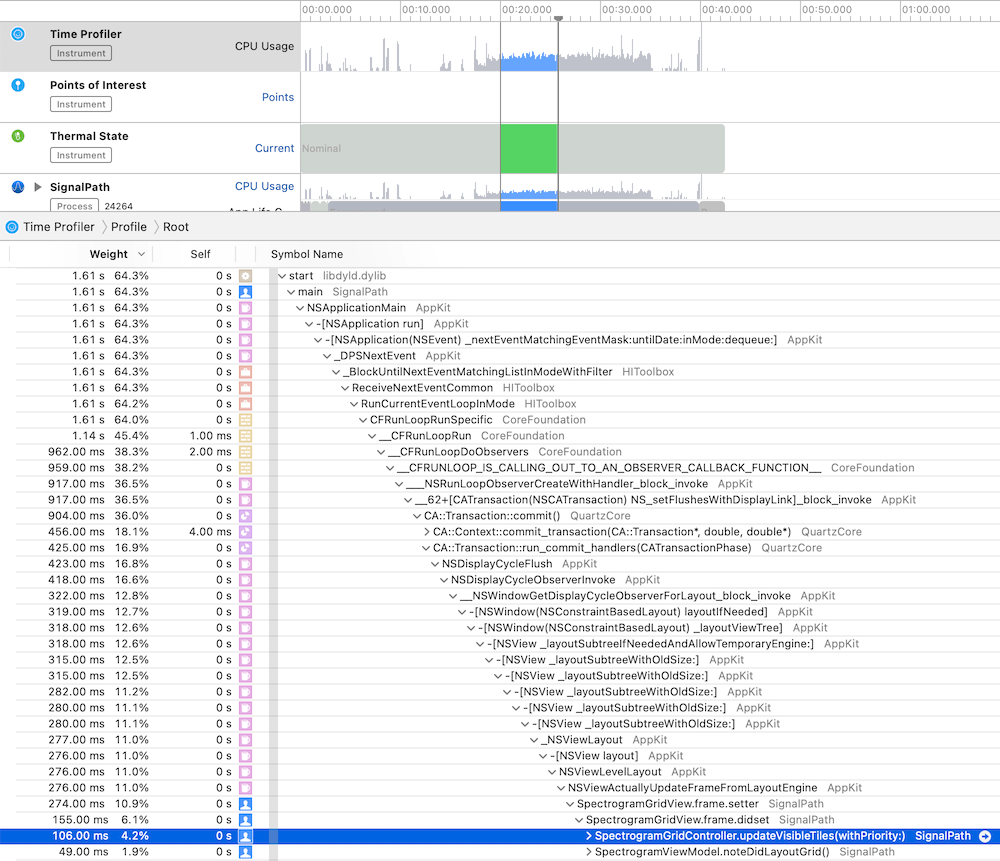
Call tree view in Instruments
While the application is running it is being sampled. In every sample Instruments captures the full backtrace of every thread. Sampled data is then aggregated and can be viewed in call tree view. Just to reiterate that sampling also means that very fast functions might not show up at all as they already stopped executing before a new sample is captured. Another thing to note is that the time in the call tree view equals to the function count in samples times the sampling time. Therefore, it is not an exact duration of the function execution. Let’s take a look at an example trace.
Call tree view in Instruments.
The call tree view contains several columns: weight, self and symbol name. The weight shows the percentage of samples that the particular call tree appeared in. The self column shows the time spent in that method itself. This excludes time spent in other methods it called itself. In summary, the work the method did itself. Just to reiterate, time equals to sample count times sampling time. In the symbol name column we can navigate the tree and see which methods were called. There can be a lot of information. Also, the backtrace can be pretty long. For making it easier one can hold option while clicking on disclosure triangles which will trigger a smart expansion of the related backtraces. Another thing we can do is using call tree filtering options.
Call tree options.
“Separate by State” option divides the data into different app states: running, backgrounded etc. “Separate by Thread” shows data for every thread separately. This is on by default as this is most of the time what we want: to see what thread was doing what. “Invert Call Tree” reverses the tree view and shows backtraces which end up calling a specific method. In other words, when a function is called from several code paths, then this option enables to see all of those code paths. “Hide System Libraries” is what I typically enable for only revealing all of my own methods. “Flatten Recursion” makes recursive functions to show up once in the call stack and “Top Functions” reveals methods which require the most work.
Another useful view is the “Heaviest Stack Trace” view which displays the call stack which needed the most work.
Something to keep in mind is that from time to time we could encounter tail call elimination which is a compiler optimization. The downside is that in some cases it will make time profiler to show a function being called by a parent method of the actual calling method. In those cases we can use CFLAGS="-fno-optimize-sibling-calls" build setting which takes away the performance gain but gives more accurate backtraces. For learning more about it, I suggest watching the WWDC video Profiling in Depth which talks about it in much greater detail.
Summary
The time profiler is an excellent tool to look into the work app is doing. It gives a detail insight on the call stack level. If we know the basics of using the time profiler we can find really quickly the areas in the app which could be more performant. Better performance means less battery usage and snappier user interfaces for users.
I was looking at formatters provided by Foundation framework and this time I would like to put some attention on MeasurementFormatter. Like the name says, it is used for creating localized strings of some sort of measurements. Measurements are represented by a generic struct Measurement where the generic UnitType describes the unit represented by it. Apple provides an Unit subclass Dimension which in turn has a many subclasses on its own. At the time of writing there are 22 dimensional units available with each of those having multitude of related units. For example, UnitDuration provides units for seconds, minutes, and hours. The full list of Apple provided dimensions are available in a table here: Dimension.
Using MeasurementFormatter
MeasurementFormatter is simple to use. If we change the unitStyle property then we can configure how the unit is spelled in the localized string.
This file contains hidden or bidirectional Unicode text that may be interpreted or compiled differently than what appears below. To review, open the file in an editor that reveals hidden Unicode characters.
Learn more about bidirectional Unicode characters
MeasurementFormatter also has an unitOptions property which controls the way how the final string is composed when taking account the current locale. For example, if locale is set to en_US then UnitTemperature measurement is formatted in Fahrenheits. If locale is set to en_GB then the measurement returns Celsius.
This file contains hidden or bidirectional Unicode text that may be interpreted or compiled differently than what appears below. To review, open the file in an editor that reveals hidden Unicode characters.
Learn more about bidirectional Unicode characters
MeasurementFormatter selecting output unit based on the locale.
In case we would like to make sure the same unit is used, then we can use the providedUnit option.
This file contains hidden or bidirectional Unicode text that may be interpreted or compiled differently than what appears below. To review, open the file in an editor that reveals hidden Unicode characters.
Learn more about bidirectional Unicode characters
Another thing to note is that the Measurement type also supports comparing measurements and mathematical operations. For example, we can add two measurements.
This file contains hidden or bidirectional Unicode text that may be interpreted or compiled differently than what appears below. To review, open the file in an editor that reveals hidden Unicode characters.
Learn more about bidirectional Unicode characters
MeasurementFormatter is built in a way that it can support custom units as well. We could create a pseudo unit for a children’s game named UnitBanana.
This file contains hidden or bidirectional Unicode text that may be interpreted or compiled differently than what appears below. To review, open the file in an editor that reveals hidden Unicode characters.
Learn more about bidirectional Unicode characters
MeasurementFormatter and Measurement types create a powerful combination which can be used for creating localized strings of values with an unit. Next time when you need to present a value with an unit, then check out the MeasurementFormatter first.
WWDC’20 introduced WidgetKit which is a new framework for building widgets on iOS, iPadOS, and macOS. Widgets provide a quick way for displaying content from your app either on the home screen on iOS or on the notification center on macOS. As I have an iOS app which stores data with CoreData then let’s see what it takes to share it with a widget. Note that we’ll only concentrate on sharing data between the app and the widget. For adding a widget to an existing project I would recommend taking a look at Apple’s excellent article: “Creating a Widget Extension”.
Configuring the project for sharing data with the widget
The project I have is an iOS app which keeps track of plants. Therefore, we’ll look into providing plants to a simple widget which just displays one of the plants which needs to be watered next. CoreData store contains all the plants with previous and next watering date. As widgets are meant to be lightweight extensions to your app we’ll aim at passing the minimum amount of data to the widget. WidgetKit does not provide a connectivity framework like WatchOS does because widgets are not running all the time. Therefore we will store data in a file and write the file to a shared container which the app and the widget can access. This can be done by adding app groups capability to both targets. The group name could be something like group.com.company.appname.widget. When this is set, then the url to a shared container can be created using FileManager like shown below.
This file contains hidden or bidirectional Unicode text that may be interpreted or compiled differently than what appears below. To review, open the file in an editor that reveals hidden Unicode characters.
Learn more about bidirectional Unicode characters
The iOS app has a class named WidgetPlantProvider which is responsible of updating the shared file and letting WidgetKit know when the data has changed. This class uses NSPersistentContainer for accessing CoreData storage and fetches dictionary representations of Plant entities. As those dictionaries contain NSDate objects then we’ll need to convert dates to double values which represent dates as seconds from the year of 1970. This enables us to archive the list of dictionaries to a data object with NSKeyedArchiver and writing the data object into the shared container. Last step is letting WidgetKit to know that timelines should be reloaded because data has changed. The implementation of the class is available below including observing managed object save notification.
This file contains hidden or bidirectional Unicode text that may be interpreted or compiled differently than what appears below. To review, open the file in an editor that reveals hidden Unicode characters.
Learn more about bidirectional Unicode characters
WidgetPlantProvider which stores Plant entities as dictionaries in the shared file.
Reading the shared file in the widget
Reading the file in the widget requires us to create an URL pointing at the shared container, reading the data, and converting the data to a list of plants. As the data contains a list of dictionary objects then we can take advantage of JSONDecoder and convert dictionaries to PlantRepresentation value type. PlantRepresentation struct conforms to Codable protocol which enables converting dictionary object to a JSON data representation and then decoding the JSON data to a value type. Date properties are represented as seconds from the year of 1970, then JSONDecoder’s dateDecodingStrategy must be set to DateDecodingStrategy.secondsSince1970. This approach of converting dictionary to a value type is discussed in detail in “Storing struct in UserDefaults”. An example provider type with described approach is available below.
This file contains hidden or bidirectional Unicode text that may be interpreted or compiled differently than what appears below. To review, open the file in an editor that reveals hidden Unicode characters.
Learn more about bidirectional Unicode characters
Timeline provider for a Widget which reads the data from the shared file.
Summary
We went through the steps of setting up app groups and sharing data in CoreData store with a widget. Next steps would be to use the timeline and polishing the Widget’s appearance.
I am happy to announce that Signal Path 2.0 is available now for macOS and iOS. Signal Path uses Apple’s universal purchase offering – buy it once for both platforms.
I spent a lot of time architecting both apps in a way that they reuse as much functionality as possible: from Metal pipelines to view models powering the UI. Most of the UI is written in SwiftUI, but there are a couple of views using UIKit (iOS) and AppKit (macOS) directly. Now when the groundwork is done, every next release will offer the same core functionality on both platforms and also integrating OS specific features. Future is bright, give Signal Path a try!
What is Signal Path
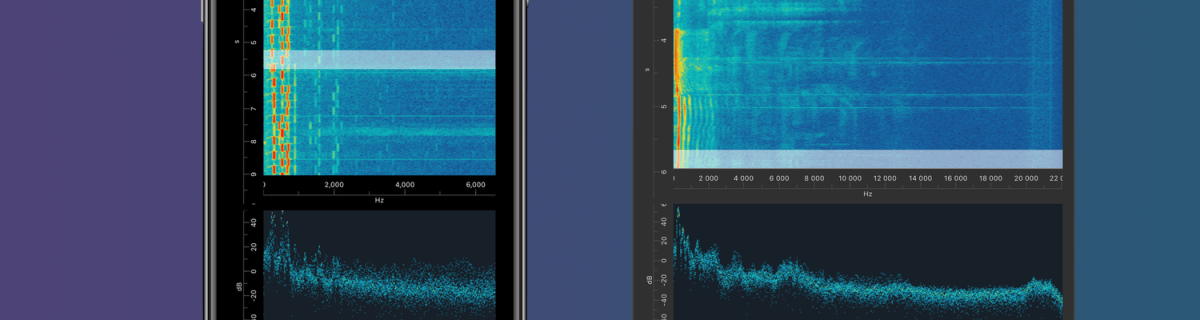
Signal Path is the most performant spectrum viewing app with beautiful user interface. You can record audio spectrums using microphone or open large recordings containing I/Q data. Read more about Signal Path.
Thank you to everyone who visted my blog and I really hope that you learnt something new. I am trying to keep my blog post short and having sample code what can be used instantly. But now, its time to take a look back on all the blog posts I wrote in 2019. This year I kept following my schedule of publishing a blog post every second week. This means that in this year I published 27 blog post covering wide variaty of topics from UIKit to SwiftUI, SpriteKit, VisionKit, CryptoKit, app architecture and so on. I finally managed to get noticed by iOS Dev Weekly and the issue 430 contained my post Adding custom attribute to NSAttributedString on iOS. Really happy about it! All in all, I am very happy to see how my blog grew in 2019. Total view count grew more than 5 times compared to 2018 (started blogging in late 2017).
Let’s take a look on stats from 2019 and list blog posts by the number of vists in 2019. The first list contains blog posts written in 2019 and the second list contains all the other blog posts people read in 2019.
Have a great coming year! I’ll keep publishing new blog posts every second week so follow me on Twitter @toomasvahter or subscribe to RSS feed. Thank you!
XCTMetric enables creating tests with measure blocks collecting information about CPU, memory and disk. In this post we’ll write UI-tests measuring a button tap what triggers writing to disk, allocating larger amount of memory and applying filters what requires CPU to do more work. It should be noted that XCTMetric can also be used in unit-tests.
Method under the test
The method we are going to write performance tests against is a simple method dealing with loading an image, writing data to disk, applying CIFilter and writing processed image to disk. In this example case, everything runs on a main thread what probably would not be a case in a real application.
XCTCPUMetric measures CPU activity and output 3 different results: CPU time, CPU cycles and CPU instructions retired. CPUs have a feature called speculative execution what means that more instructions are completed than the actual program flow requires. Retired instructions are the instructions which were actually needed by the flow of the program. This feature speeds up the program execution as CPU can process data ahead of time. Example case would be if else where CPU processes both branches but only one branch is valid in the program flow.
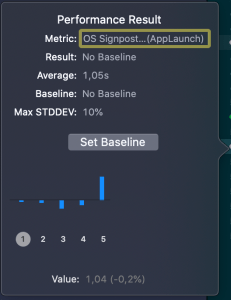
XCTOSSignpostMetric for measuring time between signposts
Apple provides signpost metric for application launch time for making it easy to add performance test measing launch time. In WWDC’19 session “Optimizing app launch” the suggested goal is 400 ms which is the duration of the app launch animation. XCTOSSignpostMetric has initializer for custom signpost as well.
XCTMetric enables writing performance tests for performance critical parts of the application. We took a look at CPU, memory, storage and signpost metrics.
Property wrappers allow property declaration to state what kind of property wrapper is used for implementing the property. We can use it for implementing transformations on properties like validating if string is email or not. This is what we will do: creating a property wrapper for email properties and validating emails using NSDataDetector. If value being set is email, we store it and if it is not, we set the property to nil instead.
Creating property wrapper
Property wrappers are types annotated with @propertyWrapper. The type needs to implement one property: wrappedValue. Emails are represented with strings, therefore our wrappedValue property is optional string. Optional is required, because string can contain invalid email and in that case we set the property to nil. Whenever we would like to use this property wrapper, we just need to add @EmailValidated in front of the property definition.
This file contains hidden or bidirectional Unicode text that may be interpreted or compiled differently than what appears below. To review, open the file in an editor that reveals hidden Unicode characters.
Learn more about bidirectional Unicode characters
Validating emails using regular expressions is not easy. Fortunately Apple provides API exactly for this: NSDataDetector. We can create an instance of NSDataDetector with specifying link as detected types. When matching emails, we use anchored option as we expect the string to only include email, nothing else. Anchored will tell the data detector to match starting with the first character. As firstMatch(in:options:range:) uses NSRange, we need to convert Swift’s range to NSRange because those ranges do not have one-to-one match. For this, we can use special NSRange initialiser taking Swift string and its range.
NSDataDetector represents links with URL, therefore we will see if match contains an URL and if URL’s scheme is mailto. If it is, we can extract the matched email and return it.
This file contains hidden or bidirectional Unicode text that may be interpreted or compiled differently than what appears below. To review, open the file in an editor that reveals hidden Unicode characters.
Learn more about bidirectional Unicode characters
For using the created property wrapper, all we need to do is to annotate property with @EmailValidated.
This file contains hidden or bidirectional Unicode text that may be interpreted or compiled differently than what appears below. To review, open the file in an editor that reveals hidden Unicode characters.
Learn more about bidirectional Unicode characters
We created a simple property wrapper for validating emails. We saw that creating a property wrapper for validating email with NSDataDetector requires only a little bit of code.
iOS 13 added a new class named UIContextMenuInteraction what is used for attaching menus to views. When adding menu interaction to a view and user uses 3D Touch or long press gesture on devices not supporting it, a menu is presented alongside with the highlighted content view. Therefore depending on the available space, not all the menu items can fit into the menu.
Setting up UIContextMenuInteraction
UIContextMenuInteraction is initialised with a delegate. Delegate’s job is to create an instance of UIContextMenuConfiguration with provider block for creating a menu when needed. It also should be noted that delegate can return nil in what case no menu is shown.
This file contains hidden or bidirectional Unicode text that may be interpreted or compiled differently than what appears below. To review, open the file in an editor that reveals hidden Unicode characters.
Learn more about bidirectional Unicode characters
Action provider of UIContextMenuConfiguration is a function taking in suggested menu items and returning an instance of UIMenu. Suggested menu items are the ones provided by responders from responder chain. For example we could use it for sharing actions among multiple responders.
Every menu item is represented by UIAction or another UIMenu allowing to have nested menus. UIActions have title and optionally image and state icon if the state is on. In addition we can explicitly disable actions and set a destructive appearance.
This file contains hidden or bidirectional Unicode text that may be interpreted or compiled differently than what appears below. To review, open the file in an editor that reveals hidden Unicode characters.
Learn more about bidirectional Unicode characters
Apple’s Vision framework contains computer vision related functionality and with iOS 13 it can detect text on images as well. Moreover, Apple added a new framework VisionKit what makes it easy to integrate document scanning functionality. For demonstrating the usage of it, let’s build a simple UI what can present the scanner and display scanned text.
Cropping text area when scanning documents
Scanning text with Vision
VisionKit has VNDocumentCameraViewController and when presented, it allows scanning documents and cropping scanned documents. It uses delegate for publishing scanned documents via an instance of VNDocumentCameraScan. This object contains all the taken images (documents). Next, we can use VNImageRequestHandler in Vision for detecting text on those images.
final class TextRecognizer {
    let cameraScan: VNDocumentCameraScan

    init(cameraScan: VNDocumentCameraScan) {
        self.cameraScan = cameraScan
    }

    private let queue = DispatchQueue(label: "com.augmentedcode.scan", qos: .default, attributes: [], autoreleaseFrequency: .workItem)

    func recognizeText(withCompletionHandler completionHandler: @escaping ([String]) -> Void) {
        queue.async {
            let images = (0..<self.cameraScan.pageCount).compactMap({ self.cameraScan.imageOfPage(at: $0).cgImage })
            let imagesAndRequests = images.map({ (image: $0, request: VNRecognizeTextRequest()) })
            let textPerPage = imagesAndRequests.map { image, request -> String in
                let handler = VNImageRequestHandler(cgImage: image, options: [:])
                do {
                    try handler.perform([request])
                    guard let observations = request.results as? [VNRecognizedTextObservation] else { return "" }
                    return observations.compactMap({ $0.topCandidates(1).first?.string }).joined(separator: "\n")
                }
                catch {
                    print(error)
                    return ""
                }
            }
            DispatchQueue.main.async {
                completionHandler(textPerPage)
            }
        }
    }
}
Presenting document scanner with SwiftUI
As VNDocumentCameraViewController is UIKit view controller we can’t directly present it in SwiftUI. For making this work, we’ll need to use a separate value type conforming to UIViewControllerRepresentable protocol. UIViewControllerRepresentable is the glue between SwiftUI and UIKit and enables us to present UIKit views. This protocol requires us to define the class of the view controller and then implementing makeUIViewController(context:) and updateUIViewController(_:context:). In addition, we’ll also create coordinator what is going to be VNDocumentCameraViewController’s delegate. SwiftUI uses UIViewRepresentableContext for holding onto the coordinator and managing the view controller updates behind the scenes. Our case is pretty simple, we just use completion handler for passing back scanned text or nil when it was closed or error occurred. No need to update the view controller itself, only to pass data from it back to SwiftUI.
ContentView is the main SwiftUI view presenting the content for our very simple UI with static text, button and scanned text. When pressing on the button, we’ll set isShowingScannerSheet property to true. As it is @State property, then this change triggers SwiftUI update and sheet modifier will take care of presenting ScannerView with VNDocumentCameraViewController. When view controller finishes, completion handler is called and we will update the text property and set isShowingScannerSheet to false which triggers tearing down the modal during the next update.
struct ContentView: View {
    private let buttonInsets = EdgeInsets(top: 8, leading: 16, bottom: 8, trailing: 16)

    var body: some View {
        VStack(spacing: 32) {
            Text("Vision Kit Example")
            Button(action: openCamera) {
                Text("Scan").foregroundColor(.white)
            }.padding(buttonInsets)
                .background(Color.blue)
                .cornerRadius(3.0)
            Text(text).lineLimit(nil)
        }.sheet(isPresented: self.$isShowingScannerSheet) { self.makeScannerView() }
    }

    @State private var isShowingScannerSheet = false
    @State private var text: String = ""

    private func openCamera() {
        isShowingScannerSheet = true
    }

    private func makeScannerView() -> ScannerView {
        ScannerView(completion: { textPerPage in
            if let text = textPerPage?.joined(separator: "\n").trimmingCharacters(in: .whitespacesAndNewlines) {
                self.text = text
            }
            self.isShowingScannerSheet = false
        })
    }
}
Summary
With the new addition of VisionKit and text recognition APIs, it is extremely easy to add support of scanning text using camera.